Here is my project:
I live in Nova Scotia, Canada, so when I think of Summer, I think of the ocean, lighthouses and beaches. When I came across this piece of patterned paper in my stash, I thought the large yellow shape looked like a sun, so it seemed perfect for this project.
To make this Cardfolio, start with a 12" x 12" piece of two-sided patterned paper. I used a piece of My Mind’s Eye - The Sweetest Thing Paper. Trim off a 2" x 12" piece, and cut it in half to give 2 pieces measuring 2" x 6". Trim off another piece, measuring 1" x 12". Cut that in half, to give 2 pieces measuring 1" x 6". This leaves you with a 9" x 12" piece.
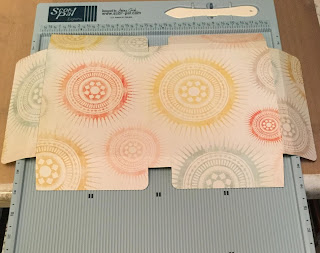
Place the 9" x 12" piece into your Scor-Pal with the 12" side along the top. Score at 1/2", 5 1/2", 6 1/2" and 11 1/2".
With the 9" side along the top, score at 1", 1 1/2", 7 1/2" and 8".
On the 2" x 6" pieces, place the 2" side at the top and score at 1/2".
On the 9" x 12" piece, cut out the four corners. Cut on the 1/2" line until you get to the 1 1/2" line, and cut off. On the 5 1/2" and 6 1/2" lines, cut down to the 1 1/2" line. Cut on the 1" score line between them, leaving a 1/2" tab.
Round the corners of the four inside flaps.
Round the corners opposite the 1/2" scored side on the 2" x 6" pieces.
Adhere Scor-Tape to the 1/2" scored sections. I used a strip of 1/4" tape and a strip of 1/8" tape. I find this to be easier than using a 1/2" strip. That way, if your scoring is slightly off, you won't have tape going off the edge. On one of the 1" x 6" piece, adhere tape to the back. You can discard the other 1" x 6" piece, or use it for another project.
Remove the backing paper from the tape on the 2" x 6" pieces and adhere them to the 1/2" flap on each side of the project.
Turn the piece over, remove the backing paper, and attach the 1" x 6" piece in the middle section. This will reinforce the spine of the cardfolio.
Make sure all your folds are well creased. Add Scor-Tape to the small spine tabs and to both sides of each flap, as shown.
Remove the backing from the tape on the small tabs and adhere them to the inside of the spine. Remove the backing from the left flap, fold the top and bottom flaps in, and adhere the side flap down. Repeat with the right side. This creates the pockets that will hold your cards and envelopes.
I cut out the sentiment with a die from the Gina K. Designs Decorative Label die set and used The Spectrum Noir marker MB3 to trace around the edge of the shape. I used the same marker to go around the edge of the lighthouse shape.
I added a piece of twine with some 1/8" Scor-Tape, and attached a button and a loop to keep the two sides together. I adhered the sentiment and lighthouse with some foam tape.
I put 3 cards and envelopes in each side, and there is still lots of room. You could also fill this with post cards or note paper to write to your friends and family when you are on vacation!
You still have a few days left to enter this month's challenge. Just make sure it has more than one score line and follows the theme of Warmer Days.


No comments:
Post a Comment