Showing posts with label Steph Ackerman. Show all posts

Monday, June 15, 2020

Mid Month Tutorial by Steph

Hi everyone, it's a new month and the challenge on the Scor-Pal blog is to create anything, just be sure it includes more than one score.

With Father's Day on the horizon, I created a card for Dad.


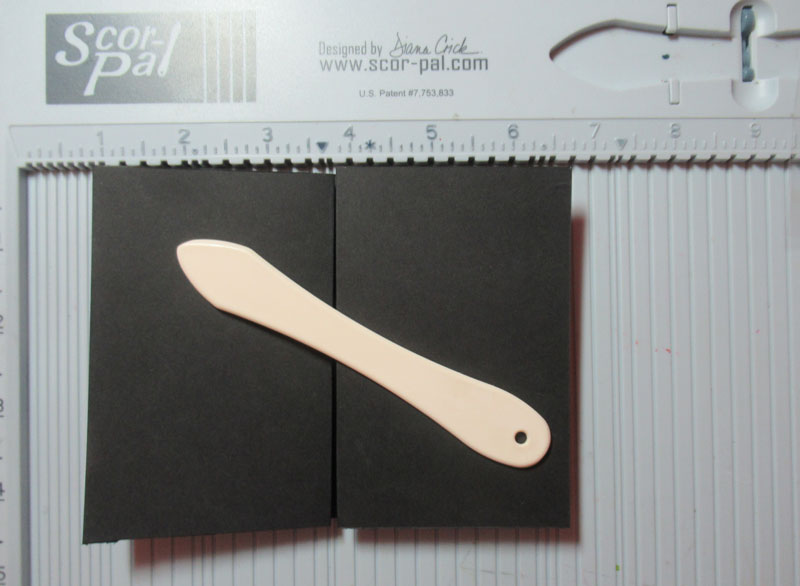
Cut cardstock 4 1/4" x 5 1/2".  Score each strip at 2 3/4" and 5 1/2".


Use Scor-Tape to assemble the panels together.  Fold the outside panels creating a double gate fold card.


Cut pattern paper to fit inside the card.  Cut strips of pattern papers and cardstock to fit the flaps.  Die cut circles, adhering just the left side to the card.


Add a puffy car sticker on the circle so it becomes the focal element of the card.


Using a stamp from the Joy Clair Classic Father's Day stamp set, stamp Happy Father's Day on a strip of cardstock and adhere under the car.  Cut a panel for the center of the card using cardstock and pattern paper.  Score 1/4" along the pattern paper and adhere to the card.


 Thanks for stopping by.

Steph


Sunday, August 25, 2019

Pinspired - Inspiration from our Pinterest Board hosted by Steph

Hi everyone, this month's challenge on the Scor-Pal blog is to create anything for organization purposes, just be sure it includes more than one score.

Today I'm sharing the direction of how to create this Hexagon Box.


Cut cardstock 8 1/2" x 6"
Score the long side at 2", 4", 6", 8"
Rotate and score 1/2"


Cut cardstock 4 1/2" x 6"
Score the short side 2", 4"
Rotate and score 1/2"


Place ScorTape along the 2 long edges that are 1/2".


Join the pieces to create the box by adhering at the  1/2" mark.


Cut 4 pieces of pattern paper, each 1 7/8" x 5 1/2".
Adhere the pieces to the exterior.
Repeat for the inside if desired.
Adhere the final edges to create the box.

Die cut 2 medium sized hexagons and 2 large sized hexagons (sorry for the different color!)


Adhere the medium hexagon to the box bottom, forming the shape.
It's a little fiddly, so work slowly - the die will not line up edge to edge - but it will hold the shape.
Adhere one of the large hexagons on top of the medium one.
It will slightly overlap the box, so cut off the excess.
Place the 2nd medium hexagon inside the box bottom giving it added stability.


Cut 1" x 7" strip for the handle.
Cut 1/2' strip of pattern paper and add to handle.

To create the box top:
Cut 2 pieces of cardstock, each 2" x 8".
Use a scalloped die to die cut both pieces and adhere them together forming one piece.


Score 1/2" from the straight edge and place a row of Scor-Tape.
Working one section at a time, line the scalloped edging with the large hexagon.
At each point, cut the scalloped strip on an angle and score.
Work around the hexagon until you reach the end and cut off the excess.
Cut a strip of pattern paper 1/2" x 9".
Score at each point and adhere around the scalloped border.
Add a large scalloped circle on top.
Place the handle next and adhere with Scor-Tape.
Place brads for added stability.
Glue flowers about the handle.
 

Simply by changing up the papers, wouldn't this make a great gift for a teacher, a friend, or perhaps a wedding couple?
 
What will you place inside?

Thanks for stopping by.

Steph


Monday, April 15, 2019

Mid Month Tutorial hosted by Steph

Hi everyone, it's a new month and the challenge on the ScorPal blog is to create anything with texture, just be sure it includes more than one score.


Cut cardstock 11 3/4" x 6 1/8"
Score at 2 1/4", 4 1/2", 6 3/4", 9"


Boxes:
Cut cardstock 5 1/8" x 5 1/8"
Score 1 1/2" around 
Cut in the corners
Add Scor-Tape and form the boxes


Top:
Cut cardstock 6 3/*" x 6 3/8"
Score at 1", 2", 4 3/8", 5 3/8"
Rotate and repeat
Cut in the corners as shown
Add Scor-Tape to corners and create the box


Decorate with pattern paper.
Cut pattern paper 2" x 5 7/8"
Cut pattern paper 2" x 1 3/8"


Use Scor-Tape to adhere the boxes to each panel.
Place the bottom box in place then fold the box and align the second box.
Fold the box to align the third and forth boxes  


Fill the boxes with candy


Add burlap to the box top and adhere a stack of buttons.


Thanks for stopping by.

Steph


Wednesday, August 15, 2018

Mid Month Tutorial by Steph

Hi everyone, Steph Ackerman here with a summer themed project this month.  We are in the heat of the summer and it's time to create summer projects.

Who doesn't love summer parties?  And who doesn't like to give small gifts to the hosts?  I've created some mini summer themed backpacks perfect for the hosts.  Alternatively, if you are hosting a kids birthday party, these would make great favors for the kids.


Supplies:
Scor-Pal
Scor-Tape
Double sided pattern paper
Cardstock


Directions:

Cut cardstock 10 1/2" x 6". 
With the short edge along the top, score at 4 1/2".


Rotate cardstock, placing the long edge across the top.
Score at 2", 5", 7", 10".


Fold along all scored lines.
Cut along the score lines to the horizontal line, thus creating the bottom of the backpack.  
Place Scor-Tape along the 1/2" edge and assemble the backpack.
Fold in the bottom flaps and use Scor-Tape to hold.
If desired, cut pattern paper to fit the front panel.


To create the top flap, cut a panel of red cardstock 3" x 3"
Score at 3/4" and 1".
Corner round the top edge.
Punch two holes in the center strip.


Run ribbon through the holes.
Tie knots on the under side to hold the ribbon in place.
Adhere the flap to the back of the backpack.
Cut 2 strips, each 6" x 3/4" for the straps and adhere.


To create the front pocket, cut cardstock 2 3/4" x 2 3/4".
Score 1/4" and 2 1/2".
Rotate and score at 1 1/4" and 1 1/2".
Cut out the tiny squares in the centers and assemble with Scor-Tape.


Create another flap for the top of the pocket as shown above.
Add the pocket to the front.


Add Velcro dots to secure the top and pocket.

 
At 4" x 2", they are perfectly sized for candy or even gift cards.  
You can even slip a folded bill in the front pocket!


I hope you will try making these backpacks.

Thanks for stopping by.

Steph


Thursday, October 1, 2015

"More Than One Score" Challenge #20 - Treat Holders

Welcome to the 13th Monthly Challenge here at Scor-Pal!
We love showing our projects to you and now it's your chance to show your creations to us!
Each month we will have a different theme and you will have a month to create and enter your projects. As well as the theme you will need to make "More Than One Score" and tell us where you used the Scor-Pal on your project. So a single fold card won't count but an Easel, Gatefold, Stair Step, etc will :) Also we love to see your "Anything But a Card" projects, just as long as you make "More Than One Score"
We have a very current theme this month, "THEME and More Than One Score".
Please note that you MUST include the theme as well as "More Than One Score", some people are not following the theme and therefore are not eligible for a Top 3 spot or the Prize, thanks. We have a nice set of samples from the Design Team, just click on their names to go to their blogs for more details on their creations.
The challenge ends at 10pm on October 31st and the new one starts on November 1st. Winners and our favorites will be revealed on November 5th.
This months featured Design Team member is Steph so please go and take a look at her blog for a more detailed post on her project.

It's time for a new challenge at Scor-Pal.  This month's theme is treat containers.  So upload your project with more than one fold on the Scor-Pal blog.

I've created several treat boxes.  These little milk boxes hold all kinds of treats for Halloween.


Cut cardstock 8" x 11 1/2".
Score at 2 3/4", 5 1/2", 8 1/4", and 11".
Rotate and score at 2 3/4", 5 3/4" and 7 1/2".


Cut as shown below.


Score the second box and the last box on the diagonal.


Cut pattern paper panels 2 3/4" x 3".
Cut a 2nd layer of cardstock and a 3rd layer of pattern paper in varying sizes.


To assemble the boxes, add Scor-Tape along the smallest edge. Then add Scor-Tape to one bottom flap.


Use Scor-Tape along the top edge just before the diagonal scores.  For added support, I added a few staples.


Thanks for stopping by.

Steph


Katie Tate


Janice Whiting


Toni Storie


Lois Bak


Katie - Inky Angel


The prize for our winner will be a surprise package from the Scor-Pal Store!

Challenge Rules:
1. Each entry must have "More Than One Score"*, mention where the Scor-Pal tool was used and follow the theme.
2. Entry can be combined with as many challenges as you like.
3. 3 entries allowed per person.
4. You must link back to the Scor-Pal blog to be considered for a prize.
5. No backlinks will be accepted.
6. Each challenge will last from the 1st day of the month until 10pm on the last day of that month.
7. Winners and Design Team Favorites will be announced on the 5th of the following month.
8. Entries not adhering to the rules may be deleted.
9. Prizes will be awarded when the challenge has at least 10 entries

* "More Than One Score" means that a single scored fold card (ie: a simple square or rectangle) with no additional use of the Scor-Pal tool will not count as an entry.

Please add your link below and Good Luck!


Wednesday, September 24, 2014

Fall/Halloween Tutorial with Steph Ackerman

Hi everyone.  Steph Ackerman here today.  It's almost Halloween.  Are you ready for the little ones collecting all that yummy candy?  Have they told you what they want to be yet?  Do you have their goodie bags ready?  Well for the big kids, here are a couple of treat bags that are easy to make and fill with all kinds of goodies.

They are extremely quick to make and fun to decorate.


Start with 12" cardstock and score at  2 1/2", 5 1/2", 8", 11". 
Rotate 180 degrees and score at 3".


Cut up the vertical score lines to the 3" score line.
Cut out the 1" corner piece.


Cut 2 pieces of pattern paper 2 3/4" x 8 3/4" and adhere to the box.
Place Scor-tape along the 1" edge and assemble the box.


Fold in the box bottom, adding Scor-tape along the edges of the outer layer.


To create the handle, cut a strip of cardstock 1 1/2" x 12".
Add Scor-tape to the edges and adhere to the sides of the box.
Tie ribbon to one side of the box.


The cat and witch were die cut from cardstock using my Cricut.  But any die cuts could be used.


Thanks for stopping by today.


Steph