Showing posts with label Gift Bags. Show all posts

Thursday, January 24, 2013

Scor-Pal & Simple Stories Week - Day 4


Today we are continuing a week long feature with our friends at Simple Stories.

Our designers will be bringing you some fun and exciting projects using not only Scor-pal products, but also, a mix of papers and embellishments from Simple Stories. Of course, that's not all. The Simple Stories team is playing with Scor-pal products this week on the Simple Stories Blog.

As always, there a prizes to be won!!
Be sure to visit both the Scor-pal blog and Simple Stories Blog each day this week to see more project ideas and to enter for chances to win some great prizes. To be entered into the random drawing for a Scor-Tape and Simple Stories prize simply leave a comment here on the Scor-pal blog each day for a chance to win.

There will be other ways to earn extra chances to win as well, so be watching for those announcements each day.

The Bonus Entry for today is:

Today's bonus entry comes by showing us one of your favorite Scor-pal projects. It can be something you've created and posted online, it can be a project from the Scor-pal Project Board on Pinterest, it can be from the Scor-pal Gallery at Splitcoast Stampers, a project from the project listing on Scor-pal website or anywhere else! Simply leave a comment with the link here on this post telling us what you can't wait to make.

Deadline for entering is 8am Central, Monday, January 28, 2013.

Our first project this week comes from Scor-pal Designer Gini Cagle

 I received the Take A Hike Collection - and as soon as I saw it, I knew I wanted to create a paper backpack box that I had seen awhile back on Splitcoast Stampers.

May Arts Ribbon Paper Twine 420-33
Epiphany Crafts Round Epoxy
CTMH Velcro Dots

I used a tutorial designed by Mary Arima - and it's very clear and easy to understand, so I will just let you refer to her original post on Splitcoast Stampers

When you are working with printed templates, such as the one used for this project, I would suggest using small metal clips to attach your template to the designer paper. This will keep anything from slipping and will provide a much more accurate cut. 


As soon as I finished this project, my nephew took off with it, and promptly put it on the back of one of his stuffed animals!


I used the printed bingo card from this collection to make a small tag that fit perfectly into the backpack. Just the perfect little note to tuck inside.

The other little tip that I can share with you, is that I used small adhesive velcro dots for my closure on the box. It also works great to keep fancy fold cards shut.


Next up, Scor-pal Designer Diane Zechman:


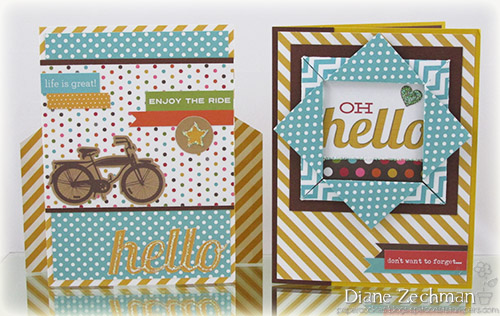
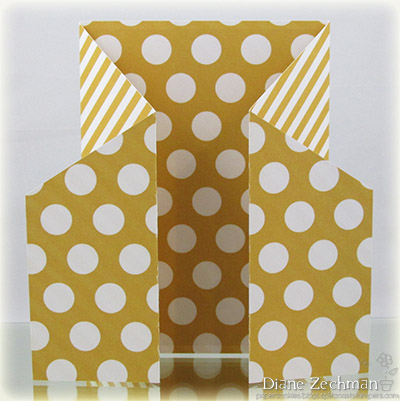
The first card is called a Stand Up Card.
I added some Stickles to the star and "hello" sentiment to make them stand out. Love that bike sticker!


Here's a view of the back of the card so you can see the scoring/folding.


For my second card I made a very simple Folded Paper Frame to showcase the main greeting (a Snap card). A tutorial on how to make the frame can be found here.


I also added some Stickles to the main image on this one. Some additional stickers and another Snap card on the inside...


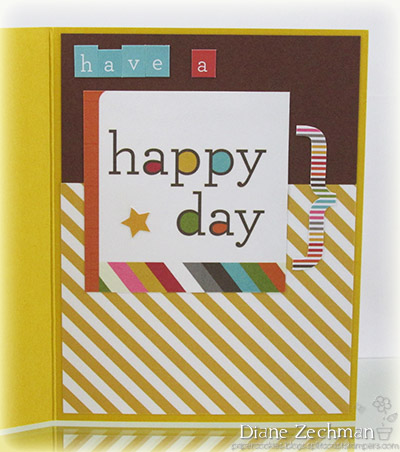
Love the Snap Color Vibe collection of papers!
Fun prints!

Monday, December 17, 2012

Scor-Pal & Fancy Pants Designs Week - Day 1


Today we are kicking off a week long feature with our friends at Fancy Pants Designs

Our designers will be bringing you some fun and exciting projects using not only Scor-pal products, but also, a mix of papers and from Fancy Pants Designs. Of course, that's not all. The Fancy Pants Designs team is playing with Scor-pal products this week on the Fancy Pants Blog.

As always, there a prizes to be won!!
Be sure to visit both the Scor-pal blog and Fancy Pants Blog each day this week to see more project ideas and to enter for chances to win some great prizes. To be entered into the random drawing for a Scor-buddy prize simply leave a comment here on the Scor-pal blog each day for a chance to win.


There will be other ways to earn extra chances to win as well, so be watching for those announcements each day.

Today's, bonus entry comes by becoming a blog follower using the Google connect feature in the sidebar. Simply follow the Scor-pal blog and leave a comment here on this post telling us you have done so.

Deadline for entering is 8am Central, Monday, December 24, 2012.


Our first project this week comes from Scor-pal Designer Tya Smith

Happy Holidays! Hey all- Tya here with my project featuring Scor-Pal and the beautiful Home for Christmas line from Fancy Pants Designs!


With the holidays fast approaching I decided to whip up a cute, fast and simple little pouch that holds 2 individual packets of hot chocolate and some yummy candy canes. These are great for a special teacher or for kids to give to their friends.

Double Pouch Gift Bag:


Supplies used:
12 x 12 Fancy Pants Home for Christmas "Nativity" paper
(2) 3 x 5 inch Fancy Pants Home for Christmas "December 25th" paper
(2) 2 3/4 x 4 3/4 Fancy Pants Home for Christmas "Pine" paper
Fancy Pants Home for Christmas Layered Sticker "Merry Christmas"
1 1/2 x 2 inch kraft cardstock for tag
Deep Red Burlap Ribbon, Cream Ric-Rac, and Green Sheer Swirl Ribbon and tan twine
Border punch from EK Success
Scor-Pal
1/2 inch Scor-Pal Tape
2 Hot Chocolate Packets
2 Candy Canes


Step 1: Score 12x12 inch "Nativity" paper at 1 inch and 11 inches.


Step 2: Add adhesive along sides of paper that you just scored.


Step 3: Fold the edges over.


Step 4: Turn your paper so that the edges you just folded are at the top and bottom of the Scor-Pal. Score the paper at 3 ½ and at 8 ½.


es are on the left and right side of the Scor-Pal. Score at 4 1/4, 5 and 5 3/4 inches.


Step 6: Fold each of the bigger sides to the middle. Notice the folded over edges are on the left and right side of the Scor-Pal.


Step 7 and 8: Add your adhesive to the top section of the paper and fold over to make a tunnel like shape.


Step 9: Fold middle section as shown.


Step 10 and 11: Add adhesive to the middle section. Glue the bag together as shown


Step 12-
Embellish bag as shown. Add the 2 pieces of "December 25th" and "Pine" papers on both sides of the bag. Add Ribbons. Add Tag with bottom edged punched with a decorative edge punch. Add Merry Christmas Layerd Sticker. Tie tag to ribbons with the tan twine. Add Hot Chocolate Packets and Candy Canes and Enjoy!


Thanks Fancy Pants! Loved working with your beautiful and inspiring products!
Happy Scoring!

Next up, Lisa Andrews:


Everyone loves a party! 
This year for New Years, we are going to a game night with the kids and I wanted to bring along a little something for the adults.

Here is the supplies I used:
a sheet of acetate
Fancy Pants Country Boutique Collection Kit
Magnolia Tag and Swirly Heart Die
Spellbinder Die
Martha Stewart punch
Maya Roads fabric flowers

Here is a close up of the top and the tag that I made


and the label on the bottom


First start with a piece of 9" x 9" black corrugated paper, score at 3" and 6" and turn the paper 90 degrees and score again at 3" and 6". 


Adhere the box together using Scor-Tape.


The next photo is a little hard to see because it is the acetate.  Cut a piece of acetate 11" x 10", score 1/2, 3 3/4", 6 1/2 and 9 1/2"  make sure you score them really well, it will be easier to fold them.  For the back piece cut a piece of acetate 2 7/8" x 11".


Fold the box together as shown below.


Using Scor-Tape secure the acetate to the corrugated box. 


For the top, use a 5" x 5" piece of paper and score 1" on each side.


To make a circle in the middle for the wine bottle to peak out of, use a cutting template and cut a circle in the middle.  I used Creative Memories cutting system using the #4 circle with the red blade.

Now decorate to make it look festive!
Happy New Year!

Lisa Andrews