Showing posts with label Z Fold Cards. Show all posts

Monday, July 8, 2013

Scor-Pal and Clearsnap with Gini Williams Cagle

This week the DT's from Scor-Pal and Clearsnap have joined forces to bring you some amazing projects.  Be sure to check the Scor-Pal Blog and the Clearsnap Blog everyday for inspiration, and also to enter to win a Scor-pal!  Just leave comments this week on any of our Scor-pal posts, and we will choose a winner next week.
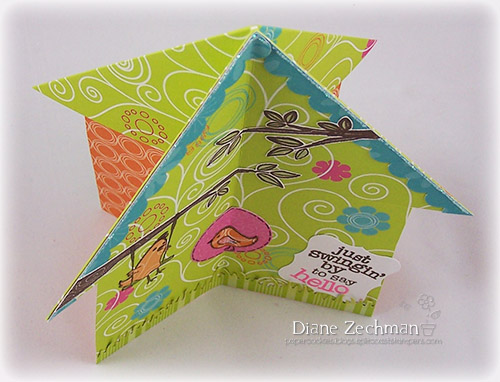
 It seems like the rain is never going to stop here, so I loved the sentiment that I used for this Upright Z-fold card.  This project uses a couple of different techniques, so I'm going to break them down for you, so you can make your own.

For the background paper, I took a patterned paper, and ran it through my machine with an embossing plate.

I used a brayer to apply Top Boss watermark ink over the top , and sprinkled it with Clear Embossing Powder and heat set the powder. 

I repeated the brayering and embossing two more times to build up a thick layer of embossing powder.


I inked over the surface with the Mix'd Media Inx in Truffle, and then used a paper towel to remove the ink off of the embossed areas. 

I set this to the side, and started the card base by cutting a strip of cardstock 4 1/4" x 11.  I placed the paper with the long side along the top fence of my Scor-Pal, and scored at 5 1/2" and then flipped the paper, and scored at 2 3/4".  Fold the base so that you have a small "tent" to the front of the card.

I adhered the embossed paper to the back panel of the card with Scor-tape.   I took a strip of gold paper 4 1/4" x 2 3/4" and used the City Girl Edger to cut decorative borders on each side.  A added a scrap of the embossed paper to the center of this panel and adhered to the bottom of the card. 

For my image panel, I cut brown cardstock 3 1/4" x 4 1/4" and covered it with the French Lattice Small.  I used the Coved Rectangle and Coved Rectangle Stitching Tool for my sentiment.  The stitching tool allows me to make perfect stitches around my border. I adhered the bottom of this whole panel to the base of the card.


The original directions for making this type of card relied on a tab on the back panel to tuck the front panel behind, to make it stand up, but I created a different method.  I glued a lace Corner to the back of my brown panel, and sat my card on the table, and used a Crop-a-dile to punch holes to line up with the opening in my fancy corner die.  I then ran ribbon through the holes in the card and laced it through the die cut and tied my bow.  This keeps the card standing upright, and can be untied to flatten the card for mailing. 

For the flowers, I used the Shasta Daisy Strip.  I inked the edges with Mix'd Media Chox in Butternut.  
  Then, I cut a small circle into a scrap of paper to make a template, and placed it over each flower, lining up with the center.

I spritzed into the opening with the Stephanie Barnard Tangerine Spray.  This kept the splatters just to the center of my flower.


I assembled the flowers and added some greenery to finish the card.

Clearsnap:
 Cheery Lynn Designs Dies:
Shasta Daisy Strip B310
City Girl Edger B308
Foliage XL Embossing Plate E127
French Lattice Small Frame FRM 132
Lace Corner Deco I B174
Small Leaves 1 D133
Wreath Strip B216
Build a Flower 2 Embellishments B188
Coved Rectangle Silver Stackers M-10
Coved Rectangle Stitching Tool MS-10
WorldWin Paper Cardstock:  Autumn Hay, Gold Ore,  Deep Coffee Brown, Medium Spring Green, Deep Spring Green
May Arts Ribbon: 3/8" Solid/ Two-tone  AF15
Verve Stamp Set - Brighter Days

Monday, November 12, 2012

Scor-pal & Hampton Art Week - Day 1


Today we are thrilled to be kicking off a week long feature with our friends at Hampton Art. Our designers have out done themselves once again to bring you some fun and exciting projects using not only Scor-pal products, but also, a mix of stamps and inks from Hampton Art. Of course, that's not all. The Hampton Art team is playing with Scor-pal products this week on the Hampton Art blog beginning at 11:30 EST each day.

As always, there a prizes to be won!!
Be sure to visit both the Scor-pal blog and  Hampton Art blog each day this week to see more project ideas and to enter for chances to win some great prizes. To be entered into the random drawing for a Scor-buddy prize simply leave a comment here on the Scor-pal blog each day for a chance to win.

There will be other ways to earn extra chances to win as well, so be watching for those announcements each day.


Today's, bonus entry comes by being a fan on the Scor-pal Fan page at Facebook  Simply "like" us on Facebook and come back here telling us you have done so.


Deadline for entering is 8am Central, Monday, November 19.


Our first project comes from Scor-pal Designer Lori Williams


Diagonal Double Pocket Card


Other Products Used: KaiserCraft Magnolia Paper Collection, Spellbinders Dies, Seam Binding Ribbon and Card Stock

I love fancy fold cards and this one is so easy but really is stunning.  I found the original tutorial on splitcoaststampers where you can also view a variation on this technique.

Step One: Cut designer paper 8 1/2 x 11.  Be sure you paper has pretty designs on both sides as they will show. 


Step Two: Score and fold your paper on the long way at 4 1/4


Step Three: Rotate your paper and score and fold at the 5 1/2 mark


Step Four: Unfold paper and cut from the left middle score line into the center,stopping at the intersection/ horizontal score line. 


Step Five:  Fold the bottom right corner up into a triangle meeting the center score line. 

Step Six: Have your piece lined up on your Scor-Pal and fold the top left corner down at the 3 1/4 mark.  This will be one inch in from the center score line. 


Step Seven:  Fold your top right quarter over


Step Eight: Fold your bottom left quarter over too. 


Step Nine: Fold your bottom corner over the top of your already folded corner on the bottom. 

Step Ten: Open back up your top flap and apply Scor-Tape to the edge and also apply Scor-Tape to the edges of the bottom flap and adhere down to make your pockets.  


Finish your card and add tags to the pockets


Next up, Scor-pal Designer Diane Zechman

Today I have 2 cards to share with you. Hampton Art has some great images, including this Home Tweet Home set with lots of fun images to put together.

House card: stamps- Hampton Art Home Tweet Home; paper- Momenta Kaleidoscope; ink- Colorbox Pigment Espresso and Pink, SU! Celery marker, black Micron pen; accessories- Scor-Pal, Scor-Tape, sewing machine, 1 1/4" circle punch, SU! Scallop Edge punch, Martha Stewart Grass punch, Stickles, SU! Curly Label punch.
Z-Fold card: stamps- Hampton Art Home Tweet Home; paper- white, Momenta Kaleidoscope; ink- Colorbox Pigment Espresso and Boysenberry, SU! Celery, Banana, Bermuda, Curry, and Razzleberry markers, brown Marvy LePen; accessories- Scor-Pal, Scor-Tape, corner rounder, Memento sticker.


First I created a 3-D House shaped card following the directions by our Scor-Pal design team member, Virginia Nebel. I love shaped cards and this one is very easy to create with the Scor-Pal. A punched circle was added to the front to turn it into a birdhouse. The bird on the swing, along with the sentiment, was one of my favorites from the stamp set.


This house card is designed to stand up on it's own. A view from the top shows the folded sides.


Next I made a Z-fold card. My card front was scored at 2" and folded back. The edge was torn and an additional torn layer was added underneath. This fold was attached to the card front. 

Don't you just love the birdhouse camper? Cute!

One great thing about clear stamps is the way you can bend them when mounting onto a clear block. Here I curved the sentiment to compliment the shape of the images.


Tuesday, August 9, 2011

Quick and Easy: Z Fold Cards #2

Hello Scor-pal friends! Stopping by today to see how many of you tried a Z fold card last week!? If you made one be sure and share your ideas on our fan page. If you haven't what are you waiting for!??

Here is another great Z fold example by Scor-pal designer Gini Cagle.


Wednesday, August 3, 2011

Quick and Easy: Z Fold Cards

Good Afternoon, Scor-pal friends!! Today we have another quick and easy design for you to try. This one is called the Z fold card.


To create the base for this card  start with a 4 1/4” x 11”  piece of card stock. 
With the longer side along the top of your Scor-pal score at 5 1/2” and 8 1/4"*. 
Now simply fold the card stock at the score line to form a “Z” and decorate! 

Totally easy, right!? 
Now grab your Scor-pal and start creating. 
When you're done be sure to stop by the Scor-pal Fan Page and share what you've created.
Later this month we will be choosing one random participant who posts a project on our page to win a Scor-tape prize!

*The latest version of the Scor-pal has 1/4" markings. If working with an older version, score at 5 1/2" then move the card stock 1/4" to the right, and score at the 8 1/2" mark