Showing posts with label Mini Albums. Show all posts

Monday, May 6, 2013

Booking It - Scor-Pal Style with Abby Henderson

Hi Friends! It's Abby with ScrappinAbby. Welcome back for another fun project I created using my Scor-pal & the ever amazing Scor-tape! Using the original Pull Out Tab Mini tutorial by Silvia Maybie, which you can check out HERE, I created my version of this project and came up with this....
 It's a You and Me pull out tab mini that I will be using for some photos of my hubby and I.

Supplies used:
DCWV & My Minds Eye Collections
Various embelishments (full product list will be posted on my blog)

For the construction of the mini itself, you'll need two pieces of card stock cut into 4 1/4" x 11"
Next you'll make a score mark on each piece at 3" and 8"
Flip your card stock over and score at 5 1/2 "
Go ahead and fold on all of your score lines...
Next up you'll need to join your two pieces of card stock together. You'll do this by using Scor-tape to adhere the ends together to create one long accordion.
Now you'll have one long accordion strip of card stock...(my scoring tool is pointing at the two end pieces that were joined together.
Now it's time to make the slits for the tabs, you'll make these on the shorter center pages. You can use your trimmer for this step but I chose to use my ruler and craft knife. I measured 1" in from the top and 1" from the bottom and made my slit on the 2 1/4" section that was left in between those marks. In the next photo you'll see where the slits are by the paper I stuck through them just as a visual...
To make the two tabs, you'll take some additional card stock and cut two pieces 3" x 2 3/4". Cut away 1/4" from each side leaving a tab at the top. Now in my photo below, I chose to use a single sided card stock since I loved the pattern so I ended up cutting double so I could adhere them back to back so the pattern would show on both sides. You won't need to do this if you are using double sided card stock. 
I knew I wanted to use these tabs as journaling cards so I added some lined card stock before I inserted them into the slits. If you want to add additional paper for a photo mat, you'll want to do that step at this time as well. 
 Now it's time to insert your tabs into the slits you made earlier. Insert the tabs through the backside of your album...
For the final steps in the construction of this mini, you'll add some Scor-tape to the card stock as I have shown in the photo below...
Peel off the backing and adhere the pages together...
You've just constructed your pull out tab mini...
Now for my favorite part...embellishing : )

I have a short video showing you the mini up close with all the embellishments I used along with some photos of the completed project...


This is such a quick and easy mini to create and there are many different themes and occasions you could use this for. I love this one and I can't wait to fill it up with some photos of my and my hubby!!

Thanks for stopping by the Scor-pal blog today and for letting me share another ScrappinAbby project. 

Happy Craftin!!


Friday, April 26, 2013

Booking It - Scor-Pal Style with Steph Ackerman

Hey everyone, this cute little accordion album would make a perfect brag book for a new baby and is made from only one sheet of double sided pattern paper.


To begin, score the paper vertically every 3"
Turn the paper and score at the 6" mark


Fold the paper in half, then fold along the 3" score lines to create an accordion effect


Score, trim and fold each section as follows:

Score the first section from the fold to the score line
Cut the corner from the 2nd panel, approximately 1" from the score line
Cut from the fold line to the top edge of the 3rd panel
Cut 4" down and across to the score line on the 4th panel


Double fold the top edge of the first panel and adhere with Score Tape


Cut pattern paper to fit the inside panels
Adhere ribbons between the layers of the first and last panels
Add Score Tape along the bottom of the panels and along the edges of each scored panel


Gently ink all edges with Ranger Pumice Distress Ink
Add ribbons to office tags and insert in the panels


Decorate the book as desired
I added a Memory Box die cut baby carriage on the front cover


Thanks for stopping by today.

Supplies:
Cardstock, Pattern Paper: American Crafts
Scoring Tool: Scor-Pal
Adhesive: Scor-Tape
Ribbon: Offray
Die: Memory Box
Ink: Ranger Distress Ink


Monday, April 22, 2013

Booking It Scor-Pal Style with Virginia Nebel

I love making mini albums especially when all you need is a 12 x 12 card stock base and a few bits of pattern paper and embellies!


Supplies: Bazzil card stock, Echo Park pattern paper and diecuts, Sizzix diecuts, Reasonably Ribbon, The Twinery Twine,

Here is how to make an accordion mini:

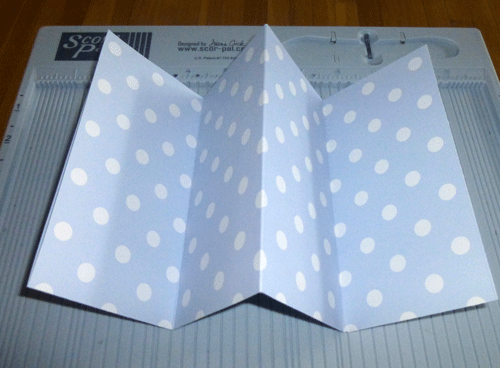
Place the 12 x 12 sheet on your Scor-pal and score at 3, 6, 9  inches.  Then rotate 90 deg right and score at 6 inches.

Fold the paper up along the 6 inch score line and then valley, mountain, and valley fold along the 3 inch increments.  You have just made your accordion album.  You can vary each panel by flipping out the corner flaps and using a circle or square punches along the top of the middle panels.

Decorate with pattern paper and embellishments.  Each panel can hold a 2.75 x 6 inch tag for more photos or journaling.


Hope you give this easy-peasy mini a try, have a wonderful day!

Friday, April 19, 2013

Booking It Scor-Pal Style with Diane Zechman

Hi! Diane here. Today I have an envelope album that I made with my Scor-Pal, Scor-Tape, and the Scor-Envi


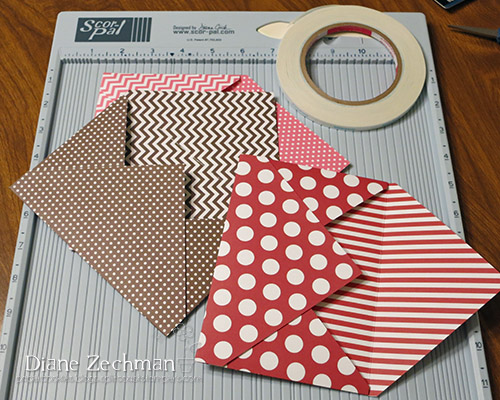
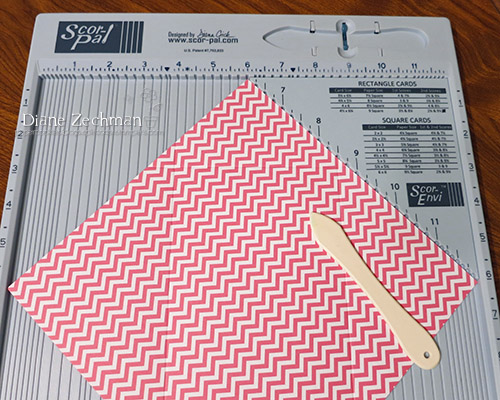
These are super simple to create and I've taken a few pictures along the way. First, I started with some Simple Stories Snap! double sided papers. I wanted to create my own envelopes but you can start with pre-made ones if you like. Using the chart printed directly on the Scor-Envi, choose the size you desire for your project. I wanted the envelopes to be able to hold 4x6 photos so I started with three 8 1/2" squares. Follow the measurements on the Scor-Envi to score all 4 sides. Then remove the corners as shown in the directions. Next assemble each with Scor-Tape, leaving the top flaps open.
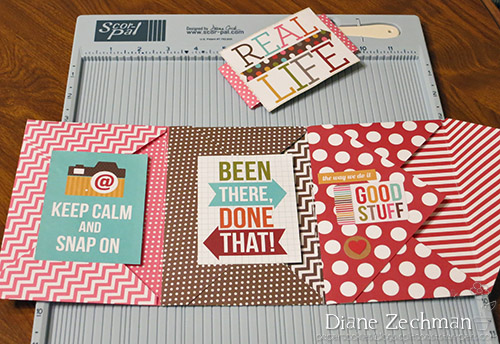
 Line them up in the order you want them and attach as shown below. Make sure they have a little room so they easily fold (roll) up when attached together.  
 I decorated each envelope with Snap! cards and stickers, then made a belly band with a 2" x 12" strip and an additional Snap! card.  
 "Roll" it up and slip the band over to hold it shut.  
Have fun creating envelope albums of all sizes with the Scor-Pal and Scor-Envi!

Wednesday, April 17, 2013

Booking It Scor-Pal Style with Toni Storie


It's Toni here with a fun book for you to try.  It's called a Flip Flop Book and it's really quite simple.  Now don't be afraid to try a book or an album because if I can do it, so can you!  Just make sure you have your Scor-Pal and your Scor-Tape handy because that will make this project much easier!

For this project, you will need: 
  • Scor-Tape
  • 2 pieces of  6 1/4" x 6 1/4"  light chipboard
  • 2 pieces of 7 1/4" x 7 1/4" designer paper
  • 2 pieces of 6" x 6" card stock
  • 2 pieces of 6" x 12" card stock
  • 4 pieces of 1 1/2" x 6" card stock
  • 3 pieces of 3 1/4" x 5 1/2" card stock
  • 3 pieces of 2 1/8" x 5 1/2" card stock
  • Twill tape
  • Embellishments, as desired
Prepare front and back book covers first.  Adhere the 6 1/4" by 6 1/4" piece of chipboard to the back side of the 7 1/4" by 7 1/4" piece of designer paper with Scor-Tape


Trim the corners of the designer paper and line flaps with Scor-Tape.  Remove backing and adhere each flap to the chipboard. 


Finish the covers, by adhering the  6" by 6" piece of card stock with Scor-Tape to cover the flaps on the inside.


Place the 6" by 12" piece of card stock with the 12" side along the top fence of your Scor-Pal.  Score at 3", 6" and 9".  Repeat this process with the second piece of 6" by 12" card stock.


Crease the score lines, creating this "W" shape with a mountain fold in the center.  Repeat this process with the second piece of 6" by 12" card stock that you scored in the previous step. 

Place a 1 1/2" by 6" piece of card stock with the 1 1/2" side of the card stock against the top fence of your Scor-Pal.  Score at 3/4" down the length of the card stock.  Repeat this scoring on the remaining 3 pieces of 1 /12" by 6" card stock.

Crease the scores on each of the 1 1/2" by 6" pieces and line the inside of three of the pieces with Scor-Tape.  Line the outside of the fourth piece with Scor-Tape.

Attach the two 6" by 12" scored pieces in a center mountain fold with one of the 1 1/2" by 6" piece of card stock with Scor-Tape lining the inside.  


Turn over this piece and reinforce the seam with the 1 1/2" by 6" piece of card stock with the Scor-Tape lining the outside.

Turn this piece over again.  Remove the adhesive backing of the remaining two 1 1/2" by 6" card stock strips and adhere them to the two remaining mountain folds for design consistency. Here you see it standing up. 

Line both ends of this accordion-like piece with Scor-Tape, as shown.


Remove adhesive backing from each end and adhere to the inside of the covers.  


Take the three 2 1/8" by 5 1/2" pieces of card stock, line with Scor-Tape and adhere to the left hand side of each mountain fold.  (Take extra care to make sure that your Scor-Tape doesn't extend beyond the top of the mountain fold.  A light pencil line drawn just beneath the top of the mountain fold prior to placement of Scor-Tape can serve as a guide).

Next, take the three 3 1/4" by 5 1/2" pieces and line them with Scor-Tape.  Adhere them to the right side of each mountain fold (remember to make sure that your adhesive doesn't extend beyond the top of the mountain fold). 

Finally, embellish your Flip Flop Book as desired.  I used additional card stock, Simple Stories Documented designer paper, Simple Stories Documented Fundamental Cardstock Stickers and dies to decorate the inside of my Flip Flop Book.


On the front cover of my book, I used more Simple Stories Documented designer paper, card stock, dies, twill tape, paper flowers, a brad, stamps and ink to create my focal image.


Thank you for joining my today for my Flip Flop Book tutorial!  Have a great day!


Details - Stamps: Sentiments O'Simple (Unity), Friends 24/7 (SU); Paper: Simple Stories Documented Simple Basics Designer Cardstock Damask/Flourish, Simple Stories Documented Fundamental Cardstock Stickers, Black Licorice (MFT), Paper Reflections Naturals, Canson Naturals; Ink: Early Espresso, Crumb Cake, Tea Stain; Accessories: Scor-Pal, Scor-Tape, Twill Tape, Hero Arts paper flowers, Spellbinders Labels 8 die, Little Leaves die, Build-a Brad, stampin' dimensionals, crystal effects, sponge dauber.