Showing posts with label Simple Stories. Show all posts

Thursday, February 28, 2013

Flip Flop Album by Katie Tate

My remake project was inspired by this Flip Flop by Eleonor McGarry
I decided to not only update it with newer paper lines but I also changed up the size a little.

Project recipe:
Papers - Sn@p Life by Simple Stories
Card Stock - Core-dinations
Scoring Tool - Scor-Pal
Adhesive - Scor-Tape

This the album finished


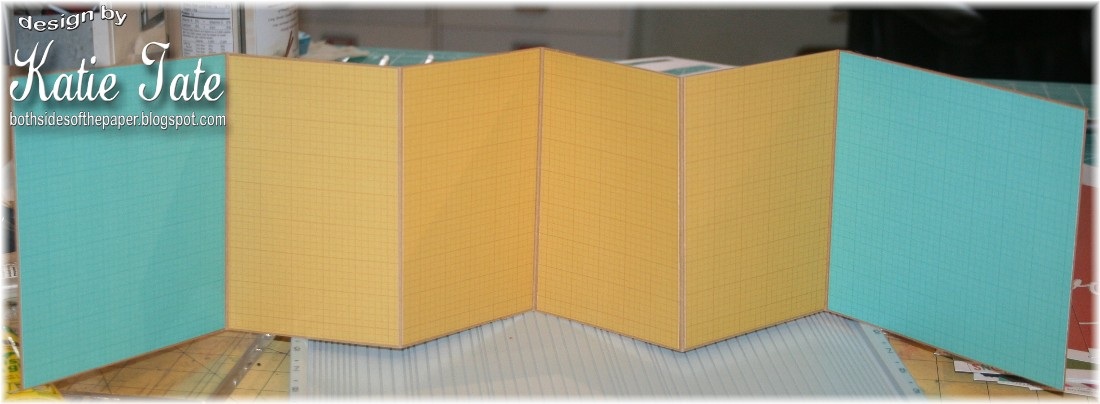
Start with 2 pieces of card stock measuring 6" by 12" scored at 4" and 8" along the 12" side. You also need 2 6" squares of card stock for the covers and 1 piece 2" by 6" scored at 1" on the 2" side.


Use the 2" by 6" piece to attach the 2 6" by 12" pieces together to form an accordion as in the photo.


Decorate the front and back covers as desired.


Decorate the back panels with coordinating papers.


Decorate the inner panels too.


Create the flaps for the album from pieces of card stock measuring 5 1/2" by 3 3/4" scored at 1/2" on the 5 1/2" side. Use Scor-Tape to attach the flaps inside the album.


Decorate the flaps and attach the the album.


The following are some views of the completed album.


Wednesday, February 20, 2013

Double pocket criss-cross card by Virginia Nebel

Hello, Virginia here. Today I would like to share with you my open double pocket criss-cross card.  The multiple pockets make this a fun card to tuck in extra messages or gift cards.

This is a variation of the criss-cross card found on Scorpal's website.
Supplies: Simple Stories pattern paper, Bazzil kraft card stock, The Twinery twine, Scor-tape, Scor-pal tool, EK success circle/border punches.

To create the double pocket criss cross card:

1. Take two 11 x 5.5 card stock pieces and score each in half at 5.5 inches.  Take one piece, cut the left flap on the diagonal and on the 2nd piece, cut the right flap on the diagonal. 


2. Take one of the triangle and place it onto the middle flap offest about 1/4 inch from the bottom and the spine and trace the 'v' line at the top.   Repeat for the other side.


3. Cut the 'v' at the top and glue the flap down with adhesive on the sides and bottom to form a pocket.


4. Cross the outside flaps with adhesive along the bottom edge to create the 2nd pocket.


5. Decorate and add tags.


Friday, February 8, 2013

Desk Calendar by Lisa Andrews


Hi everyone, Lisa Andrews here!  
I made a cute Desk Calendar using my Scor-Pal and the Awesome collection from Simple Stories.  

Supplies:
card stock
various brads
adhesive numbers
acetate
date stamps


To create the drawer, start with a 4 1/2" x 4 1/2" square of cardstock, score 1" on all sides to create the drawer.  Tip:  I decorate the drawer front and positioned my brad before I assembled my drawer.  Next, for the drawer wrap.  Start with a piece of cardstock 3" x 9", score at 1", 4", 5" and 8".  Create the wrap and place the drawer inside.


The calendar pages are 2 1/4" x 1 3/4".  I used a 1" and 3/4" circle punch for the calendar pulls and used coordinating brads for each month. 

Use the drawer to store the off months.  The easel card on top measures 2 1/2" x 5 ", score at 1 1/4" and 2 1/2".  I used a 2 1/4" square of acetate adhered with brads to slide the months into.  

Wednesday, January 30, 2013

Scor-pal & Simple Stories Week Winer

Thanks to all who joined us last week for Scor-pal & Simple Stories week. If you missed any of last week's projects you'll want to be sure and go back and take a look. If you did join us and left comments or entered for the bonus entries this is the moment you have been waiting for, ;) The winner of the Scor-Tape/Simple Stories prize is....


Pamela, please send you mailing address to ScorpalMedia@gmail.com before Wednesday, February 6, 2013 and we will get that out to you.

Thanks to all who joined us. 
don't forget to subscribe to the Scor-pal blog (links in the sidebar) and also follow the Scor-pal Fan Page on Facebook and check out the Scor-pal Projects Board on Pinterest.

Happy Scoring!

Friday, January 25, 2013

Scor-pal & Simple Stories Week - Day 6


Today we are wrapping up the long feature with our friends at Simple Stories.


Today we have our last twoprojects using not only Scor-pal products, but also, a mix of papers and embellishments from Simple Stories. Of course, that's not all. The Simple Stories team is playing with Scor-pal products this week on the Simple Stories Blog. If you missed anything be sure to scroll down through the other great ideas showcased this week.


As always, there a prizes to be won!!

Be sure to visit both the Scor-pal blog and Simple Stories Blog each day this week to see more project ideas and to enter for chances to win some great prizes. To be entered into the random drawing for a Scor-Tape and Simple Stories prize simply leave a comment here on the Scor-pal blog each day for a chance to win.


There will be other ways to earn extra chances to win as well, so be watching for those announcements each day.


The Bonus Entry for today is:
Today's bonus entry comes by telling us something you have learned this week. Just leave a second comment on this post for the bonus entry.


Deadline for entering is 8am Central, Monday, January 28, 2013.


Our first project this week comes from Scor-pal Designer Katie Tate:


As the Simple Stories Sn@p Life designs lead me towards a youthful design I decided to go with an organizer for my 14 year old daughter to keep all her movie tickets/notes/memorabilia in before she gets around to scrapbooking it.


Project Recipe:
Scoring Tool - Scor-Pal
Adhesive - Scor-Tape
Patterned Papers and accessories - Sn@p Studio
Ribbon and eyelets - Stash


First I started by creating 12 simple pockets (one for each month) from 6" square pieces of card stock. I scored each at 3" and burnished.


Then I cut the date tags from the patterned paper, each measuring 6" by 3"


Then I added Scor-Tape to the base of each month block.


 attached each month block to the inside of the back side of the pocket so you could see them when opened.

I
Then I added Scor-Tape to the back of each pocket (at the top of the pocket before the tab) so that I could attach the pocket together in a kind of accordion folder style)


I removed the tape lining and attached them together in order as you can see in the photo.


I then used Scor-Tape on the front and rear pockets to add the decorative front and back from the papers


Then I went "old school" and added 2 eyelets to both the front and back covers to allow me to add a ribbon closure to the organizer.


I added a sheer ribbon and tied it in a bow.


Next I created a base box to stand the organizer in so that all the things wouldn't fall out when it was opened.
This was simply a 12" square piece of coordinating patterned paper scored at 3" on all 4 sides.


I snipped each corner up one square and added Scor-Tape to the front side formed flaps to created the box.


Here you can see the base


I then added embellishments to the box and the organizer sits perfectly.


This is a super simple project and perfect for the teenage girl in your life :)


Scor-Pal & Simple Stories Week - Day 5


Today we are continuing a week long feature with our friends at Simple Stories.

Our designers will be bringing you some fun and exciting projects using not only Scor-pal products, but also, a mix of papers and embellishments from Simple Stories. Of course, that's not all. The Simple Stories team is playing with Scor-pal products this week on the Simple Stories Blog.

As always, there a prizes to be won!!
Be sure to visit both the Scor-pal blog and Simple Stories Blog each day this week to see more project ideas and to enter for chances to win some great prizes. To be entered into the random drawing for a Scor-Tape and Simple Stories prize simply leave a comment here on the Scor-pal blog each day for a chance to win.

There will be other ways to earn extra chances to win as well, so be watching for those announcements each day.

The Bonus Entry for today is:

Today's bonus entry comes by sharing with us how you first heard about Scor-pal. Simply leave a comment here on this post telling us for an extra chance at this week's prize.

Deadline for entering is 8am Central, Monday, January 28, 2013.


Our first project this week comes from Scor-pal Designer Lisa Silver.

Hello! It's Lisa with a mini-book project using my favorite Scor-pal tools and the amazing Simple Stories patterned papers.


Supplies: 
Patterned Paper: Fab{u}lous and Simple Basics kit by Simple Stories (papers, kit stickers and journal prompts)
Cardstock: black cardstock by DiscountCardstock.com
Embellishments: rhinestones by Recollections, Mod Podge
Other: cardboard

Instructions:
Begin with two pieces of cardboard. This book was sized as 8.5" x 5". You can opt to purchase heavy weight cardboard OR... you can be thrifty. I save cardboard from large packs of patterned pattern, save cereal boxes (the sturdy kind not the econo boxes we usually buy) or from the back of a pad of notebook paper. Cover the piece of patterned paper and cardboard completely with Mod Podge. I find that when you cover both surfaces with liquid glue, you avoid air bubbles behind the paper. Cover both sides of the cardboard. Set aside to dry.


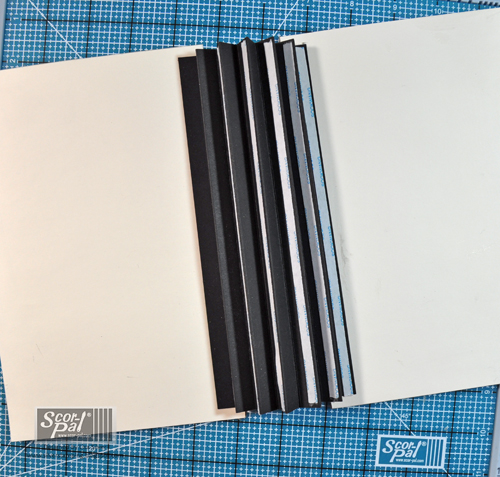
Cut a piece of black cardstock to 8" x 6.5". Score with the Scor-pal scoring board and Scor-Tool along the 6" side every 0.5". Add Score-tape to one side of each score mark and fold.


Adhere to the cardboard covers.


Cut black cardstock for the pages at 8" x 5". Adhere to the spine of the book.


Embellish the pages with the fun stickers and journal prompts from the Simple Stories Fab{u}lous kit.

Doesn't this make a great gift for a sweet teenager? I know my sweet girl will love it! I left plenty of spaces to add fun pictures and high school mementos.

Next up, Scor-pal Designer Steph Ackerman.


Good morning, Steph here with a fun project using products from Simple Stories Take a Hike Collection and my Scor-pal. 

This collection with it's earth tone colors and it's assorted array of patterns and elements made this  the perfect collection to create this Wilderness Survival Box.   Fill it with cards, mementos and little goodies from home so your little camper won't be lonely.

Supplies:
Scoring Tool:  Scor-pal
Adhesive: Score-tape
Cardstock: Bazzill
Pattern paper:  Simple Stories
Ink: Ranger Distress Ink


Cut cardstock to 12" x 7", then score at 4 1/2" and 7 1/2".  Fold on the scored lines.


Cut pattern paper 4 1/4" x 6 3/4" to cover both the front and back of the box.
Cut additional cardstock and pattern paper as decorative elements for the front of the box.


To create the sides of the box, cut 2 pieces of cardstock 6" x 2 1/2" and score every 1/2" across. 


Once folded, adhere the two end pieces to the larger cardstock panel to create the box.


Inside the box, add cardstock strips to create separate compartments by cutting 4 pieces of cardstock 7" x 2 1/2".  Score 1/4" on both ends, and adhere to the side panels created above.


Cut elements from the pattern paper collection and include inside the box.  And also add some goodies from home.


To create the top of the box, I used Spellbinders dies, cutting the bottom layer from cardstock and the top layer from pattern paper.


Fitting the cardstock to the box, create the back flap by scoring  at 1 1/2".
To create the front flap, score at  2".    
Cut the pattern paper into 3 sections to fit between the scored lines and then adhere each section.


Add assorted tickets and elements to the back of the box, inking the edges of each piece and matting each piece with cardstock before overlaying and adhering to the box. 


Add assorted elements and stickers to finish the top and front of the box.
Side view of the completed box:


To close the box, add a Velcro dot in the center of the front.