Showing posts with label Holidays. Show all posts

Wednesday, February 27, 2013

Tiny Take Out Box by Tya Smith


Hello everyone! I was really excited about the assignment that we were given for this month to give our take on a project from the existing projects on Scor-Pal.com. Before I was on the Design Team, I was constantly trying out all of these projects on my own and loved all the many talented designers that added their talents to the website.

I decided to do my project based on the Tiny Take Out box designed by the incredibly talented Beate Johns. Here is a link to the original post : Tiny Take Out Box.

I added a little St. Patrick's Day twist to my box since that fun holiday is just around the corner. (Plus any excuse to add some chocolate to ANY project is a plus in my book!) :) Here is a peek at the project:


 Supplies used:
8x8 black cardstock
Border Punch
 (2) 2  1/2 inch Scallop Cirlces (Used Echo Park Kiwi Tiny Dot)
(1) 2 inch circle
(2) 1 x 2 inch banners ( used Echo Park Kiwi Small Dot on the Stripe Side)
12 inchs gold tuelle
Pop Dots
Glitter Shamrock Button
28 gauge gold wire
Wood Skewer
Candy

Here are the Steps to make your own:

Step 1- take 8x8 Black Cardstock and score at 1, 3, 5, and 7 inches


Step 2:
Turn paper and score again at 1,3,5, and 7 inches in the other direction.


Step 3:
Cut off outer panels of the box as shown. Make sure to leave the center section intact. These will be the sections we fold over.


Step 4:
Turn the box on the diagonal and line up with the 6 inch mark. Scor each of these sections on all 4 corners of the box up to the intersecting score line as shown. 


Step 5:
Using a border punch - punch out the border on all of the taller sections of the box.


Step 6:
Trim off the sections that you scored on the 6 inch line as shown. These are the sections that fold into the inside of the box.


Step 7:
Fold all of the score lines so you have nice, crisp lines to work with. Add adhesive to the inside sections of the box as shown:


Step 8:
Add adhesive on ONE side of the inner flaps as shown inside the box, and glue these down. Take the wooden skewer and place it into one of the chocolate candies. Glue this candy to the bottom of the box with Scor-Tape.


Step 9:
Add Dimensional Adhesive to the outside flaps of the box on all 4 sides as shown.


Step 10:
Add gold tulle ribbon and tie around the box with the bow in front.Add the rest of the chocolate candies.


Step 11-
Add the (2) 2 1/2 inch  Scallop circles to the front and back of the skewer. Add the 2 inch white circle to the front of one of the scallop circles. Type a fun, festive sentiment ( I used fonts Expo and Amelie for my example.) Add green glitter shamrock button and thin gold wire to the sentiment.) Add the (2) 1x2 inch banners to the bottom of the scallop circles.


 Happy Scoring!
Tya
Saturday, December 22, 2012

Scor-Pal & Fancy Pants Designs Week - Day 6


Today we are finishing up our week long feature with our friends at Fancy Pants Designs

Our designers will be bringing you some fun and exciting projects using not only Scor-pal products, but also, a mix of papers and from Fancy Pants Designs. Of course, that's not all. The Fancy Pants Designs team is playing with Scor-pal products this week on the Fancy Pants Blog.
As always, there a prizes to be won!!
Be sure to visit both the Scor-pal blog and Fancy Pants Blog each day this week to see more project ideas and to enter for chances to win some great prizes. To be entered into the random drawing for a Scor-buddy prize simply leave a comment here on the Scor-pal blog each day for a chance to win.


There will be other ways to earn extra chances to win as well, so be watching for those announcements each day.

Today's bonus entry comes by telling us something you have learned this week. Just leave a second comment on this post for the bonus entry.

Deadline for entering is 8am Central, Monday, December 24, 2012.


Our first project this week comes from Scor-pal Designer Toni Storie

  For your viewing pleasure today, I have constructed a Christmas Cracker*.  In my experience, the cracker is traditionally filled with a paper crown, a joke and a small gift.  However, you could fill it with whatever you like.
Details - Paper: Fancy Pants Designs Hopscotch (Strolling & Jump Rope); Accessories: Scor-Pal, Scor-Tape, Fancy Pants Designs Hopscotch Mingled Buttons, Fancy Pants Designs Hopscotch Fundamental Stickers, mini jingle bells, ruler, paper snips, silver wired ribbon, silver cording, corner chomper, hole punch, glue dots.


For this project, you will need:
Card stock or patterned paper measuring 6 3/4" x 9" 
Ruler 
Pencil 
Scissors 
Ribbon 
Embellishments


Begin with your 9" side of the paper again the top fence of your Scor-Pal.  I used patterned paper from the Fancy Pants Designs Hopscotch line called Strolling.  Make sure the pattern that you want to show on the outside is face up.  Score at 1", 2 3/4", 6 1/4" and 8".


Turn your paper 90 degrees.  Now your 6 3/4" side will align with the top fence.  Score at 3/4", 1 1/2", 2 1/4", 3", 3 3/4", 4 1/2", 5 1/4" and 6". 


Rotate back 90 degrees to the original paper placement and flip over.  Now the pattern you want on the outside will be face down.  Score at 1 7/8" and 7 1/8".  Don't sweat the fact that you don't have those grooves marked on your Scor-Pal.  Diana has put together a video to help you score at any 1/8" mark you need.  Check it out. 


With a ruler and a pencil, make marks on the 1 7/8" and 7 1/8" score lines at each 1/4" interval between the vertical score lines.  I have made black dots to illustrate this in the next picture.  I highlighted a couple of score lines to clearly show the 1/4" intervals.  After you complete this, burnish all your score lines.


With one score line folded at a time, trim out a triangle shape.  The triangle will go from the 2 3/4" score line to the marked 1/4" interval and back out to the 1" score line. 


Repeat this trimming until all the score lines have two trimmed out triangles on them.  When you lay the paper flat, they look like diamonds.  Next, you will have to trim two of the same triangle shapes on each end.  I traced the triangle pattern in black for illustration purposes.


Flip your patterned paper over and line one end with Scor-Tape


Remove the backing from the adhesive and adhere the two end segments together. 


You will want to tie one end of the cracker closed with ribbon.  Fill the center with treats and close off the other end with ribbon.  For my cracker, I tied off each end with a thin wired silver ribbon.  Then I threaded some silver cording through a couple of the Fancy Pants Designs Hopscotch Mingled Buttons.  I added a couple of mini jingle bells, tied a small silver cording bow and then glued my button/bell/bow embellishment down to the ribbon.  To personalize my cracker a bit more, I created a tag.  I cut a piece of Fancy Pants Designs Hopscotch paper named Jump Rope to size.  I rounded two corners, trimmed the others, punched a hole and used the Fancy Pants Designs Hopscotch Fundamental Stickers to spell out my name!  I tied my tag on with some more silver cording.

I hope you have enjoyed my tutorial for today.

* I adapted my cracker from a tutorial for a triangle box. 

And our final project of the week from Steph Ackerman:

My project this week is an Triangle Explosion Box using my Scor-pal, 3 pieces of cardstock and assorted pattern papers from Fancy Pants Designs.


Supplies:
Cardstock: Bazzill
Pattern paper: Fancy Pants
Scoring Tool:  Scor-pal
Adhesive: Scor-Tape
Stamps: Cornish Heritage Farms
Ink: Memento


To begin, prepare your cardstock as follows:

1 piece of cardstock is 12" x 12" - score at 4" and 8", turning the paper and scoring again 4" and 8", creating 9 equal sized squares.
Cut 1 piece of cardstock 10 1/4" x 10 1/4"  and score at 3 1/2" and 6 1/2", turning the paper and scoring again at 3 1/2" and 6 1/2", creating 9 equal sized squares.
Cut 1 piece of cardstock 8 1/2" x 8 1/2" and score at 2 3/4" and 5 3/4", turning the paper and scoring again at 2 3/4" and 5 3/4, creating 9 equal sized squares.

Cut along the score lines and remove the corner pieces.  Your three pieces of cardstock should look like a "t"


Fold each piece along the scored lines.


To form the triangle, cut each piece on the diagonal.  Find the center of each edge and cut to the score lines.

Add Scor-Tape to the center of each piece and assemble together to form one unit.


Using assorted papers from Fancy Pants Designs - The Good Life Collection - cut pattern paper to fit each triangle.


Layer 1 - cut 8 pieces, each 3 3/4" x 3 3/4".


Layer 2 - cut 8 pieces, each 3 1/4" x 3 1/4".


Layer 3 - cut 8 pieces, each 2 3/4" x 2 3/4".

To finish the inside, add a 2 3/4" x 2 3/4" square to the base.

Decorate as desired.  I added stamps around my box.

Punch holes in the tops of each point and thread ribbon through the holes. 

Fill the box with candy or other little treats and pull the ribbon together to close.

This is the perfect item to put in the Christmas tree since it doesn't weigh very much, or even use as a place setting on the dining room table.


Friday, December 21, 2012

Scor-Pal & Fancy Pants Designs Week - Day 5


Today we are continuing a week long feature with our friends at Fancy Pants Designs

Our designers will be bringing you some fun and exciting projects using not only Scor-pal products, but also, a mix of papers and from Fancy Pants Designs. Of course, that's not all. The Fancy Pants Designs team is playing with Scor-pal products this week on the Fancy Pants Blog.

As always, there a prizes to be won!!
Be sure to visit both the Scor-pal blog and Fancy Pants Blog each day this week to see more project ideas and to enter for chances to win some great prizes. To be entered into the random drawing for a Scor-buddy prize simply leave a comment here on the Scor-pal blog each day for a chance to win.

There will be other ways to earn extra chances to win as well, so be watching for those announcements each day.

Today's bonus entry comes by sharing with us how you first heard about Scor-pal. Simply leave a comment here on this post telling us for an extra chance at this week's prize.


Deadline for entering is 8am Central, Monday, December 24, 2012.


Our first project this week comes from Scor-pal Designer Lori Williams

Products Used: Scor-Pal, Scor Tape, Fancy Pants Hopscotch Card Stock, Card Stock, Stamps, Donna Salzar Ink, KaiserCraft Flower, Spellbinders Dies, Velcro Tabs and corner rounder

There is nothing like a last minute gift, and gift cards are perfect.  Today I'm going to share a simple project with you that will really take your gift cards to the next level. 

Step 1: Cut a piece of card stock 4 1/2 x 10 inches and score at the 3 inch, 4 inch, 5 inch and 8 inch mark. 


Step 2: Fold as shown below and use your Scor-Pal Tool to make the edges crisp. 


Step 3: Round the corners on the outside edges


Step 4:  Cut the following designer card stock pieces and corner round your end pieces 
(4)  4 x 2 3/4 
(2) 4 x 1 3/4 
(2) 4 x 3/4

Note: this will decorate the outside and the interior of the wallet


Step 5: Flip your wallet over the the outside and apply a line of Scor-Pal Tape to the very bottom of the score line between the small peaks that are going to form where the gift card sits. Apply the to peaks together. 


Step 6 : Flip back over to the interior and use a Spellbinders Die to line up just on the edges of the small pop up flap.  This will make a slit for your card to sit in and when the wallet is opened the gift card will flip up.  TIP: if the die doesn't cut all the way through just trim it up with scissors as the score line will be embossed enough. 


Step 7: Slip your gift card in the open notch


Step 8 : Apply velcro tabs to the flap of you wallet to open and close.  If you don't have velcro tabs you could easily use ribbon or twine to close the wallet. 


Decorate your wallet as desired and give away with love!!!!


Next up, Diane Zechman

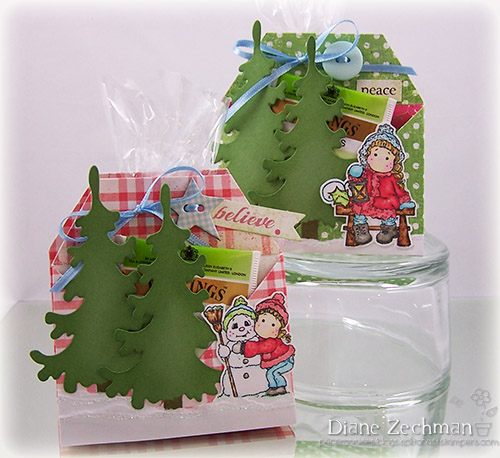
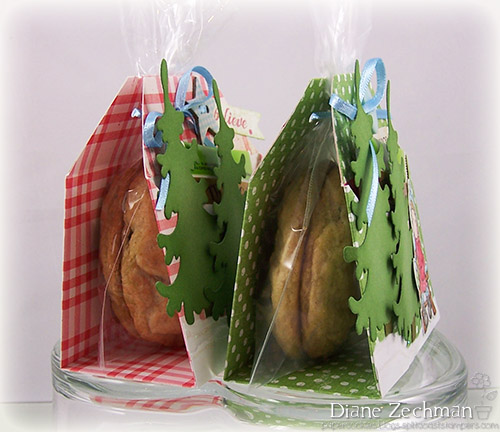
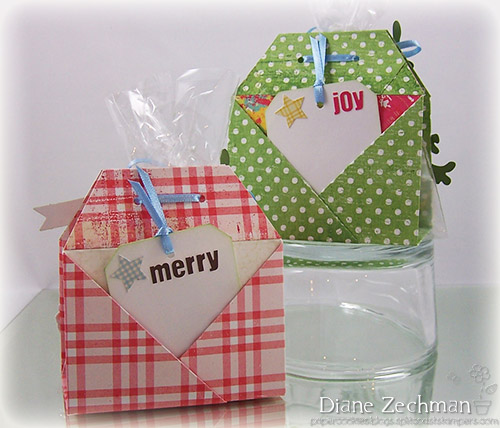
I made some quick and easy last minute gifts with Fancy Pants' Hopscotch papers (absolutely fun prints!) that would be perfect when you need a "little something" for a coworker or friend. The folded papers hold 2 cookies and one or two tea bags. I chose to add a teabag in one side and a little tag in the other to write a short note.


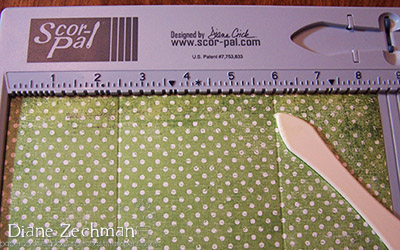
 The original design is by Debi Pippin and can be found here. Another tutorial with pictures can be seen here. (In step 3 of that tutorial, ignore the 6" score as it must be a typo). I took a few photos along the way as well... Start with an 8 1/2 x 12 inch piece of double sided patterned paper. Using a Scor-Pal, score the 8 1/2 side @ 2 1/2 and 6.


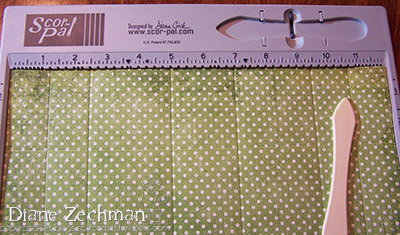
Next score the 12" side @ 1 1/4, 2 1/2, 5, 7, 9 1/2, and 10 3/4.


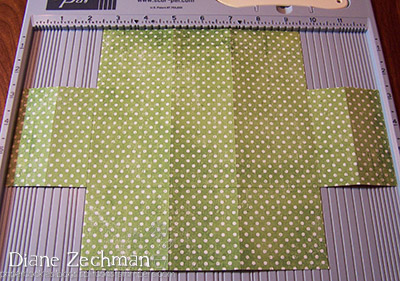
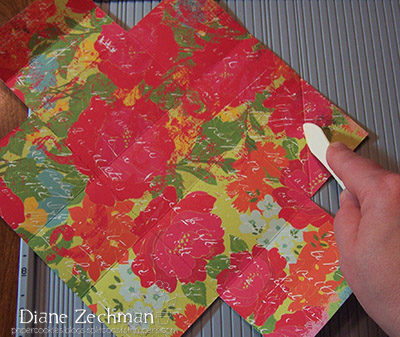
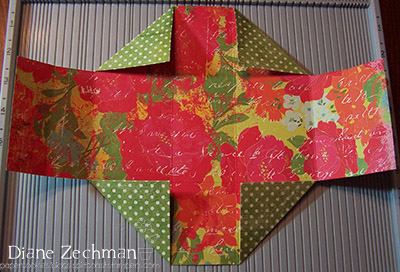
Crease all scored lines and unfold. Next you will cut 2 rectangular sections from each corner (cut a 2 1/2" square from each corner) to look like this...  


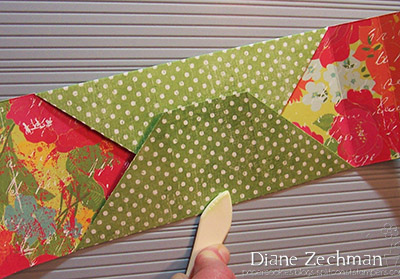
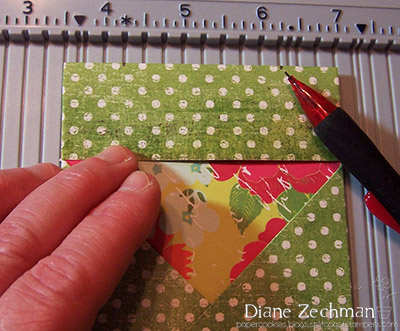
Now score the 4 center corners diagonally before folding them in.


After folding the center corners, it will look like this.


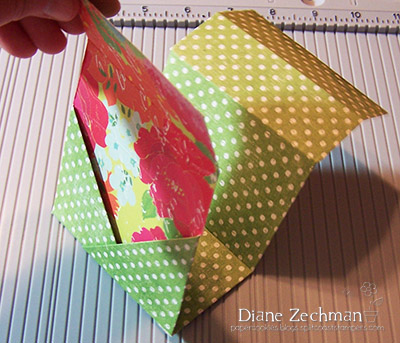
Fold the top and bottom in. They will overlap each other a bit. I added a bit of glue here but it's really not necessary.


Flip the paper over and fold the scored lines to look like this...


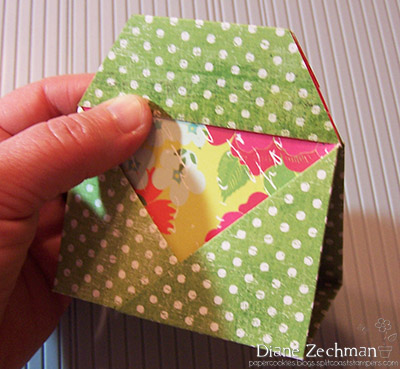
When cutting the "tag shape" on the top, first fold the top flap down on each side. I added a bit of adhesive underneath. Then I measured 3/4" in from each end and made a mark.  


 Then cut both sides to look like this. Punch 2 holes at the top to tie a ribbon through.  


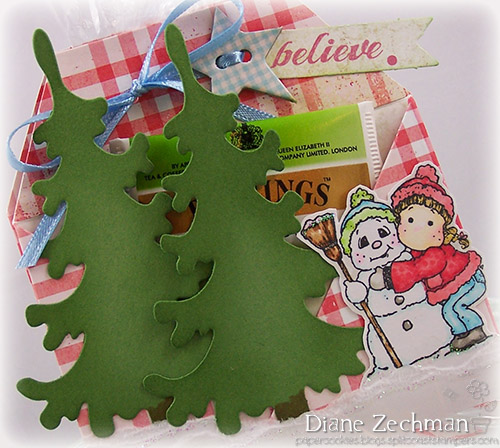
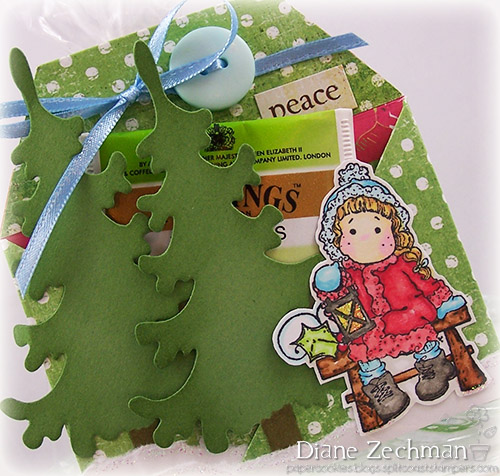
 Decorate and fill as desired. I used some adorable Magnolia Minis from the Magnolialicious store.


 A view from the side... fill a 4x6 cello bag with 2 cookies, add a twist tie to the top, and insert so the baggie is between the ribbon tied at the top.  


 And here's the back... I added a tag but you could add a second teabag here. Some Fancy Pants stickers adorn the tags.


 The buttons are also from the Fancy Pants Hopscotch line, as well as the "believe" banner and "peace" sticker.