Showing posts with label Spring. Show all posts

Monday, March 25, 2013

Bunches of Beautiful Boxes with Diane Zechman

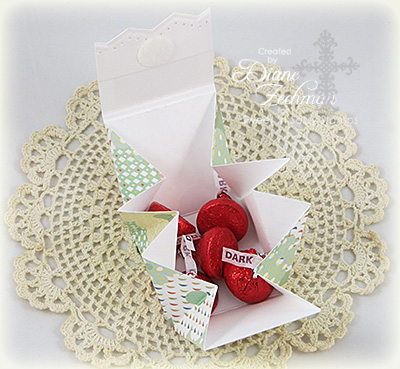
The Scor-Pal team has created Bunches of Beautiful Boxes and today I am sharing my Tiny Easter/Spring Triangle Treat Box. The tutorial for this was done here by Deb Felts and you can also find it here on the Splitcoast site. I've altered the design slightly so I included my own template below. Instead of cardstock, I used patterned paper to create the box and then punched a decorative zigzag edge on the flap. It is held shut with sticky-back velcro.  


The finished box has a 2" base and is almost 2" high...a very sweet little size! It holds a few Hershey kisses or any other small treat or gift. I didn't have the chocolates in pretty spring colors, so I'll switch out the red foil wrapped candies when I'm ready to give it away. ;) Here it is open... 
 
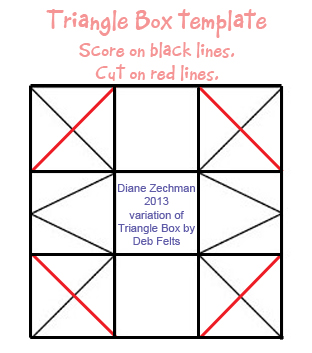
It is quite easy to make with a few scored lines using the Scor-Pal. I didn't want the bulkiness of all the folds on the inside of my box, so I also cut each corner off before attaching the cover. Here's my template showing where to cut/score. I followed Deb's instructions for this box, starting with a 6" square and scoring at 2" and 4" in each direction. Then I added the additional score lines and attached the 2x4 cover, scored in half. After scoring the cover in half, I added an additional score line 1/8" from the first to allow for bulk at the top of the box. I also made 2 more boxes which are a little larger. For one I started with a 7 1/2" square and scored it at 2 1/2" and 5". The cover is 2 1/2 x 5, scored in half. For the other, I started with a 12" square and scored at 4" and 8". The cover is 4 x 8, scored in half. I also scored an additional line 1/8" from the first on each of those covers. These boxes are a quick and easy project...I hope you try it!

Monday, March 11, 2013

Fancy Easter Card by Gini Cagle

Fancy Easter Card 
Designer: Gini Cagle

I've got a fun and different fancy fold card to share with you today! And the great part - it's super easy to make!  The outside looks like a normal card, but there's a surprise on the inside.
Supplies:
Graphic 45 Ladies Diary Paper
DCWV Cardstock
Hampton Art/Graphic 34 Ladies Diary Stamp Set 3
Cheery Lynn Designs Dies: Delicate Lace Script
Spellbinders Dies: Labels 3
May Arts Ribbon 365-2-10
Clearsnap Ink
Copic Markers
To make the inside of the card, cut a base 10" x 6".  You are going to cut two slits in the paper, parallel with the long side of the paper.  Measure down and inch and over an inch, and cut an 8" cut.


I think you will understand the cuts and scores more if you look at my diagram.  The black lines indicate where to cut and and dotted red lines indicate where to score. 
As you can see, you are going to score all the way from top to bottom at the 5" mark.  At the 3" and 7" you are only going to score the one inch strips at the top and bottom.  The center portion will be scored at 1", 1 3/4", 8 1/4", and 9".  The small bands are going to pop out and the larger center section will fold in. Decorate this base as you desire.
Cut a card base slightly larger than the inside (10 1/2 x 6 1/2).  Score at 5 1/4.  Use Scor-tape to attach the folded paper to the card base, but make sure you only add the tape along the two outer sides, and horizontally along the 1" border just to the first fold on each side.  If you glue down any more, the card won't pop out like it is supposed to.

Add your card front, and you are all set!

Wednesday, March 6, 2013

Easter Centerpiece by Steph Ackerman


Good morning Steph Ackerman here with an Easter centerpiece.  
This would be lovely on the center of the Easter table.

Supplies:
Scoring Tool: Scor-pal
Adhesive: Scor-tape
Cardstock:  Coredinations
Stamp: Justrite Stampers
Dies: Spellbinders
Punch, Stickers:  EKSuccess
Ink: Clearsnap


Instructions:  
Starting with a sheet of 12" x 12" cardstock, score at 3 1/2" and 8 1/2".  Rotating the cardstock, score again at 3 1/2" and 8 1/2".  Cut to the score lines on all four corners, creating the flaps for the basket.


Using Scor-tape, apply the tape the smaller ends and fold the larger up to create the basket base.


Using a Spellbinders Scalloped die, die cut coordinating cardstock to add around the basket.  


Stamp an image on coordinating cardstock, then die cut with the same Spellbinders die.  Score 1/2" from the top edge and fold over.  Add Scor-tape and align the stamped piece so that the scallops are slightly offset.  Fold the scored edge into the basket to create a finished edge. 


To create the handle, cut a strip of coordinating cardstock 1 1/2" x 12".  Score at 1/4" and 1/2" from both long edges for a little dimension.  Ink edges and staple to the sides of the basket. 


Cut 1" strips of coordinating cardstock and create rosettes by scoring every 1/4".


For the sides of the basket, I created double rosettes, creating  the top rosette using cardstock cut to 1" x 12" and the bottom rosette using cardstock cut to 1 1/2" x 12".  The small rosette was scored every 1/4" and the large rosette was scored every 1/2".  The rosettes were adhered together and then adhered to the sides of the basket.


Create six small rosettes in multiple colors and add coordinating 1 1/2" punched circles on top.  Add letter stickers to the top of each rosette.  Add color to the letter stickers with Gold Smooch Ink.


Cut 3 strips of cardstock each 1" x 9" and score every 1/4".  Adhere together and use these as egg holders. 


Place the eggs in their holders inside the basket.

Monday, March 4, 2013

St. Patrick's Day treat set by Katie Tate

Today I'm going to give you a little something to help you with your St Patrick's Day preparations.
I have a multi-fold card and a cute little treat box, just perfect for the celebration!

St Patrick's Day card & treat box
Designer Katie Tate


Supplies:
Patterned paper of your choice
Image - New Years Edwin
Medium - Copic Markers
Scoring Tool - Scor-Pal
Adhesive - Scor-Tape
Ribbon - Hobby Lobby
Flower and Brad
Sentiments - Reminisce
Tags - Acuucut Die


Instructions:
For the card we start with a piece or card stock 6" by 12". Along the 12" side score at 2", 4". 8" and 10" and fold as in the photo.


Decorate the panels as desired


Make a belly band for the card with a piece of card stock 2" by 9". Score along the 9" side at 7/8" and at 5", score and join the ends at the overlap. Decorate as desired.


For the base of the box start with a piece of card stock 7" by 6". Score all sides at 2" and snip each corner as the photo to form a flap to make the box.


Use Scor-Tape on the flaps to form the base of the treat box/bag.


Form the base of the box as in the photo. Burnish the inside corners for a crisp finish.


Add Scor-Tape to the longer (3" sides) of the box to adhere the tags to form the treat bag.


Add candy to the inside of the treat bag.


Here is the completed set.


New Years Edwin looks great as a Leprechaun and I hope I have inspired you to create something for St Patrick's Day.


Friday, March 1, 2013

Spring Centerpiece by Tya Smith


Hello all - I am so happy to be able to share this bright and cheery Spring centerpiece that I made using some beautiful papers from Little Yellow Bicycle Hello Spring Collection and my trusty Scor-Pal! I am hoping that if I put this up, that spring will come that much sooner! :)

Here is how I put this fun project together:

Supplies:
All papers, and stickers - Little Yellow Bicycle Hello Spring Collection
Spring Floral Branch(purchased at Hobby Lobby)
Wood Tall Box (purchased at Hobby Lobby)
Paper Shreds
Monofilament for hanging shapes
1 1/8 oval punch
Decorative edge punch
Twine and various ribbons for decoration and embellishment

This project features 3 different elements that I made with my Scor-Pal. The birdhouse, the butterflies and the kites. I will show you how to make each one:

BIRDHOUSES:
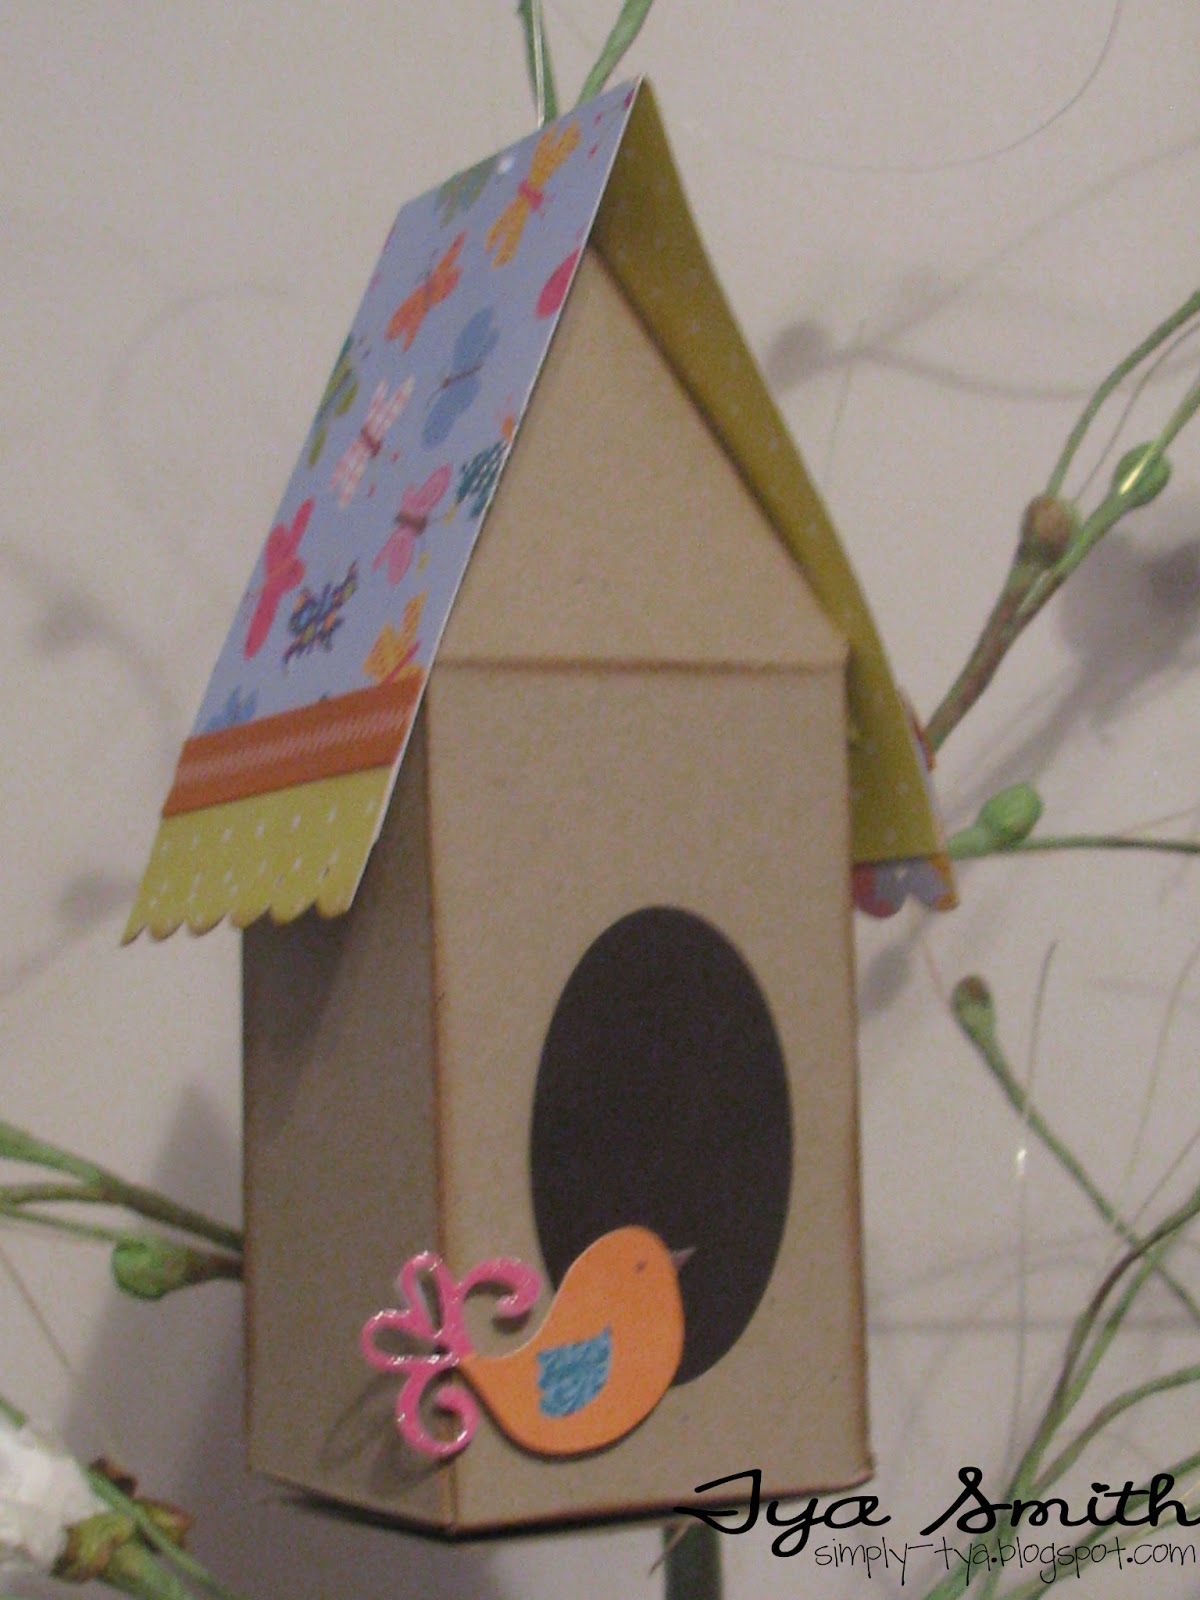
The birdhouses were made following this tutorial that is found on the Scor-Pal Project Site under Advent Houses. I just did not add a cut out door or window and opted for a Brown Cardstock oval cut from an oval punch for the opening. Decorate the roof edges with a decorative edge punch and some ribbon.


BUTTERFLIES:

To make the butterflies you will need to cut 2 rectangles from either cardstock or pattern paper. The rectangles here are 3 x 3 1/2 inches.  After you cut these out, I just rounded the outside corners with my scissors to make the shapes as shown below.


 Next I lined the shapes up and make score marks every 1/4 inch


 Next - glue the 2 shapes together as shown


Add 2 brown cardstock ovals to the front and the back of the accordion folded shapes. I then added a cute butterfly sticker to the front for some added decoration.

KITES:


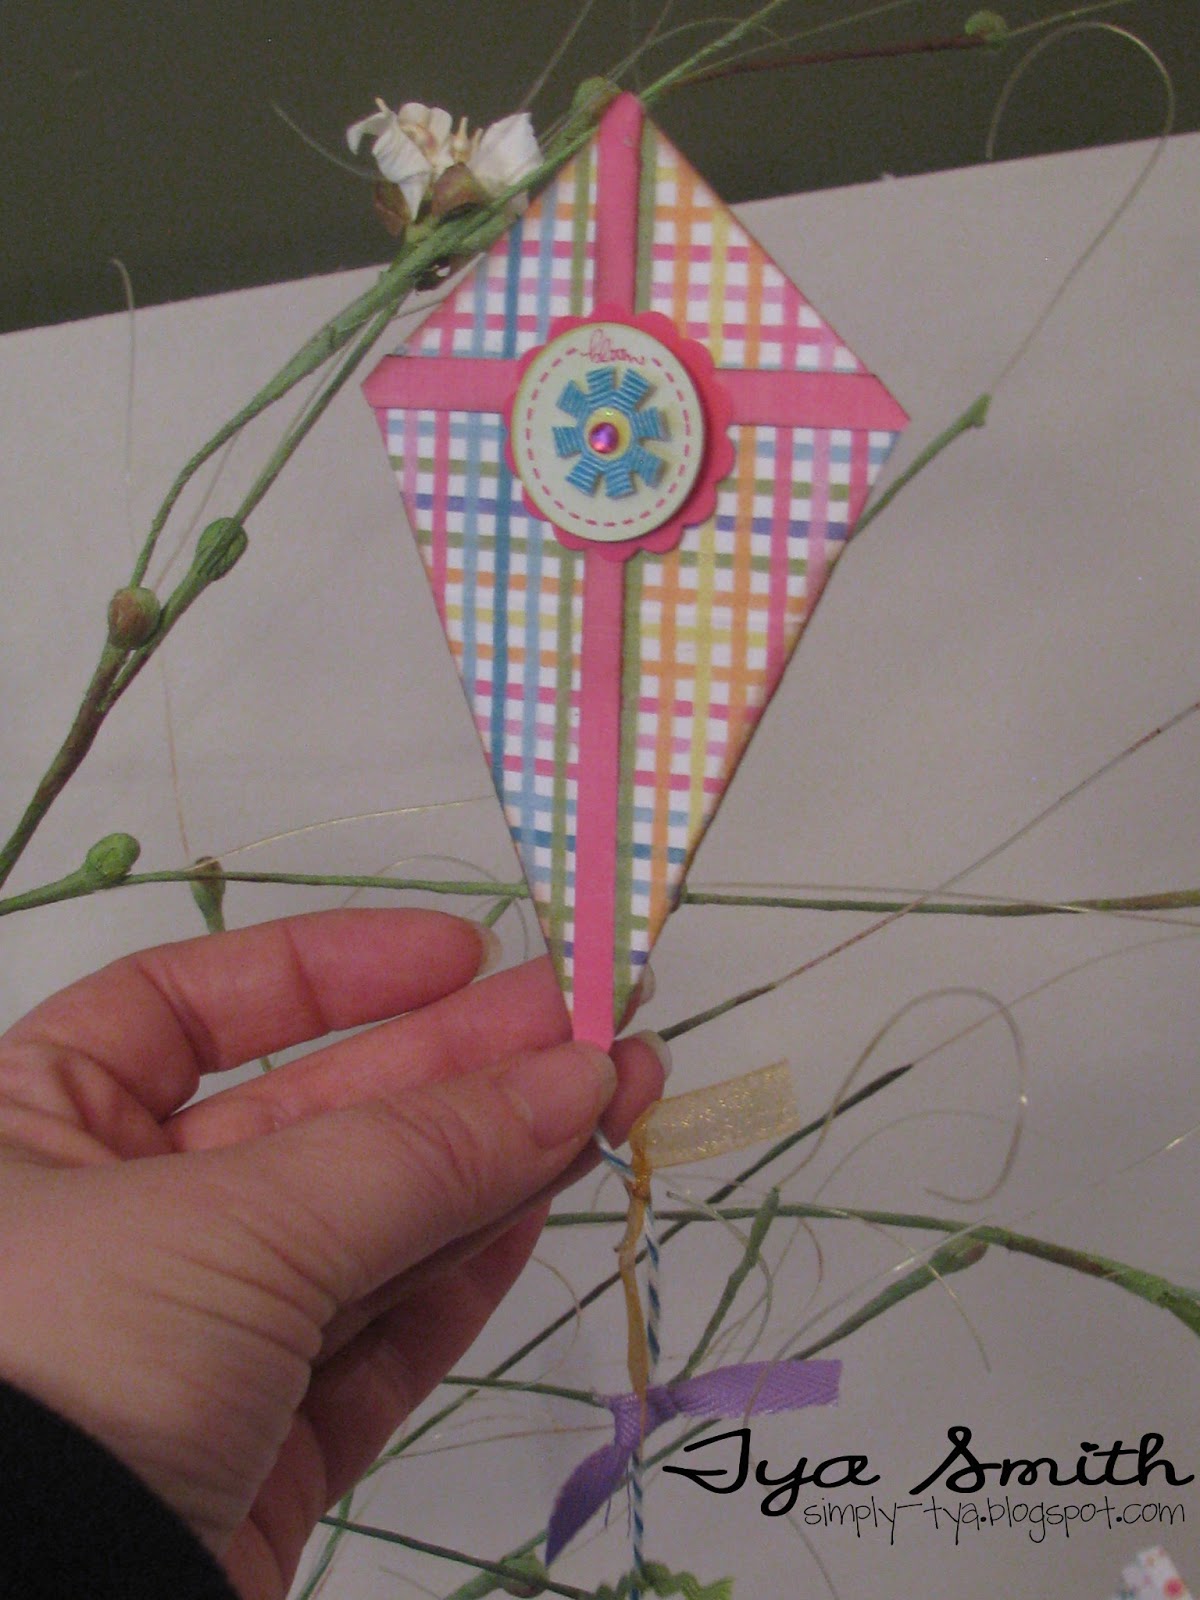
To make the kites I took a 3 1/2 x 3 1/2 inch square and scored it right down the middle going both ways:


Next you will simply fold the 2 outer edges to the center line to make a kite shape like below. Glue these 2 edges down.


Cut some thin strips of coordinating cardstock to the front to make the cross sections of the kite. Attach some baker's twine to the bottom of the kite for the kite's tail and add some tiny ribbon knots onto the baker's twine.


To attach the shapes to the Floral branch, I simply poked a small hole in the top of my shapes and fed the mono-filament twine (similar to fishing line) through the hole, tied a knot and added it to the branch.

I hope you will try these cute and fun techniques out for your own Spring Centerpiece. I love that I can add such fun little details to my home decor projects using my Scor-Pal! I hope you will too!

Happy Scoring!