Showing posts with label Boxes. Show all posts

Friday, April 5, 2013

Bunches of Beautiful Boxes with Gini Williams Cagle

Want a quick and easy way to spruce up a deck of playing cards?  How about a custom box?  The original Lexicon Of Love tutorial, by Leslie Miller , but my updated version uses the latest edition of the Scor-Pal making this cute idea even easier!  The patterned paper from Webster's Pages seemed like the perfect choice, while adding just a slight bit of humor

Supplies:
Cardstock 5 3/4 x 7"
Patterned Paper
 (2). 2 3/8 x 3 3/8
(2) 5/8" x 3 3/8
Ink
Twine

Cut 
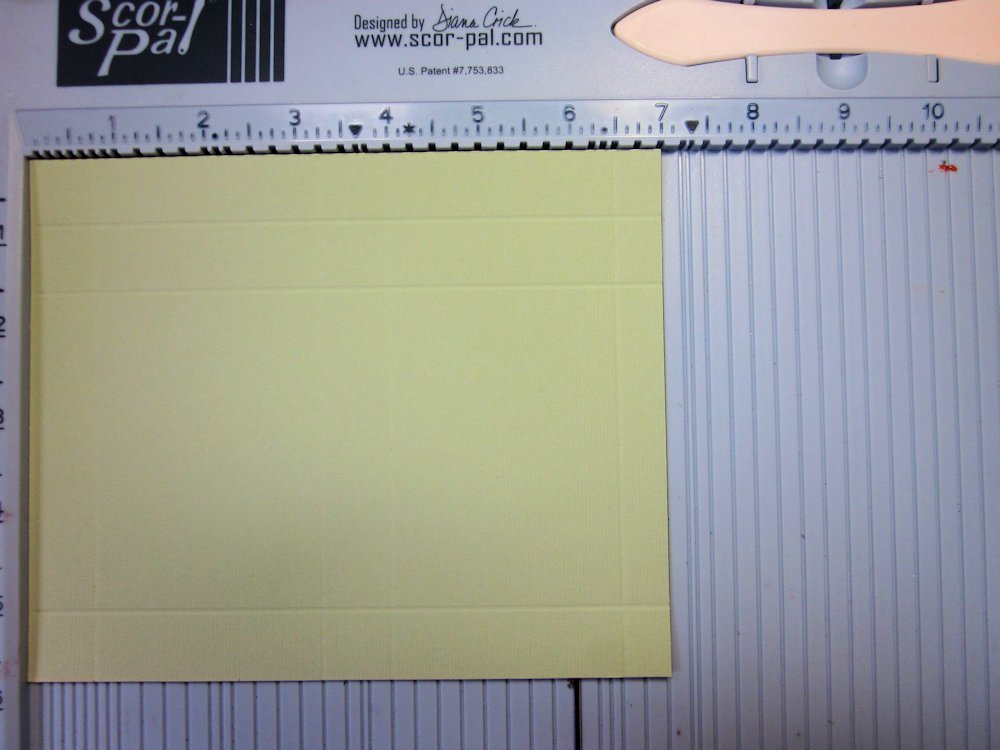
the cardstock to 5 3/4" x 7". Line the 7 inch side along the upper fence, and in the upper left corner.  Score at 3/4", 3 1/4", 4" and 6 1/2".  Turn the paper so the 5 3/4" side is aligned in the upper left corner and score at 3/4", 4 1/4" and 5".


Trim the flaps as shown.


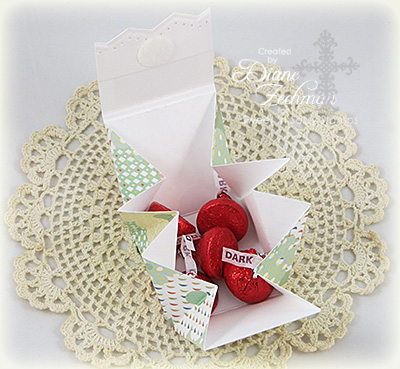
Add the patterned papers as shown, and assemble with the Scor-Tape.
 

 Add some playing cards, and you are all set for some fun!

Wednesday, April 3, 2013

Bunches of Beautiful Boxes wtih Katie Tate

For my "Bunches of Beautiful Boxes" project I decided to go with an easy to replicate design that you can do so much with!
I made 3 simple boxes and then gave them a Spring inspired make over.


Project Recipe:
Scoring Tool - Scor-Pal
Adhesive: Scor-Tape
Paper - Chateau Lavender by DCWV
Border Punch - Martha Stewart
Ribbon - Hobby Lobby
Butterfly - Michaels Floral Dept

The boxes are of simple construction and for my samples I used the following sizes of cardstock:
Largest box 12" square scored at 3" and 9" on all sides, lid 9" square scored at 1 1/2" and 7 1/2" on all sides.
Middle box 10" square scored at 3" and 7" on all sides, lid 7" square scored at 1 1/2" and 5 1/2" on all sides.
Smallest box 6" square scored at 2" and 4" on all sides, lid 4" square scored at 1" and 3" on all sides.


Burnish the fold lines and snip up the corner square as in the photo to form the flap to make the box


Use Scor-Tape on the flaps to ensure a good adhesion.


A little tip, to make a nice crisp corner use your Scor-Tool on the inside corners of the box.


Repeat for all 3 boxes and lids.


Using coordinating paper I punched a band to go around the boxes to hold them together in a stack.


I added a feather Butterfly from a floral pick to the top of the band.


And there you have my completed trio of Spring boxes.


I hope you enjoyed this and will give it go yourself.

Katie

Tuesday, April 2, 2013

Bunches of Beautiful Boxes with Lisa Andrews


Welcome!  Thanks for stopping by today!  Today I have created a Secret Little Box, inspired by THIS box by Norma Lee.  I just love little surprises and secret little hiding places, so I had a create a box that delivered both!  I hope you enjoy my tutorial.

Supplies:

Teresa Collins Designer Paper
bling
Tilda with Eggs by Magnolia
Memory Box Die
Magnolia Doo-Hickey, Hearts and Swirls and Butterfly
Card Stock

Copic Markers:
Skin:  E00, E21, E11, E23
Hair: E41, E42, E43, E57
Clothes:  BG0000, BG10, BG15, BG90

Here are all the pieces you will need for our box.

12" x 6" piece of card stock
(3) 4 7/8" squares of card stock
(2) pieces of 3" x 3" card stock

To create the drawers, using a 4 7/8" square of card stock, score 7/8" on each side.  Construct your drawer.


Next, we are going to create the base for our secret box.  Using the 12" x 6" piece of cardstock, score at 1 1/2", 4 1/2", 7 1/2" and 10 1/2".  Cut out the middle section, 4 1/2" to 7" 1/2" as shown below.


Attach the 3" x 3" pieces of card stock to your box as shown below.  I decorated the panels before attaching them. 
Next attach the drawers into place.  When attaching top drawer, be sure not to attach to the front panel, this is where it will tuck in to secure the box closed. 


Here are a couple more views


Thanks for coming by!  Happy Spring!

Lisa A.

Friday, March 29, 2013

Bunches of Beautiful Boxes with Tya Smith

Hello Scor-Pal Buddies! This month we are sharing with you our favorite "box" type of project. There are soo many wonderful options of boxes that are available to create using the Scor-pal but my favorite type of boxes are ones that hold a little treat. That is why I chose to do a Hanging Treat box. There are many variations of this type of box floating around out there. The boxes can hold anything from fun party supplies to yummy chocolates. I decided to do my box as a flavored water holder that attaches right over the lid of your favorite brand of bottled water. I used Doodlebug Design's new line "Fruit Stand" for my papers and embellishments. Here's how to make it:

Supplies:
3 3/4 x 10  inch cardstock in purple for box base
1 1/2 x 4 inch Stripe paper for box insert
2 x 10 inch Stripe paper for wrap around bottle
1 1/2 x 3 inch green cardstock for box front
1 1/4 x 2 3/4 inch white cardstock for box front ( I embossed mine with an embossing folder)
3/4 x 10 inch green cardstock for rosette on straw
Stickers and embellishments from Doodlebug Design "Fruit Stand" collection
Green straw
Drink Mix and bottled water
1 1/4 inch circle punch to make the hole in the top of the box

Step 1-  On 10 inch side of cardstock score the paper at 3 1/4 , 3 3/4 and 8 inches

Step 2-  On 3 3/4 inch side score the paper at 1/2  and 1 inch.
Rotate the paper around to the other side and score again at 1/2 and 1 inches.
Step 3- Snip away the edges of the paper as shown. Make sure that when you look at your paper that in the middle section you need to be working with the smaller of the 2 middle sections. That needs to be on the top.
Step 4- Add your Scor-Tape to the edges as shown and then fold up the box. Attach the side flaps to the back of the box.


Step 5- Take a 1 1/4 inch circle punch and punch a circle in the upper section of the box as shown.
Step 6- Make a rosette with the green 3/4 x 10 cardstock and attach to the green stripe straw. Embellish front of box as shown. Add drink mix and straw to box. Attach the 2 x 10 inch purple stripe paper wrap around the water bottle.

That's all there is to it! Thanks for joining me and Happy Scoring!


Find me on Facebook/Pinterest/My Blog/Heartland Paper

Thursday, March 28, 2013

Bunches of Beautiful Boxes with Jennie Harper

Hi Scor-Pal fans!  It's Jennie and I wanted to share a project I created for our Bunches of Beautiful Boxes theme. Using a Scor-Pal, I created a Cupcake Box, using Valerie Stangle's tutorial.
Supplies:
 Patterned Paper: Country Boutique Fancy Pants 
Die: Large Circles (Spellbinders)
Adhesive: Scor-Tape

 You will need cardstock or patterned paper in the following sizes:
10 1/2" square
6 1/8" square
4 7/8" square 


Main Box: Start with the 10 1/2 " square piece of patterned paper.  Score at 3 1/4" and 7 1/4", rotate and repeat. 

Cut on 4 score lines to where they intersect (2 on each side). Trim and notch corner panels, as shown, to create flaps.


Adhere flaps to inside of box with Scor-Tape.

Lid: Score 6 1/8" square at 1" on all sides. Cut on 4 score lines to just where the scores intersect - 2 on each side. Trim and notch corner panels, as shown. Cut circle shape with circle die in the center of square.  I added a 4x4" piece of clear card stock to the inside using Scor-Tape.

 Insert: Score 4 7/8" square 1/2" on all sides. Notch corners, as shown.
 Cut main circle shape with a circle die. Insert into main box, flaps down, to nestle cupcake (this will hold the cupcake of muffin in place).
 I added some die cuts from the Fancy Pants Country Boutique line to the box for decor and it is ready to give to a dear friend!


Hope you will try making one of these yourself!!  If you do be sure to leave me a comment as I would love to check it out!!

Monday, March 25, 2013

Bunches of Beautiful Boxes with Diane Zechman

The Scor-Pal team has created Bunches of Beautiful Boxes and today I am sharing my Tiny Easter/Spring Triangle Treat Box. The tutorial for this was done here by Deb Felts and you can also find it here on the Splitcoast site. I've altered the design slightly so I included my own template below. Instead of cardstock, I used patterned paper to create the box and then punched a decorative zigzag edge on the flap. It is held shut with sticky-back velcro.  


The finished box has a 2" base and is almost 2" high...a very sweet little size! It holds a few Hershey kisses or any other small treat or gift. I didn't have the chocolates in pretty spring colors, so I'll switch out the red foil wrapped candies when I'm ready to give it away. ;) Here it is open... 

 
It is quite easy to make with a few scored lines using the Scor-Pal. I didn't want the bulkiness of all the folds on the inside of my box, so I also cut each corner off before attaching the cover. Here's my template showing where to cut/score. I followed Deb's instructions for this box, starting with a 6" square and scoring at 2" and 4" in each direction. Then I added the additional score lines and attached the 2x4 cover, scored in half. After scoring the cover in half, I added an additional score line 1/8" from the first to allow for bulk at the top of the box. I also made 2 more boxes which are a little larger. For one I started with a 7 1/2" square and scored it at 2 1/2" and 5". The cover is 2 1/2 x 5, scored in half. For the other, I started with a 12" square and scored at 4" and 8". The cover is 4 x 8, scored in half. I also scored an additional line 1/8" from the first on each of those covers. These boxes are a quick and easy project...I hope you try it!

Thursday, March 21, 2013

Bunches of Beautiful Boxes with Steph Ackerman

Good morning, Steph  here with a really fun way to spruce up those little tissue boxes that are all over the house.  The original tutorial can be found on Diane Zechman's blog - here.


To create the box, cut 2 pieces of  cardstock 5 1/8" x 9 1/2".
With the long sides at the top of the Scor-pal, score each piece at 1/2" and 5".


To create the top, cut another piece of cardstock  6 1/2"  x 6 1/2".
Score at 1" around all 4 sides.


Cut in on each side to the score line.


Add Scor-tape to the 1/2" sides of the box pieces and assemble the pieces together.
Add Scor-tape to the cut tabs on the box top and assemble to form the top.


Cut yellow pattern paper 4 1/4" x 4 1/4" - this will fit the box top.
Tape a Spellbinders circle die in the center of the pattern paper and run through your die cut machine.


Die cut a scalloped circle from coordinating pattern paper to achieve a nice finished edge.


Adhere the scalloped piece to the top.
Add Scor-tape around the box top and adhere the pattern paper on top.


Cut 4 pieces of pattern paper 4 1/4" x 1 1/2".
Punch the long edges of each piece.
Ink each piece with brown ink and adhere along the edges of the box top.

Cut 4 pieces of striped pattern paper 5" x 4 1/4".
Adhere each to the sides of the box.
Ink the edges of the box with brown ink.


Thanks for stopping by today.

Supplies:
Score tool: Scor-pal
Adhesive: Scor-tape
Cardstock: Stampin Up
Pattern Paper: Little Yellow Bicycle
Die cuts: Spellbinders
Ink: Clearsnap
Punch: EKSuccess