Showing posts with label Rosettes. Show all posts

Monday, October 21, 2013

Scor-Pal and Graphic 45 Week with Virginia Nebel

Today marks the start of a very special week of projects you featuring the fabulous Scor-Pal products and the gorgeous papers of Graphic 45!

We will have projects here and over at the Graphic 45 blog


We have 2 Scor-Buddies up for prizes and there are giveaways at the Graphic 45 blog too. There are plenty of ways to win, each day will be a little different but will involve a little commenting from you, our wonderful viewers.

Today I'd like to you leave some love here for our designer Virginia Nebel and make sure you are a follower on our blog to be eligible to go into the drawer.

Graphic 45's Bird Song collection is made up of beautiful Asian inspired motifs.  I created a 12 x 12 page by layering a few patterns and fussy cutting out some tags and lanterns.  I used the Scor-pal tool to create the half rosette by scoring a 10 x 1.5 inch strip in .025 inch intervals.

This layout celebrates a very special memory when we were in China and my daughter was  presented with a gift from China's Cultural Affairs Minister.  A booklet of finely silk stitched Asian symbols of the Chinese Zodiac.


Supplies: Graphic 45 Bird Song collection, Scor-pal tool, American Crafts cardstock.


Remember to leave a comment and be sure to pop back later for another project and another chance to win (1 entry per comment (max 1 per post)

Katie

Tuesday, June 25, 2013

Scor-Pal and Heartfelt Creations with Katie Tate

Today is my turn to share my project for the week of projects on the Scor-Pal and Heartfelt Creations blogs.
Now we all given birthday cards and often flowers too so I decided to use both of those ideas and make a pot of Birthday Flowers!
It is just as great as a card and the flowers are everlasting!


Project Recipe:
Scoring Tool - Scor-Pal
Adhesive - Scor-Tape
Patterned Papers - SEI
Lace - Hobby Lobby
Leaf, Flowerpot and Tag Die and Leaf and Sentiment Stamp - Stamps and Dies by Heartfelt Creations
Buttons - Unknown
Paint - Apple Barrel
Dowel - Walmart
Embossing Enamel - Aged Green by Stampendous


Here you can see the base items to create the flower pot. The leaves were stamped first and then cut with the matching die.

The flower pot is created from 4 die cuts of the pot, 4 strips of cardstock measuring 3 3/4" by 1" scored at 1/2" along the short side. The base of the pot is a square measuring 3 5/8" scored at 1/2" on all sides and the corners snipped as in the photo to create the base.

Add Scor-Tape to the edge to ensure a good adhesion.

Attach the 4 pots together in a row.

Make the base of the pot and add one edge to the bottom of one of the pots as in the photo.

Continue connecting the base to the pots using the bone folder on the inside edges to create crisp and firm corners.

The completed pot should look like this.

Cut flower foam to fit the inside for you to add your flower stems.

For an extra I added embossing enamel to the leaves but this is optional.

To decorate the pot create rosette flowers from strips of punched papers measuring 12" by 1" and 12" by 1 1/2 scored at the scalloped of the punched design. Paint the doweling to make the stems. Cut the doweling into various lengths and attach rosettes with hot glue. Add buttons to the centers of the flowers and add the die cut leaves to the stems.

I finished the decoration with a sentiment stamped onto the two die cut tags.


The recipient will get to enjoy them a lot longer than a regular bunch of flowers.
Katie

Wednesday, December 19, 2012

Scor-Pal & Fancy Pants Designs Week - Day 3


Today we are continuing a week long feature with our friends at Fancy Pants Designs

Our designers will be bringing you some fun and exciting projects using not only Scor-pal products, but also, a mix of papers and from Fancy Pants Designs. Of course, that's not all. The Fancy Pants Designs team is playing with Scor-pal products this week on the Fancy Pants Blog.

As always, there a prizes to be won!!
Be sure to visit both the Scor-pal blog and Fancy Pants Blog each day this week to see more project ideas and to enter for chances to win some great prizes. To be entered into the random drawing for a Scor-buddy prize simply leave a comment here on the Scor-pal blog each day for a chance to win.


There will be other ways to earn extra chances to win as well, so be watching for those announcements each day.

Today's bonus entry is for those readers who use Pinterest! Earn an extra entry by becoming a follower of the Scor-pal project board on Pinterest where you will find all sorts of great projects. (and a few contests to be announced as well!) Simply follow the board and come back here and let us know you did.

Deadline for entering is 8am Central, Monday, December 24, 2012.


Our first project this week comes from Scor-pal Designer Jennie Harper

I am excited that Scor-Pal and Fancy Pants Designs are teaming up to bring this fun Blog Week! Today I wanted to share a Bread Box I made using Mary Jo Beth Williams' tutorial found here.

Supplies:
Card Stock: Gina K. Designs
Sentiment: SRM Stickers
Die: Spellbinders
Bling: Want2Scrap
Twine: The Twinery
Adhesive: Scor-Tape and Foam Dots


Place your 8 1/2" x 11" piece of card stock at the 3/4" mark on a Scor-Pal and score at 3 1/2". Turn and repeat on all 4 sides. Then align card stock to the left side of the Scor-pal and score at 1/2" on all 4 sides.


Cut the corner tabs that measure 1/2" x 2 3/4 and fold along score lines. Trim along score lines (on the sides) to the center rectangle base of the box.


Add patterned paper to outside of the box.


Using Scor-Tape attach the sides and form a box, folding flaps down.


Then simply create a band and decorate:

These would be perfect for a neighbor, co-worker, or a friend. Thanks for checking out my project and hope you will give it a try!!! 


Hey everyone...today I have a really fun & festive project to share with all of you using the gorgeous Home For Christmas collection from Fancy Pants and my ever handy Scor-pal.

When I saw the Home For Christmas collection I knew right away I wanted to make something to decorate my home for the holidays. I created a holiday banner from some paper cones I made using my Scor-pal. 


Products used:
Fancy Pants Home For Christmas collection
Vintage lace/muslin
Glitter letters
Distress Ink-Frayed Burlap
Bling


After selecting the papers I wanted to use for my banner, I cut the 5 pieces of card stock to 8 1/2 x 8 1/2.


Next I placed the paper on the diagonal on my Scor-pal and made a score mark down the center...


Fold along your score line then flatten out your paper....


The next step is to create your fold down flap. Measure 4" from the both sides of one corner and make a light pencil mark. 


Place your paper back on your Scor-pal and score along the line you just lightly drew. 


Next you're going to score from the top right edge of your flap to the bottom point of your paper. My pen indicates the bottom point and the scor-tool indicates the top right edge...


This next photo shows the score marks a little better since it's a solid piece of paper...


You'll repeat this same step for the other side of your paper. Fold on all of your score lines and your paper cone will look like this...


Use some Scor-tape on the inside edge of your paper. I inked all of my edges before I assembled the paper cones, it's much easier when the paper is flat. 


Now you have your first cone completed and you can easily assemble the rest.


I added some vintage lace to the underside of my flap for an added vintage/shabby touch using some more Scor-tape...


Next I made some rosettes by cutting some of the patterned paper into 1 1/2" strips. I placed it on my Scor-pal and scored at every 1/2" mark...


To create rosettes just fan fold on your score marks...adhere them together and place the rosette on a piece of circular card stock or chipboard that's been covered in adhesive...I used Scor-tape of course : )


Now you've completed all of the components for your banner project and the fun begins...decorating and embellishing the banner. This is always my favorite part as you can just let the creativity flow.


This is the first thing you see when you walk into my foyer and I just love how the banner frames my family photo...

Thanks for checking out my holiday themed banner project. I hope I've inspired you to pick up some of the Home For Christmas paper collection from Fancy Pants, break out your Scor-pal and get started on your own home holiday decor. 

Saturday, December 15, 2012

Scor-Pal & Core'dinations Week - Day 6

Today we are wrapping up our week long feature with our friends at Core'dinations.

Our designers will be bringing you some fun and exciting projects using not only Scor-pal products, but also, a mix of papers from Core'dinations. Of course, that's not all. The Core'dinations team is playing with Scor-pal products this week on the Core'dinations blog.


As always, there a prizes to be won!!
Be sure to visit both the Scor-pal blog and Core'dinations blog each day this week to see more project ideas and to enter for chances to win some great prizes. To be entered into the random drawing for a Scor-buddy prize simply leave a comment here on the Scor-pal blog each day for a chance to win.


There will be other ways to earn extra chances to win as well, so be watching for those announcements each day.


Today's bonus entry comes by telling us something you have learned this week. Just leave a second comment on this post for the bonus entry.

Deadline for entering is 8am Central, Monday, December 17, 2012.


Today's project by Scor-pal Designer Steph Ackerman:

Good morning, Steph here and we had the pleasure of working with Core-dinations cardstock this month.  I love the rich colors of this cardstock and the many ways you can use it.

I chose to create a combination card/envelope.


The Kraft-Core cardstock is a combination of rich colors on one side and kraft on the other. I used a sheet of the red Kraft-Core for the base of my card, cutting 2 pieces 5 1/2" x 11".  I then scored each piece at the 5 1/2" center point.


Lining up the center of each piece, I cut them on a diagonal to create the flaps.


Adhere the 2 pieces together on the square panel so that a card is formed.


Using the diagonal cuts, flip them over to use the Kraft side. Trim them to fit the flaps and then emboss with an embossing folder.   Since I was going with a winter woodland scene, I chose to emboss with a wood embossing folder.  Lightly ink the edges before adhering to the card.


Add a strip of red cardstock across the center of the card.  Print a digital image from Cornish Heritage Farms and color with Copic Markers. Using Spellbinders circle dies, die cut and lightly ink the image with Ranger Antique Linen Distress Ink.   Cut a larger Spellbinders circle using the green cardstock from the Graphic 45 collection.


Cut a panel of green to fit inside the envelope and adhere a punched tab to the right corner.  Using the Scor-pal, score 3 lines each 1/4" apart along the bottom edge of the card to create a decorative finish.


I stamped a sentiment which was then die cut with Spellbinders circle dies in 2 sizes. After inking the edges, I placed it on the panel slightly above the final score line.  I did not want it to show above the stamped image on the front.


And the finished envelope and card.


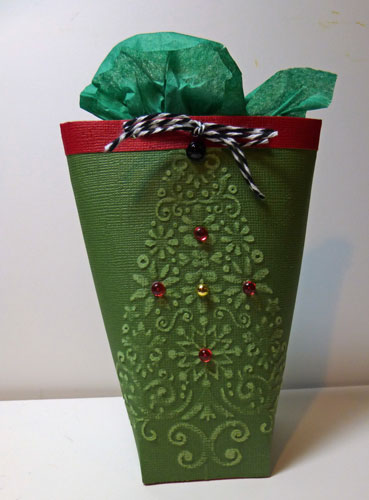
My next project is a small gift package using papers from the Graphic 45 collection.  This cute package could be used for all kinds of small gifts for the holidays.

Cut red cardstock 4" x 4" and score around every 1". Cut in on 4 sides and fold to create the bottom of the package.  Then add Scor-Tape around the entire piece as this will hold the package together.


Cut green cardstock 5 1/2" x 9" and mark the center of the bottom.  Using a Sizzix Embossing Folder, emboss the tree onto the cardstock (being sure to emboss at the center point), then sand to remove some of the color.


Gently fold this piece around the box.   At the back, where the paper overlaps, add some additional Scor-Tape and gently adhere the pieces together.


Cut a 1" x 9" strip of red cardstock and score in half. Once folded, add Scor-Tape to both sides and gently fold around the top of the box to finish off the top edge.


Punch 2 holes in the top and add twine to tie it shut.


Decorate the tree with assortment embellishments.  I used  Dew Drops from the Robin's Nest to decorate my tree.

Thanks for stopping by today.


Our final project comes from Lisa Andrews


Lisa A. here, today I made a simply and easy gift card holder and vintage looking snowman gift tags for your last minute gifts. These would be great for teacher gifts, secret santa gifts or for anyone on your gift lists! I also made a quick card.


Supplies:
Core'dinations Vintage card stock
white and sparkly red card stock
Scor-Tape
Scor-Pal
Hot Glue
black jewels
various punches and embossing folders


Let's start with the gift card holder. I saw this idea for a gift card holder at a scrapbook store here in town and went home to make one of my own right away!


Start with a piece of 5 1/2" x 6 3/4" Core'dinations vintage red, score at 1 1/2" on each side.


Assemble box with Scor-Tape


For the top start with a white piece of card stock 5 3/4" x 4 1/2", punch around the edges, you really don't need to be perfect with this since you will fold the sides in to create the top of the box. Score at 1" on all sides. Using a punch, punch a snowflake on the left bottom of the lid. Assemble the top using Scor-Tape.


Cut a piece of sparkly card stock 2 1/2" x 3 3/4" and adhere to the underside of the snowflake.


Next, we are going to make the snowman rosette. Using a 1 1/2" x 12" piece of vintage Core-dinations card stock, score every 1/2", turn the card stock over and score again starting at 1/4" and every 1/2" from there. Fold the card stock into an accordion  using the indented score mark as your mountains and raised up score mark as your valley. Attach the end of the card stock together with Scor-Tape. 


Using a 1 3/4" punch, punch a circle and hot glue it to the back of the rosette.


For the snowman's hat, use a 1 3/4" x 6" piece of vintage black Core'dinations card stock and score every 1/2", turn the card stock over and score again starting at 1/4" and every 1/2" from there. Fold the card stock into an accordian, using the indented score mark as your mountains and raised up score mark as your valley. 


Gather the bottom of the card stock together and hot glue to the snowman's head.


Using a piece of vintage black Core'dinations card stock, cut a piece 3/4" wide for the brim of the hat. Don't forget to sand all of the edges with sandpaper to give it that vintage look. Cut a carrot nose out of vintage orange Core'dinations card stock and adhere it to your snowman. Add black jewels for eyes. Repeat three times for three tags. Don't forget to stamp a message on the back!


Now we are going to make a little gift box for your gift tags. Starting with an 8 1/2" x 6 1/2" piece of vintage green Core'dinations card stock, score 2 1/2" on all sides. Cut 1 3/4" from the corners as shown below.


Punch a snowflake on the front of the box.


Sand your edges and adhere box together with Scor-Tape.


Thanks for joining us this week. I hope you've gotten a lot of inspiration to make to homemade this year!