Showing posts with label Graphic 45. Show all posts

Friday, October 25, 2013

Scor-Pal and Graphic 45 week with Katie Tate

Today marks Katie's project in the very special week of projects featuring the fabulous Scor-Pal products and the gorgeous papers of Graphic 45!

There have been projects at Scor-Pal and at the Graphic 45 blog


For your extra entries into the draw today comment on this post, follow our blog and like our Facebook page. If you have been following all week you should be all set!
Be sure to check our Facebook Fan Page as there will be another way to win there too!


I decided to use both The Secret Garden and A Place in Time papers to create a cute exploding box with a surprise inside!


Project Recipe:
Scoring Tool - Scor-Pal
Adhesive - Scor-Tape
Papers - The Secret Garden and Place in Time both by Graphic 45
Border Punch - Martha Stewart Garden Lattice
Flower Die - My Favorite Things
Flower - Recollections
Lace - Hobby Lobby
Ribbon - Really Reasonable Ribbon

Start with a 12" square of cardstock, score at 4" and 8" and rotate and repeat.
Cut away the corners as in the photo.


For the lid use a piece of patterned paper 7 1/8" square, score at 1 1/2" on all sides. Snip as in the photo to form the flaps for the corners and add Scor-Tape to adhere.


Use your score-tool on the inside edges to make crisp corners on the lid.


Decorate as desired. I use cotton lace and ribbon on the edge and a flower centerpiece on the top of the lid.


I used accents from the paper pad on the inside.


From the Place in Time pad I used the calendar sheet to create a mini calendar as a surprise.


I hope I have inspired you to get creating with Scor-Pal and Graphic 45 and I hope you have enjoyed this week of projects.

Katie

Scor-Pal and Graphic 45 Week with Jennie Harper

There have been projects at Scor-Pal and at the Graphic 45 blog and we another wonderful one today!


For your extra entries into the draw today comment on this post, follow our blog and like our Facebook page. If you have been following all week you should be all set!


Hi Scor-Pal fans!  It's Jennie and I wanted to share a project I created for our Graphic 45 ~ Scor-Pal Blog Week. Using a Scor-Pal and come beautiful Graphic 45 patterned paper, I created an easy desk calendar.
Supplies:
Patterned Paper: Graphic 45 French Country
Cardstock: Gina K. Designs
Stamps: Rejoice from The Craft's Meow

Pearls: Want2Scrap
Stickers: SRM Stickers
Adhesive: Scor-Tape
Scissors

Score a 4" x 12" piece of card stock at 4" and 8".
Fold each end in towards the center of the card. It should easily stand on one end with the center section at the "back" of the card, and the other end flap folded down to make the front of the card. To help it stand up easily, embellish the bottom flap. This will keep it from collapsing while on display.


This is very easy to do and I am thinking of making some of of these for Christmas gifts this year.
Thanks so much for stopping by and I hope you have a wonderful day! 
Blessings, 

Thursday, October 24, 2013

Scor-Pal and Graphic 45 Week with Tya Smith

Here we are with the sixth project of our very special week of projects you featuring the fabulous Scor-Pal products and the gorgeous papers of Graphic 45!

We will have projects here and over at the Graphic 45 blog


For today's entry I want you to comment on this post and for an extra entry "like" the post I make on the Facebook group about this project.
Also for another entry go and like Graphic 45 on Facebook and post that we sent you there on their post!
Lots of ways to get extra chances today.


Hi there! Tya here with a fun project that shows off how amazing a pairing up of Graphic 45 and my handy Scor-pal can be! I loved the beautiful, rich papers that we were given to work with, so thanks Graphic 45! I was inspired by this project from songofmyheartstampers, but I used some fortune cookies instead of the coffee cups to go along with the theme of the papers. This would be a great gift to show that special friend, spouse or teacher just how "fortunate" you are to have them in your life :)
Here's my project:
Fortune Cookie Box

Supplies:
Cardstock (2) 2x 5 1/4 inches
ribbon
cellophane
buttons
black ink
fortune cookies
Step 1- take a 8 1/4 x 8 1/4 square of pattern paper. Score on one side at 2 and 6 1/4.

 Step 2- Rotate paper and score again at 2 and 6 1/4.
 Step 3- Snip the edges as shown.
 Step 4 - Take the 2 x 5 1/4 inch cardstock and score each piece at 1/2 inch and 4 3/4 inches
Step 5- Make a mark at the 2 5/8 inch mark. 
 Find a groove and score a line about half way down.
 Trim the 2 score lines you just made about half way down.
 Fold on the scored lines and line up the half way snipped up lines and fit them together as shown.
 Step 6- Add adhesive to the sides of the box.
Adhere sides together to form the box.
 Step 7- Add adhesive to the flaps on the box as shown.
 Glue this divided section to the inside of the box as shown.
 Step 8 - Add fortune cookies.
 Step 9 - Make the tag by using a cut out from the pattern papers. Add cellophane to the outside of the box. Punch a hole and add the ribbon to the tag. tie the tag to the cellophane. Add buttons and ink the edges of the tag with black ink if desired.
Thanks for joining me and thank you to Graphic 45! Happy Scoring!


Find me on Facebook/Pinterest/My Blog/Heartland Paper

Wednesday, October 23, 2013

Scor-Pal and Graphic 45 Week with Diane Zechman

Here we are with the fourth project of our very special week of projects you featuring the fabulous Scor-Pal products and the gorgeous papers of Graphic 45!

We will have projects here and over at the Graphic 45 blog


For today's entry I want you to comment on this post and also make sure you "Like" us on our Facebook Fan Page

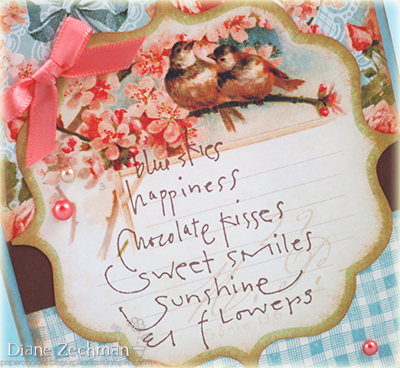
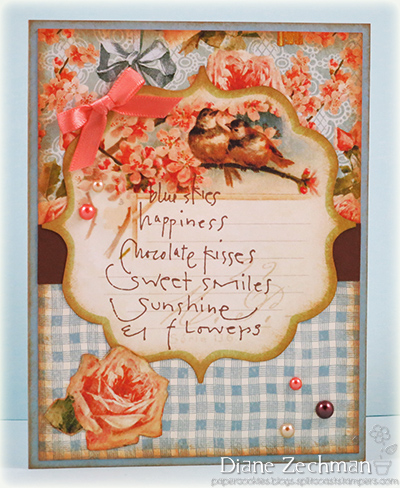
Hello! This week the Scor-Pal DT is teaming up with the Graphic 45 team and I have a fun pop up card to share today. As far as I know, this card was originally done in metric here and then re-done as a 6x6 card here. Gini also made a beautiful card with slightly different measurements here. Since I mostly make my cards A2 size, I changed the measurements once again to suit my needs
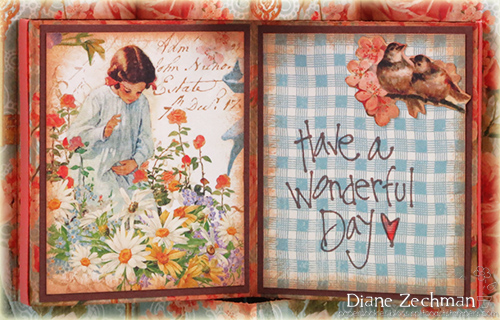
 (template below). Here's the front of my card with the beautiful Graphic 45 Secret Garden papers. I stamped a sentiment onto the piece with the framed birds and cut it out for the main image. When the card is opened, the inside layer has panels that pop up. Here's a close up of the section that looks like a book...
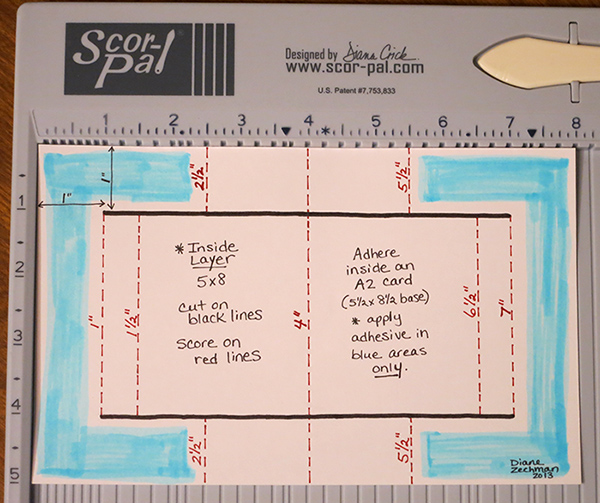
The girl and birds were also cut from the G45 papers. Then I stamped a sentiment and added ribbons with Scor-Tape to the sides. Here is a template I've drawn with measurements to make this card in the A2 size. You will start with an A2 size card base (5 1/2" x 8 1/2", scored at 4 1/4 and folded in half) and set it aside. This template is for the inside layer. Click on the template for a larger pic.
 Start with a 5 x 8 piece of heavy patterned paper or cardstock. Following the diagram, cut two horizontal slits as shown by the black lines. Measure 1" in from both sides of each corner and make a mark. Then make a 6" cut from the 1" mark to the 7" mark. Next you will follow the diagram and use your Scor-Pal to score where indicated by the red dotted lines. The center 4" line is scored all the way through. The top and bottom are scored at 2 1/2" and 5 1/2". The middle is scored at 1", 1 1/2", 6 1/2", and 7". Fold on the scored lines to create the pop ups. The top and bottom sections are Valley/Mountain/Valley folded. The middle section is Valley/Mountain/Valley/Mountain/Valley. Here's a picture again.
Now attach this layer to the inside of your A2 card base. Be sure to only apply adhesive where indicated in blue on the diagram! Otherwise, your pop ups won't pop. ;) Scor-Tape works great!
stamps- Printworks- Blue Skies & Wonderful Day; paper- Graphic 45 Secret Garden, SU! Baja Breeze, brown; ink- Distress Tea Dye, Memento Rich Cocoa; accessories- Scor-Pal, Scor-Tape, adhesive pearls, Paper Shapers Fancy Photo Corner punch, ribbon, Copics.

Tuesday, October 22, 2013

Scor-Pal and Graphic 45 Week with Steph Ackerman

For your entry today I need you to comment and also to follow our Pinterest board if you don't already!
You can find all the wonderful Scor-Pal projects at Pinterest


Good morning everyone, Steph  here today.  This week Scor-pal  and Graphic 45 are working together to create some wonderful projects for you.

I received the awesome Graphic 45 Secret Garden Collection and knew I wanted to create a box.  This paper collection is gorgeous with it's assorted colors and designs and I knew it would be perfect for the mini box I had in mind.  Then I also created some mini cards to fit inside
.


To create the box:
Using Spellbinders Grand Calibre Label Dies, die cut two pieces of green cardstock.
Cut 2 strips of green cardstock 3" x 12".


Adhere the 2 strips together to create one continuous strip and then cut it down to 17 1/2".
Score horizontally as follows:
1/2", 4 3/4", 9".
Rotate the strip and score at 4 1/4".


Rotate the strip vertically and score  at 1/4", turning the strip to finish scoring.
Add Scor-tape to the length of the strip.
Snip through the tape to the vertically scored lines (these will create the shape of the box).
Adhere the ends together to create the box sides.
Center over one of the die cut labels and adhere to create the box.


For the exterior:
Cut pink cardstock 2 1/2" x 4".
Cut pink pattern paper 2 3/8 x 3 3/4".
Cut brown cardstock 2" x 3 1/2".
Cut blue pattern paper 1 3/4" x 3 1/4".
Ink all edges with Clearsnap's Chox Ink in Sparrow before assembling.


To create the "hinge", cut green cardstock 3" x 3" and score in half. 
Add Scor-tape to one half and adhere inside the box.
Add Scor tape to the top half.


Center the second green die cut on top of the "hinge" and adhere.
Using several different sized dies, cut white cardstock and pattern paper to finish the box top, inside and out.


Adhere a Graphic 45 keyhole to the center of the front using ScraPerfect's The Best Glue Ever.
Add Want2Scrap bling around the key hole letting it flow around the sides.


Finish off the inside -
Cut pink cardstock 2 1/2" x 4".
Cut pink pattern paper 2 3/8 x 3 3/4".
Cut white cardstock 4" x 4" for the bottom.
Ink all edges with Clearsnap's Chox Ink in Sparrow before assembling.


Now let's create some cards to go inside the box.


Use left over scraps to create assorted cards.
Cut cardstock 8" x 4" and score at 4" to create 4" x 4" cards.
Add strips of cardstock across the center of each.
Cut apart elements of the pattern paper and ink edges with Clearsnap's Chox Ink in Sparrow.
Stamp assorted sentiments on each using ColorBox Wicked Black Archival Dye Ink.
Adhere to card fronts.


The cards are a perfect fit.  


Wouldn't this make a great birthday gift set or perhaps a Mother's Day gift set?

Thanks for stopping by today.

Steph