Showing posts with label Pinspired. Show all posts

Tuesday, December 15, 2020

Pinspired- Inspiration from our Pinterest Board with Dawn


Hi, everyone! At the beginning of the month, I showed my Christmas Slimline Box card, for the Scor-Pal More Than One Score Challenge - Any Winter Holiday. I'm back today with the detailed instructions.


To make the box, you will need:
one sheet of 8 1/2" x 11" cardstock

Decorations and embellishments that you wish to use.


I drew a template to show where you cut(solid lines) and score(dotted lines) your piece of cardstock. Sections marked with an X are cut off and not used.


To start, cut two 3/4" wide strips from the short end of your cardstock. Trim 1/4" off one end, and score at 5/8" from each end of each piece. Crease along the score lines and add Scor-Tape to the end flaps.

You now have an 8 1/2" x 9 1/2" piece. With the 9 1/2" side at the top of your Scor-Pal, score at 7" and 9". Rotate the piece a quarter turn to the right, score at 6", and score at 2" from the 7" score line to the bottom (9 1/2"). You can also score at 4" and 8" if you are going to cut with scissors. I used a paper cutter, so I could measure with that.

Cut at the 4" and 8" marks. This will leave you with two pieces. The one with the score line all the way through will be the front piece, and the other one will be the back. That's the reason we didn't score that part - it doesn't get folded down. On each of the pieces, cut off the top right rectangle, and cut down the 7" score line to the score line in the middle.

Crease all the score lines and add Scor-Tape to the two tabs on the right. Your pieces should look like this.


Attach the tab of one of the large pieces to the side of the other large piece. 


Fold the right hand piece over and attach to make the box. 


Attach the strips to the inside, butting the flaps against the back edge for one, and the front edge for the other. This gives fairly even spacing.


Now comes the fun part - decorating your box! I used my Kadomaru Corner Rounder to round the corners of the flaps. There are a few to choose from on the Scor-Pal site.

The patterned paper is from the DCWV Holiday Collection - The Christmas Stack.
I used the following pieces: 
Light patterned paper: two 1 7/8" squares
                                    one 1 7/8" x 6 7/8"
                                    one 3 7/8" x 6 7/8"
Green patterned paper: two 1 7/8" squares
                                      one 1 7/8" x 6 7/8"

I rounded the corners on the flaps, to match the base. The Stacker helped me add the Scor-Tape to all the patterned paper pieces. It's like having an extra hand!

The figures were cut with my Silhouette Cameo machine. I can't find where I got the file, but there are a few that are similar in the Silhouette Design store. I added all the figures, rearranging them until I was happy with the placement. Then I attached them with Scor-Tape. I added some Clear Wink of Stella to the star to add a bit of sparkle.

The box folds down to fit in a standard business envelope.


We would love to see your creations. You still have 2 weeks to enter, and all you have to do is have more than one score, and tell us where you used your Scor-Pal on your project. You could win a $25 gift certificate to the Scor-Pal store!


Wednesday, November 25, 2020

Pinspired - Inspiration from our Pinterest Board with Isia

Hello crafty friends! It's Isia here with another Pinspired post for the Scor-Pal blog. I found this pin - box for sweets on the Scor-Pal Pinterest Board. It was originally created by Toni Storie two years ago.

Supplies:
One 12"x12" piece of cardstock
One 12"x12" piece of pattern paper
Tissue paper
Scor-Pal scoring board
Scor-Tape
Paper Cutter (exacto knife and ruler or scissors)
Ribbon
Some embellishments
Score your cardstock at 10 cm. Turn your cardstock and score again at 10 cm. Repeat another two times on each side of cardstock.
Use your exacto knife or scissors to cut out all four squares (wings of this box) away as shown.
Prefold all scores and adhere pattern paper using Scor-Tape to the side tabs. Adhere some ribbon leaving some space between wings of this box. It should stay loose.
Decorate the front of the box with flowers or tag.
Insert tissue paper inside this box and fill with sweets.
Your box is done.

Friday, September 25, 2020

Pinspired- Inspiration from our Pinterest Board by Dawn

This project was inspired by a project on the Scor-Pal Pinterest board by Gini Cagle. It's a cute box that opens up to reveal 3 trays.


This box was my inspiration:


To make this box, you will need:

One 6" x 9" piece of cardstock (I used Accent Opaque Digital Cover Smooth 120 lb. White cardstock)
One 6" x 11" piece of cardstock (I used White, as above)
Three 4 5/8" squares of cardstock for the trays (I used White, as above)

You can then cover and decorate your box as you like. These are the pieces you need to make one like mine:

Five 3" squares of cardstock (I used Green Bazzill Basics Paper cardstock)
Six 3/4" x 3" pieces of cardstock for the edges of the trays (I used Green cardstock, as above)
Three 2 7/8" squares of complementary coloured cardstock (I used some pale yellow cardstock)
Three 2 3/4" squares of patterned paper (I used Crate Paper Oh Darling paper)


Embellishments for the three decorated sides (I used the dragonfly from the Gina K. Designs Follow Your Dreams stamp set by Theresa Momber; Spellbinders Nestibilities Big Scalloped Ovals Small die and Spectrum Noir alcohol markers MG3, BT5, AG2, IG5)

There is a great tutorial by Heather on Splitcoaststampers with a video (actually 4 videos!). I'll describe it here, but if anything is unclear, check out her step by step instructions.

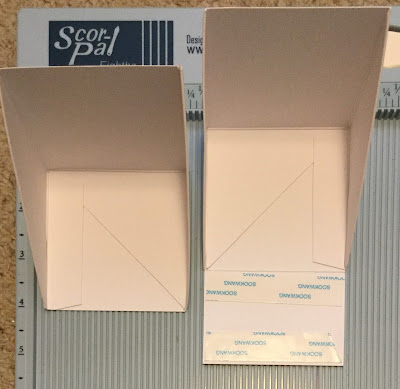
Start with the piece of 6" x 9" cardstock and score at 3" and 6" on the long side, and 3" on the short side. Referring to the picture below, score on the diagonals in the two top edge squares. Score again 1" away from the diagonal score lines and trim the corners off. Cut up from the bottom on the bottom left square, and cut along the diagonal in the bottom middle square. Finally, create the tab in the bottom right square. It is 3/4" wide. Crease all score lines and set aside.


Next, take the 6" x 11" piece. Score at 3", 6" and 9" along the long side and at 3" on the short side. Score along the diagonals of the top edge squares like before, trimming off 1" past the diagonals. Cut up from the bottom of the 6" score line, trim off the diagonal to the left of the cut you just made, and create the 3/4" tab on the bottom left square. The flap on the bottom right will be used to attach the two sides of the box together. Crease all score lines.


Adhere Scor-Tape to the inside of the two diagonal flaps at the top of each piece.


  • Remove the backing and fold the flaps in to adhere the tape. Add Scor-Tape to the bottom of the triangular flaps and the 3/4" tabs.


Remove the backing paper and attach the triangular flap to the bottom square to create the first corner. Then attach the tab to create the second corner. This is one half of the box. Repeat with the other piece.


Attach the two sides together, placing the flap on the back of the other half.


Score at 7/8" on each side of the three 4 5/8" squares. These will be the three trays. Cut from the bottom of the score lines on one side up to the perpendicular score line. Repeat on the opposite side. Trim the corners slightly to give a better fit when you fold it into the tray.


Add Scor-Tape to the corner flaps and adhere to the inside. Repeat for all three trays.


Attach the 3/4" x 3" strips of cardstock along two sides of each of the trays. Trim slightly, if necessary.

Attach a tray at the top and bottom of the left side of the box. On the right side of the box, on the inside, make a mark at 1 7/8" from the top, along the side and back. Attach the third tray with the bottom of the tray along the mark you made. I held it in place to make sure it would fit before I attached it with the Scor-Tape!

Tape your five 3" squares of cardstock to all the sides except the bottom. Add your three 2 7/8" squares to the top and to the right and left sides of where the box opens. Add your patterned paper on top and embellish as desired.


There is still time to enter this month's challenge on the Scor-Pal blog. This month, the theme is School or Storage, or you can make an Anything Goes project, as long as it has More Than One Score and follows the general rules. You could win a $25 gift certificate to the Scor-Pal store!


Thursday, June 25, 2020

Pinspired- Inspiration from our Pinterest Board by Nancy

Hello crafters! Nancy here today to show you a project I did that was inspired by the Scor-Pal Pinterest Board - a Box in a Bag! The first one shown is a little larger than the one below it.


I can't believe that in all the years of paper crafting that I have never made one of these. I was inspired by this piece.


I decided to go with a nautical theme because I recently purchased a pad of 12" paper at Michael's called "Coastal Cove" that included beachy and nautical papers.

You start by making a box - the "bag" portion of this project will be wrapped around this box, so you really don't see the box unless you look inside.

For the smaller project you will need a piece of cardstock measuring 3 x 3 and score at .5" all the way around.

For the medium piece, use a 4.5 x 4.5 piece of cardstock and score at 1" all around.

You can find the Scor-Pal here and Scor-Tape here.


Cut the tabs and add scor-tape as shown.


Assemble to make the box


Now you will begin the bag portion where you wrap decorative paper around the outside of the box.

For the small project use a piece of decorative paper measuring 3.5 x 8.5.

For the medium project use a piece of decorative paper measuring 5.5 x 11.

Place Scor-Tape on the inside of the decorative paper along the bottom and on one side.


Take your box about halfway on one side and start wrapping the paper around it. Take care to line up the bottom of the box with the bottom edge of the paper.


Continue moving the box along the bottom edge of the paper ..


Keep wrapping the box around the paper until you have completely covered the box.


Now you can start decorating. I used a small piece of coordinating paper and wrapped it around the bottom of the bag, and also used the same paper to make handles.


Add decorative elements and ribbon or twine to the front and you are done!

Here is a close up look at how I embellished mine.


Thanks so much for stopping by today. I hope you check out the Scor-Pal Pinterest board for more inspiration!


Monday, April 27, 2020

Pinspired- Inspiration from our Pinterest Board by Lois

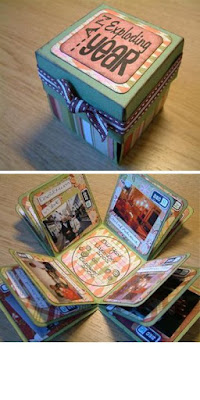
I've got a project on my blog today that was inspired by another project from the Scor-Pal Pinterest Board -- an Exploding Box from 2006.

When I started my box, I decided that my theme would be a favorite of mine -- a certain boy wizard and his friends.  My box differs from the original in that there are only two layers of explosion rather than three, and also there is a 3-D object on the inside.


To start my project, I scored a piece of 12" x 12" cardstock at 4" and 8" on both sides . . .


. . . and a piece of 10 1/2" x 10 1/2" cardstock at 3 1/2" and 7" on both sides.


I then cut the four corners out of each piece.


I chose some wizard-related patterned paper and cut eight pieces 3 3/4" square and eight pieces 3 1/4" square.  As you can see, the patterns represent all four houses at the magic school.


Scor-tape is attached to the bottom of the center square of the smaller panel, the pieces are glued together, and the patterned paper applied appropriately.


The next step was to make the lids for the two layers.  The larger lid is made from a piece of matching yellow cardstock 6 5/8" square.  The smaller lid is made from a piece of matching dark gray cardstock 6 1/8" square.  I then scored each piece 1 1/4" in from all four sides.


After cutting tabs on all four corners, I added some Scor-tape.


This was done to both the yellow lid and the dark gray lid.

I then stamped and colored the images (4 teachers and 4 students).  I cut them out with a Spellbinders Labels One die with a slightly larger Labels One die for the matting.


Following the video instructions for the Karen Burniston Castle Pop-up, which you can find on her website here, adding the additional trimwork.


After the castle was completed, I attached it to a 3 3/4" square of patterned paper, using the tabs created with one of the dies in the Castle Pop-Up die set.  I then cut a hexagonal piece of the same patterned paper, inserted the free-standing turret, and glue it inside the castle.


As you can see from the photos, the teachers are glued to the first layer of explosion. . .


. . . and the students are glued to the inside layer.


I hope you enjoyed my tutorial and will try to make an Explosion Box yourself.  It was a really fun project.