
Good morning! Ruza here as your Pinterest Inspired Hostess this month. What does that mean. Well ... I find something on Pinterest that I would like to try and re-create the project, but also make it my own. I was inspired by this One Sheet Mini Album created by Virginia Nebel from the Scrapbook & Cards Today Blog.

This lovely mini-album is beautifully made using only a 12" x 12" sheet of cardstock. I love the design, and then added a little bit of me into it.
I went with a Summer Mini Album since our Challenge Theme this month is about Summer. It also helped that I had left over Carta Bella Summer Splash DP to work with.

I started with the basic design that Virginia has in her tutorial. I took a 12" x 12" sheet of cardstock, and scored is at 3", 6", and 9" on one side, turned the sheet and scored at 6".

As shown in the photo above, I used my ruler and craft knife to cut out the center score lines; fold and burnish the score lines.

Fold the piece in half, and then push the sides together to see a square in the center, as shown below.

I laid the paper down, and folded it as shown in the first photo below. As you can see in the first photo, the arrows show that there are openings in the bottom. I used my 1/4" Scor-Tape to close these areas, as shown in the other two photos. However, I left the top openings alone.

I then folded and reburnished the cardstock, as shown in the first photo on the left below. Now for my addition to the design. Since the edges are not even, I added a closure to the Mini Album with magnets.

The closure is 2-3/8" x 6". With the 2-3/8" at the top - score at 1/2" and 7/8". Burnish the score lines. I put 3/8" Scor-Tape to the 1/2" flap on the inside, and then adhere it to the back of the mini album. I added large magnets to close the album as shown above.
The next addition I made was to the inside. There are two open areas at the top after folding that I didn't seal. I made and added two fold down flaps to one of them. You will see them more clearly when I reveal the finished album.
To create the flaps I cut two (2) pieces of 3" x 4-1/2" pieces of cardstock. With the 4-1/2" side at the top - score at 1/2". I trimmed off a sliver from the 3" side of the cardstock as shown in the first photo. Miter the edges and join these 2 pieces together with scor-tape, as shown in the second photo.

I added Scor-Tape to the sides standing up, and then slid them into the top slat. This is a bit tricky. I would remove only one side of the scor-tape, insert into the opening, and then take the Scor-Tape off of the other side. I learned my lesson on that part. It was very hard to do with the Scor-Tape off of both ends. My apologies for not taking a picture of this part before I decorated the pages.
The following photos show how I decorated the inside pages. I put stickers onto cardstock, cut them out then added 1/2" Scor-Tape to the bottom, or top, and added them to my pages to hold extra mini-photos or journalling pages.

The picture below shows the decorated flap raised. I used a magnet to hold down both sides.


Products used:
- Scor-Pal Eighths Board, 1/4" Scor-Tape, and 3/4" Scor-Tape.

This lovely mini-album is beautifully made using only a 12" x 12" sheet of cardstock. I love the design, and then added a little bit of me into it.
I went with a Summer Mini Album since our Challenge Theme this month is about Summer. It also helped that I had left over Carta Bella Summer Splash DP to work with.

I started with the basic design that Virginia has in her tutorial. I took a 12" x 12" sheet of cardstock, and scored is at 3", 6", and 9" on one side, turned the sheet and scored at 6".

As shown in the photo above, I used my ruler and craft knife to cut out the center score lines; fold and burnish the score lines.

Fold the piece in half, and then push the sides together to see a square in the center, as shown below.

I laid the paper down, and folded it as shown in the first photo below. As you can see in the first photo, the arrows show that there are openings in the bottom. I used my 1/4" Scor-Tape to close these areas, as shown in the other two photos. However, I left the top openings alone.

I then folded and reburnished the cardstock, as shown in the first photo on the left below. Now for my addition to the design. Since the edges are not even, I added a closure to the Mini Album with magnets.

The closure is 2-3/8" x 6". With the 2-3/8" at the top - score at 1/2" and 7/8". Burnish the score lines. I put 3/8" Scor-Tape to the 1/2" flap on the inside, and then adhere it to the back of the mini album. I added large magnets to close the album as shown above.
The next addition I made was to the inside. There are two open areas at the top after folding that I didn't seal. I made and added two fold down flaps to one of them. You will see them more clearly when I reveal the finished album.
To create the flaps I cut two (2) pieces of 3" x 4-1/2" pieces of cardstock. With the 4-1/2" side at the top - score at 1/2". I trimmed off a sliver from the 3" side of the cardstock as shown in the first photo. Miter the edges and join these 2 pieces together with scor-tape, as shown in the second photo.

I added Scor-Tape to the sides standing up, and then slid them into the top slat. This is a bit tricky. I would remove only one side of the scor-tape, insert into the opening, and then take the Scor-Tape off of the other side. I learned my lesson on that part. It was very hard to do with the Scor-Tape off of both ends. My apologies for not taking a picture of this part before I decorated the pages.
The following photos show how I decorated the inside pages. I put stickers onto cardstock, cut them out then added 1/2" Scor-Tape to the bottom, or top, and added them to my pages to hold extra mini-photos or journalling pages.
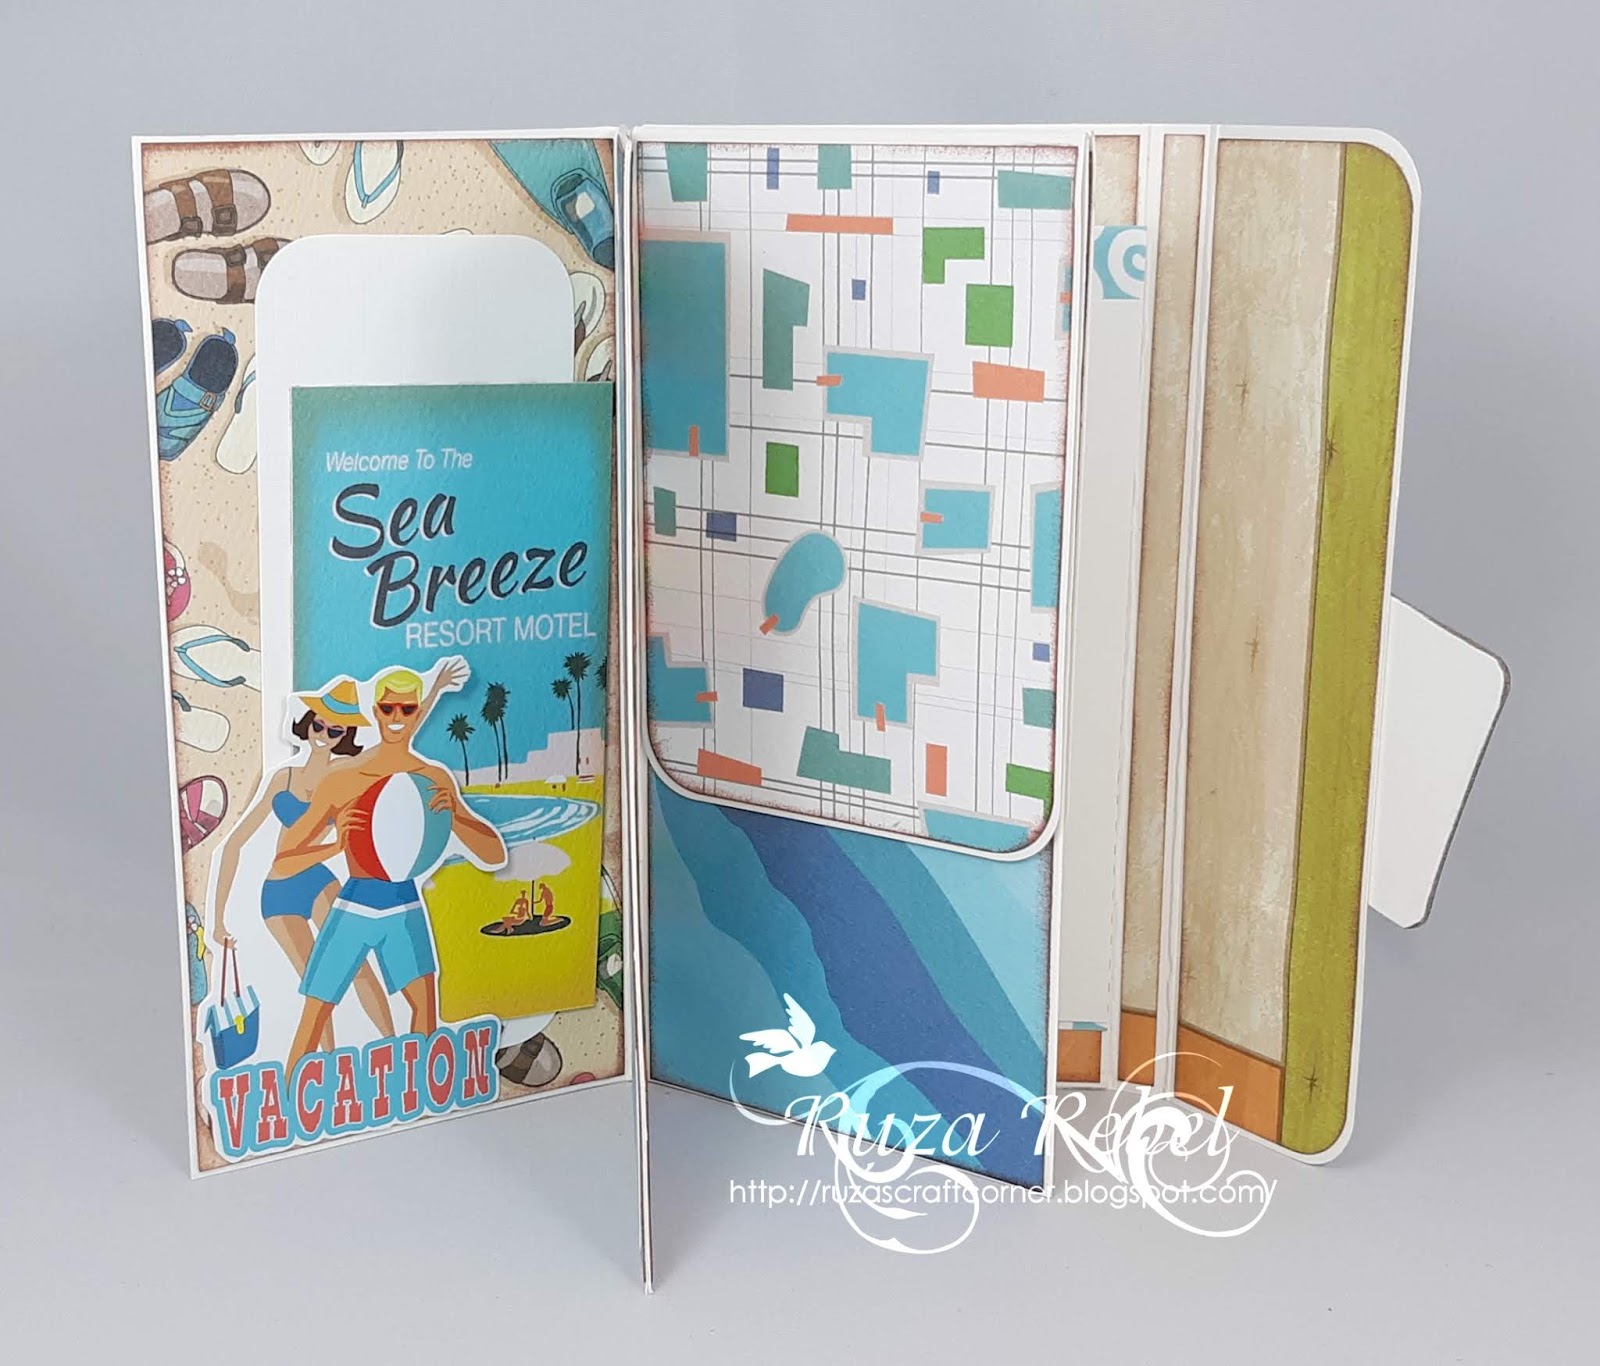
The picture below shows the decorated flap raised. I used a magnet to hold down both sides.


Products used:
- Scor-Pal Eighths Board, 1/4" Scor-Tape, and 3/4" Scor-Tape.
I hope you enjoyed my Pinterest Inspired Project and give it a try. You still have time to join in our More Than One-Scor Challenge #51 ~ Summer.
Until next time ... Enjoy!


