Friday, March 22, 2013

Bunches of Beautiful Boxes with Toni Noggle Storie

Toni is  back with another fun Scor-Pal project.  This time she has a box for you. She says she really loves that you can make it out of one sheet of card stock and some patterned paper.  After a few scores, cuts and embellishments, the flip top box is ready to fill and give away.

Here is what you need to get started:
  • One 4 1/2" x 10 3/8" piece of card stock
  • One 4 1/2" x 2" piece of card stock
  • One 2 5/8" x 3 5/8" piece of patterned paper
  • One 2 5/8" x 2 3/4" piece of patterned paper
  • One 2 5/8" x 7/8" piece of patterned paper
  • One 2 5/8" x 3/4" piece of patterned paper
  • Scor-Pal
  • Scor-Tape
  • Scissors
  • Pencil
  • Ruler
  • Punch or Die Cutting Tool
  • Embellishments, as desired 
First, place your 4 1/2" by 10 3/8" piece of card stock with the 4 1/2" side of the paper against the top fence of the Scor-Pal.  Score at 7/8" on each side.
Turn your card stock so that the 10 3/8" side is against the top fence of your Scor-Pal.  Score at 1/2", 1 1/2", 2 3/8", 6 1/8" and 7".  For a quick and simple solution to 1/8" scores that are not marked on your Scor-Pal, check out Diana's video tutorial. 
Without moving your card stock, score at 2 7/8" and 9 7/8" between the two horizontal scores made in step 1. 
With your pencil, make a mark at 1" and 3 3/8" the top and bottom of the card stock.  Draw a line from your pencil mark to the intersecting score lines 1/2" in front of the mark.  Draw a line from the top and bottom right corners to the score line 1/2" before it. 
Trim away corner pieces as shown  here.
Cut on score lines as indicated by red lines in the photo.  (One line was drawn previously).
Burnish all of your score lines.
Add patterned paper pieces, as shown.  Add Scor-Tape to the four tabs cut on the sides.  I used some patterned paper from the Fancy Pants Designs Hopscotch line.  I sponged the edges of my patterned paper and the edges of my card stock for definition.
Turn the card stock over and add Scor-Tape to the end flaps, side flaps of what will be the box front and the square tabs of the box top.  You can see the adhesive positioned in the photo.
 Remove adhesive backing on the ends and adhere down.
Adhere box base together by removing backing off tabs first and adhering to the bottom of the box.  Then remove backing off adhesive on the side flaps and secure to the outside of the box.  
Next, adhere flip top together.  Remove backing from Scor-Tape on square tabs first and adhere to the top of the box.  Remove backing from the Scor-Tape on the angled flaps and secure to the side of the flip top.  Here you have a completed flip top box.
Optional: If you would like to make your flip top box lid more secure, follow these additional steps.  Place your 4 1/2" by 2" piece of card stock with the 4 1/2" side against the top fence of your Scor-Pal.  Score at 7/8" on both sides.
Use a punch or a die to create a cut out along one edge of your insert. This will allow easier access to the contents of your flip top box. 
Line outside edges and edge opposite of the cut with Scor-Tape and burnish your score lines.
Remove backing from your Scor-Tape and insert inside of the flip top box, with the top edges aligned.
Embellish as desired.  I embossed a butterfly on vellum, trimmed it out and popped it up off the front of my box.  Then I stamped a sentiment on a small flag, sponged the edges and attached it to the back of a Fancy Pants Designs Hopscotch Mingled Button.  I tied a raffia bow and secured a random button to it's center.  I then attached it to my flip top box lid.
 I thank you for reading my tutorial today.  Happy crafting!

Details: Stamps: Fluttering By (Verve); Paper: Vanilla (MFP), Fancy Pants Designs Hopscotch dp, vellum; Ink: Crumb Cake, Versamark; Accessories: Scor-Pal, Scor-Tape, Fancy Pants Designs Hopscotch Mingled Buttons, white embossing powder, heat tool, wide oval punch, pencil, ruler, scissors, sponge dauber, stampin' dimensionals, raffia, random button, crystal effects.

Thursday, March 21, 2013

Bunches of Beautiful Boxes with Steph Ackerman

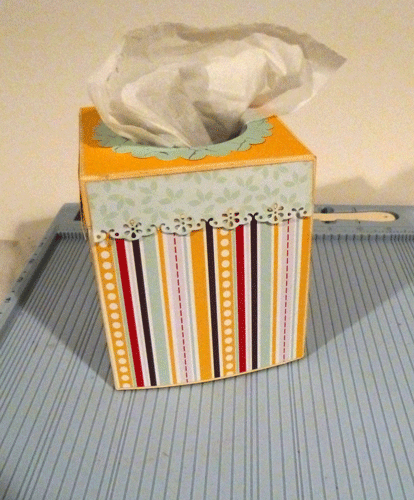
Good morning, Steph  here with a really fun way to spruce up those little tissue boxes that are all over the house.  The original tutorial can be found on Diane Zechman's blog - here.


To create the box, cut 2 pieces of  cardstock 5 1/8" x 9 1/2".
With the long sides at the top of the Scor-pal, score each piece at 1/2" and 5".


To create the top, cut another piece of cardstock  6 1/2"  x 6 1/2".
Score at 1" around all 4 sides.


Cut in on each side to the score line.


Add Scor-tape to the 1/2" sides of the box pieces and assemble the pieces together.
Add Scor-tape to the cut tabs on the box top and assemble to form the top.


Cut yellow pattern paper 4 1/4" x 4 1/4" - this will fit the box top.
Tape a Spellbinders circle die in the center of the pattern paper and run through your die cut machine.


Die cut a scalloped circle from coordinating pattern paper to achieve a nice finished edge.


Adhere the scalloped piece to the top.
Add Scor-tape around the box top and adhere the pattern paper on top.


Cut 4 pieces of pattern paper 4 1/4" x 1 1/2".
Punch the long edges of each piece.
Ink each piece with brown ink and adhere along the edges of the box top.

Cut 4 pieces of striped pattern paper 5" x 4 1/4".
Adhere each to the sides of the box.
Ink the edges of the box with brown ink.


Thanks for stopping by today.

Supplies:
Score tool: Scor-pal
Adhesive: Scor-tape
Cardstock: Stampin Up
Pattern Paper: Little Yellow Bicycle
Die cuts: Spellbinders
Ink: Clearsnap
Punch: EKSuccess

Wednesday, March 20, 2013

Bunches of Beautiful Boxes with Virginia Nebel

 Pizza Box
Designer: Virginia Nebel
 
Sometimes we need a quick way to wrap little treats and this mini pizza box is so versatile and so easy to make from just one sheet of paper!  You can find the scoring template here.  This mini pizza box holds 4 rolls of pretty washi tape, a cute little goodie box for your scrapping friends!


Supplies: My Mind's Eye pattern papers, Bazzill card stock, Scor-tape, American Crafts embellishments, Reasonably Ribbon

Monday, March 18, 2013

Photo Storage and Display Boxes by Diane Zechman

Photo Storage Boxes
Designer Diane Zechman


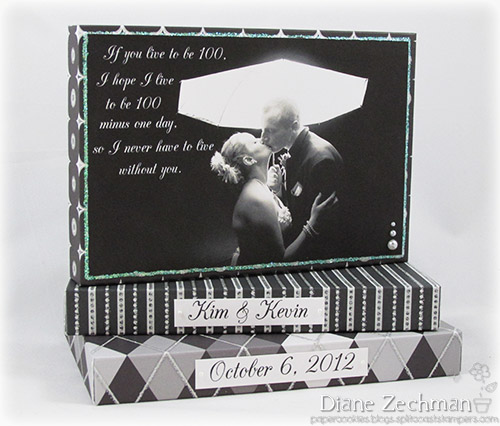
Do you have photos to give to family or friends and need a way to present them? Have photos that you've printed or received and don't want to shove them in a drawer, never to be seen again? My project today may be the solution. I've used my Scor-Pal and Scor-Tape to create decorative boxes that hold 4x6 photos. Display them on a shelf or give as a gift...they would suit any occasion. (a box of new baby photos would be adorable!) Since we have wedding pics here, I made this set in black & white. It's very easy and I designed this box to be made from one 8 1/2 x 11 piece of paper.
   

Supplies: 8 1/2 x 11 cardstock or heavy patterned paper (white, DCWV used here), Scor-Pal, Scor-Tape, photo or printer, and any additional embellishments as desired (Stickles and pearls used here). 

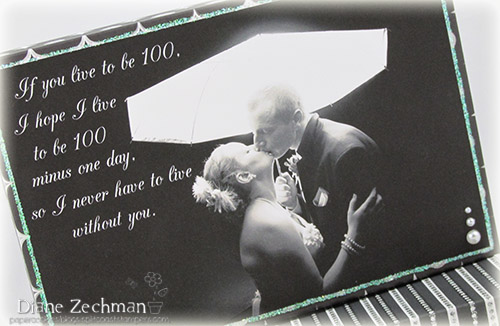
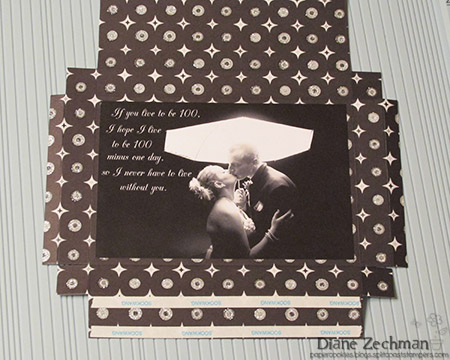
 First choose a photograph for the front of your box. I didn't want my photo to be glossy, but rather seem to be a part of the box itself. So I printed my photo onto white cardstock and cut it out.  
Before printing, I added some text to the photo.


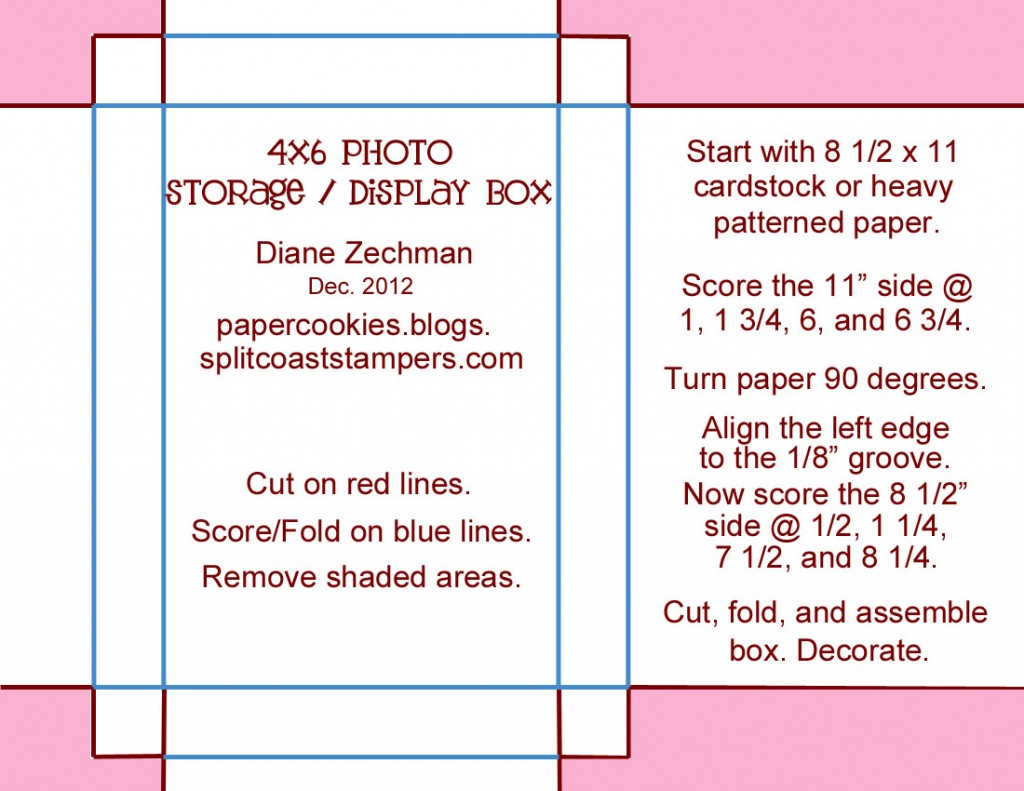
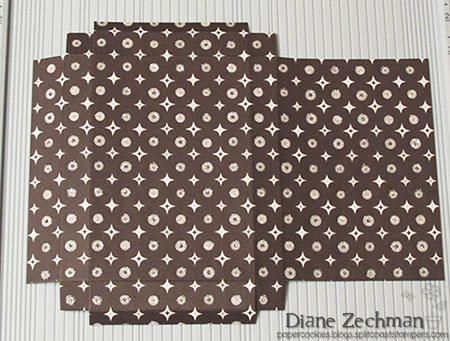
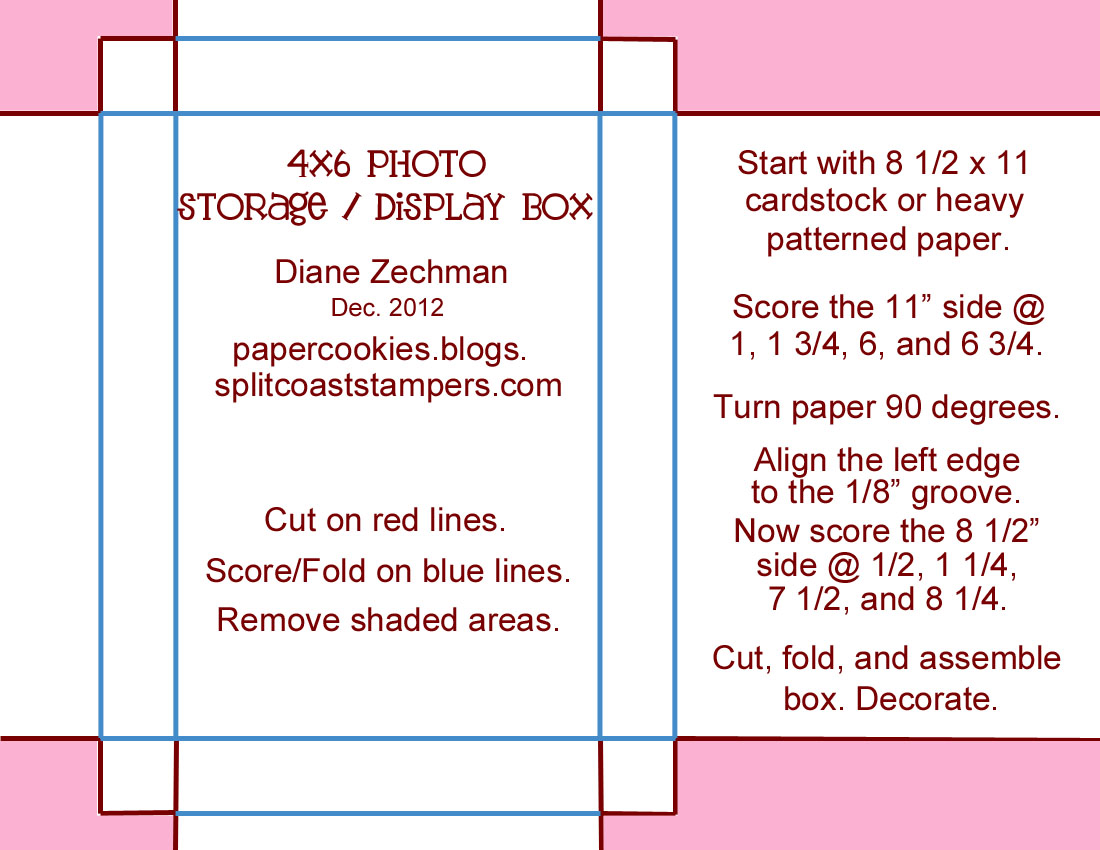
Next choose some coordinating paper or cardstock. Starting with an 8 1/2 x 11 piece, score the 11" side @ 1, 1 3/4, 6, and 6 3/4. Turn the paper 90 degrees. Align the left edge to the 1/8" groove. Now score the 8 1/2" side @ 1/2, 1 1/4, 7 1/2 and 8 1/4. Using the following diagram, cut and fold the box. Remove shaded areas. (click on diagram for larger pic. Right click on it to save to your computer).


 It should now look like this:


 Before assembling the box, attach your photo. Then apply Scor-Tape as shown.


Assemble the box. Trim the corners of the tabs if necessary when folding and inserting the ends. Decorate as desired. When using for display, making 3 coordinating boxes looks nice. For special occasions or new baby, add names, dates, etc. to the sides.  

Friday, March 15, 2013

Guest Designer Melissa Craig

Hi everyone!  Happy Friday.  I have a fun project to share with you that I am so super excited about.  I mentioned {on my blog} that I have been rediscovering my punches.  And with this rediscovery, I needed to incorporate that with Scor-Pal.  First let me show you what I created and then I'll tell you all about it.


Isn't this cute?  I swear to you, I was doing the happy dance when I finished this.  So excited that it came together!  Let me talk about the bunnies first.  This was the punch art that I discovered on a You Tube video by Dawn Griffith.  It starts out by creating a wrapper for the candy bar.  I scored according to her directions, but they are for KitKat bars, not little Hershey bars, so I ended up forgoing the score lines and just wrapping the candy bar with Springtime papers (by Echo Park).  Then proceeded to make the bunny out of large and small oval punches, tag punch, 1/2" and 1/4" circle punches, a gel pen and a Copic liner.

So how did I incorporate the Scor-Pal?  Here's the very exciting part for me.  I created the picket fence box!


First, I created the base from a 4 x 4 square of white cardstock.  I scored at a 1/2" on all four sides and stamped the grass on the edges and then created the box bottom.  I then cut 20 3/8" x 2" pickets, lined up 5 of them side by side and stamped more grass on them.  Then I cut the crossbar piece which is about 12 1/4" inches.  So, of course, it was cut in two pieces and then spliced together with Scor-Tape.  I scored the crossbar at 3, 6, 9 and 12 inches.  Then on the Scor-Mat I carefully laid out 5 pickets just inside the 0 and the 3 inch marks, spacing the middle pieces out evenly.  With liquid glue I put a thin line of glue on the pickets where I wanted my crossbar piece to go.  Then laid the crossbar down to adhere.  Then repeated this process until all four sides had their pickets.  Then I applied more liquid glue to the end of the pickets, lined it up to the base bottom and if you did it with precise measurements, the sides will just "roll" along each side.  When this is done, there is a 1/4" hang over from the crossbar, which is scored at 12" - this is your tab to close up the box.  Then I just stamped some flowers and a dragonfly, fussy cut them out and glued them onto the box.  I filled it with Easter grass and the bunnies.

I wish I had thought to do a picture tutorial but I was so excited to get my idea into paper that I didn't bother with the camera until the end.  I hope you enjoyed this share without it.

Wednesday, March 13, 2013

Card Set and Matching Holder by Jeannie Harper

Card Set/ Holder

by Designer: Jennie Harper


I made some mini cards using The Craft's Meow Sew Happy and the coordinating Spellbinders Sew Elements dies. The patterned paper I used for the cards is My Mind's Eye Portobellow Road and accented each mini-card with Want2Scrap bling.  All of the images/sentiments were stamped with Memento London Fog ink.


I thought it would be cute to make a holder for these little cards and coordinating envelopes and made this holder from a 4 1/4 x 11 piece of card stock using my Scor-Pal:
 
 The labels is from Lovely Labels 18.  And here is the inside:


Monday, March 11, 2013

Fancy Easter Card by Gini Cagle

Fancy Easter Card 
Designer: Gini Cagle

I've got a fun and different fancy fold card to share with you today! And the great part - it's super easy to make!  The outside looks like a normal card, but there's a surprise on the inside.
Supplies:
Graphic 45 Ladies Diary Paper
DCWV Cardstock
Hampton Art/Graphic 34 Ladies Diary Stamp Set 3
Cheery Lynn Designs Dies: Delicate Lace Script
Spellbinders Dies: Labels 3
May Arts Ribbon 365-2-10
Clearsnap Ink
Copic Markers
To make the inside of the card, cut a base 10" x 6".  You are going to cut two slits in the paper, parallel with the long side of the paper.  Measure down and inch and over an inch, and cut an 8" cut.


I think you will understand the cuts and scores more if you look at my diagram.  The black lines indicate where to cut and and dotted red lines indicate where to score. 
As you can see, you are going to score all the way from top to bottom at the 5" mark.  At the 3" and 7" you are only going to score the one inch strips at the top and bottom.  The center portion will be scored at 1", 1 3/4", 8 1/4", and 9".  The small bands are going to pop out and the larger center section will fold in. Decorate this base as you desire.
Cut a card base slightly larger than the inside (10 1/2 x 6 1/2).  Score at 5 1/4.  Use Scor-tape to attach the folded paper to the card base, but make sure you only add the tape along the two outer sides, and horizontally along the 1" border just to the first fold on each side.  If you glue down any more, the card won't pop out like it is supposed to.

Add your card front, and you are all set!