

Day 3 of our Scor-pal and Bo Bunny product feature and we have two more Scor-pal designers with projects to share.
When you are done here stop by the Bo Bunny blog for even more ideas!
And, of course, leave a comment on this post and the rest of week's Scor-pal/Bo Bunny posts as well. We will be giving away a Scor-buddy to one of this week's visitors!
Be sure to stop by the Scor-pal Fan page too because are always great prizes, contests, and ideas to be found ;)
Now over to today's designers!
This week the Scor-Pal DT has teamed up with the Bo Bunny DT to bring you lots of paper inspiration! Today it's my turn to share a few things I made with the Scor-Pal and the sweeet Bo Bunny Blitzen collection. Be sure to also check out the matching embellishments...adorable!
Here I created a Gate-fold card and two Mini Christmas Totes.

stamps- Bo Bunny Blitzen; paper- SU! Espresso, Bo Bunny- Double Dot Chiffon Stripe, Blitzen Dot, Blitzen Stripe, Blitzen Sentiment; ink- Memento Tuxedo Black, markers- Bravo Burgundy, Sahara Sand, Cocoa; accessories- Scor-Pal, Scor-Tape, pop dots, Stickles, SU! Clear Tinsel Trim, Crop-A-Dile, jumbo eyelets; Bo Bunny Blitzen accessories- Stickers, Jewels, Layered Chipboard Stickers, Buttons, and Rub-ons.
The front of the Gate-fold card has a Layered Chipboard Sticker wreath. I outlined the striped paper layer with some glitter.

When the left flap is opened, it reveals the panel attached to the right flap. A large green snowflake sticker, some Blitzen jewels, and a few rub-on words were added to the patterned paper.

The card fully opened... the ornament circle is a sticker and the birds are another rub-on.

The Mini Christmas Totes are quite cute in size and very easy to make. The Blitzen ornament was stamped onto patterned paper, cut out, and popped up with dimensionals. It was also adorned with jewels. The bag has a few other Blitzen embellishments...the red snowflake and scalloped border are stickers, and the silver snowflake is a button.

The reindeer on this bag was stamped and popped up also. Select areas were colored and glittered, and a tiny jewel was applied where a collar might be. More scalloped border here and three layered chipboard snowflake stickers.

One last photo... I wanted to share with you how professional the bottoms of the bags look. Be sure to check out the tutorial (linked above) to see how to fold the bottom flaps to achieve this look.

Now over to today's designers!
First up: Scor-pal Designer Diane Zechman
This week the Scor-Pal DT has teamed up with the Bo Bunny DT to bring you lots of paper inspiration! Today it's my turn to share a few things I made with the Scor-Pal and the sweeet Bo Bunny Blitzen collection. Be sure to also check out the matching embellishments...adorable!
Here I created a Gate-fold card and two Mini Christmas Totes.

stamps- Bo Bunny Blitzen; paper- SU! Espresso, Bo Bunny- Double Dot Chiffon Stripe, Blitzen Dot, Blitzen Stripe, Blitzen Sentiment; ink- Memento Tuxedo Black, markers- Bravo Burgundy, Sahara Sand, Cocoa; accessories- Scor-Pal, Scor-Tape, pop dots, Stickles, SU! Clear Tinsel Trim, Crop-A-Dile, jumbo eyelets; Bo Bunny Blitzen accessories- Stickers, Jewels, Layered Chipboard Stickers, Buttons, and Rub-ons.
The front of the Gate-fold card has a Layered Chipboard Sticker wreath. I outlined the striped paper layer with some glitter.

When the left flap is opened, it reveals the panel attached to the right flap. A large green snowflake sticker, some Blitzen jewels, and a few rub-on words were added to the patterned paper.

The card fully opened... the ornament circle is a sticker and the birds are another rub-on.

The Mini Christmas Totes are quite cute in size and very easy to make. The Blitzen ornament was stamped onto patterned paper, cut out, and popped up with dimensionals. It was also adorned with jewels. The bag has a few other Blitzen embellishments...the red snowflake and scalloped border are stickers, and the silver snowflake is a button.
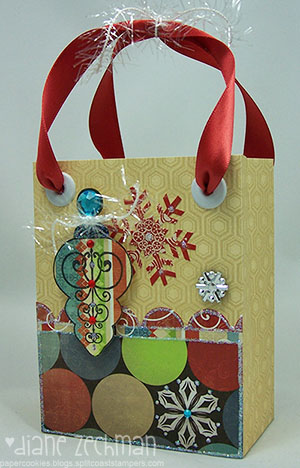
The reindeer on this bag was stamped and popped up also. Select areas were colored and glittered, and a tiny jewel was applied where a collar might be. More scalloped border here and three layered chipboard snowflake stickers.

One last photo... I wanted to share with you how professional the bottoms of the bags look. Be sure to check out the tutorial (linked above) to see how to fold the bottom flaps to achieve this look.

Next up: Scor-pal Designer Steph Ackerman

Supplies:
Scoring tool: Scor-Pal
Cardstock, pattern paper, die cuts, brads, buttons: Bo Bunny Garden Girl Collection
Ink: Clearsnap
Die cuts: Spellbinders, Nestabilities; Cricut Expression
I had the privilege of working with Bo Bunny's Garden Girl line in conjuction with my Scor Pal this month. Since Bo Bunny was very generous with their supplies, I decided to make a party ensemble.

The Party banner was cut at 5" and 5 1/2" with my Cricut Expression and the Sports Mania Cartridge. The smaller piece was inked with Clearsnap's Mix'd Media Leather Inx and adhered on the larger piece. A small piece of pink cardstock was cut for the top of the banner headers and 2 score lines were made with my Scor-Pal. Ink was added to the score lines to help them stand out a bit. The letters were cut using the Plantin Cartridge and attached to a Spellbinders Scalloped Circle.

The candy bag uses a Bo Bunny die cut that was scored in half with my Scor-Pal then it was adhered to the top of the bag. A second Bo Bunny die cut and the owl were added on top.

The gift bag uses Bo Bunny cardstock and pattern paper. - score lines were added across the bag just above the pearl accents.

The card was cut 5 1/2" x 11" and then folded to create a center opening. A Bo Bunny die cut was used on the card's front and rub-ons were added. Inside, I added additional Bo Bunny die cuts. The edges were then inked.
Thanks for stopping by!
See you tomorrow with our final day with Bo Bunny.


