
This week the DT's from Scor-Pal and Clearsnap have joined forces to bring you some amazing projects. Be sure to check the Scor-Pal Blog and the Clearsnap Blog everyday
for inspiration, and also to enter to win a Scor-pal! Just leave
comments this week on any of our Scor-pal posts, and we will choose a
winner next week.


- Scor-Pal
- Scor-Tape
- 7 3/4" x 9" piece of card stock for base
- 6 7/8" x 8 1/8" piece of acetate for lid
- paper snips
- brayer
- Clearsnap Mix'd Media Inx
- mini cording
- Scor-Envi
- Stamps
- Dies
- ink
- Clearsnap Smooch, Smooch Glitz & Smooch Spritz
- Clearsnap Mix'd Media Inx embossing powder
- burlap string
- corner rounder
- dimensional adhesive

Turn your piece of card stock 90 degrees and center the new corner at the top of the 6" groove and the opposite corner between the arrows at the bottom of the 6" groove. Again, score every half inch across the entire piece of card stock. You will create a diamond grid pattern on your paper.

If you want to highlight the grid pattern with ink, you will do that now. Refer to the card below for more information on inking the grid pattern. For now, we will continue on with creating our box base. With the 9" side of the card stock up against the top fence of the Scor-Pal, score at 1 1/2" on all four sides.

On the 9" sides, cut along the 1 1/2" score lines in to the 1 1/2" score lines. You will create four tabs to adhere the box together. Crease all of your score lines.

Turn the box base over and line all four tabs with Scor-tape.


Creating the box lid follows the same steps with slightly different dimensions. This box lid was created with acetate, but could easily be made with card stock. The acetate measures 6 7/8" by 8 1/8". It is places into the Scor-Pal and scored at 1" on all four sides. Tabs are created by cutting on the 1" score line in to the 1" score line. Adhesive is placed on the outside of the tabs and adhered to the inside of the lid. Below, you see the acetate lid placed on my scored grid box base.

For the first of four cards, I recreated the scored grid background on my card.

Since my background was smaller, I placed my Scor-Envi into my Scor-Pal and used it to help me stabilize the smaller piece. I placed one corner into the 6" groove and lined up one side flush with the Scor-Envi. Score every half inch across the whole piece.


I finished my card with a couple of stamped flowers, dies and burlap string. For my gold flower centers, I used both Gold Lame Smooch and Goldrush Smooch Glitz.

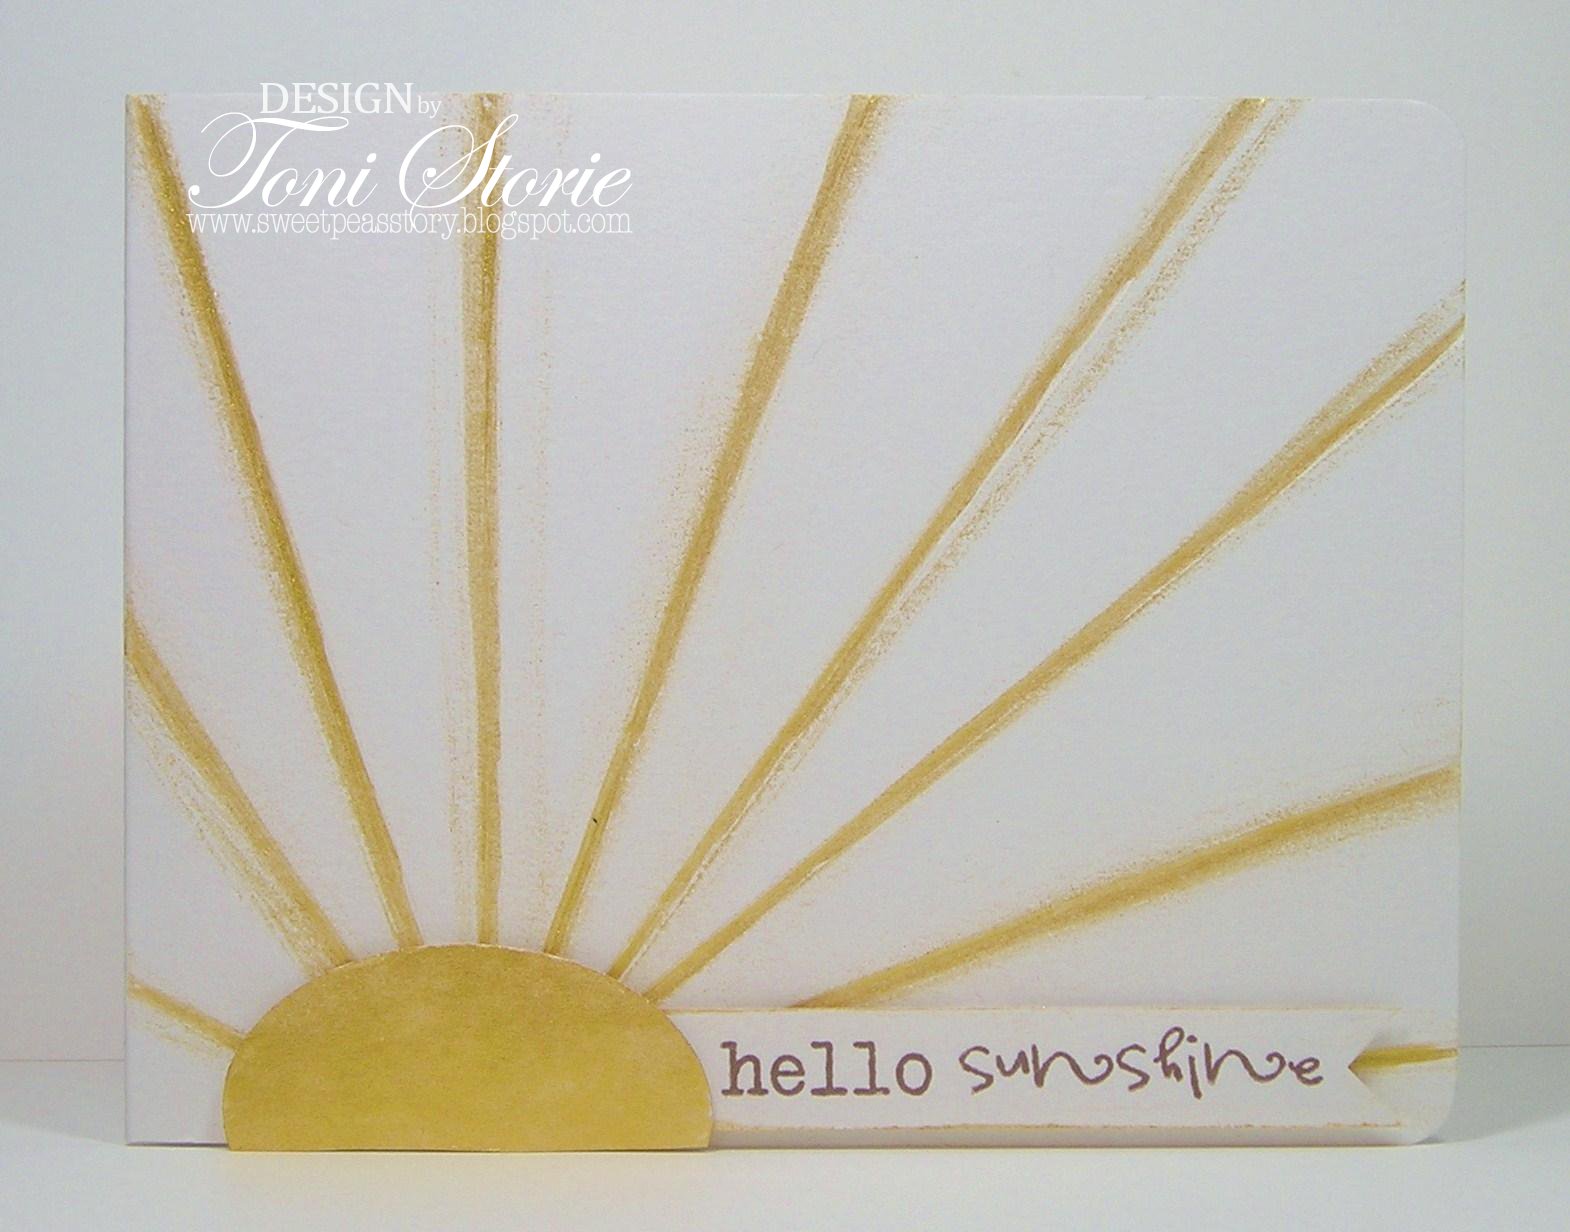
For the next card, I scored sun rays onto my card base. I used Gold Lame Smooch to line each ray and then ran a finger over it to spread it like it was glowing. I also covered some card stock with the Smooch and die cut and trimmed it to represent my sun.


The cards and envelopes fit neatly into the box with the lid. It was finished with a simple bow tied with mini cording to match.
Thanks for reading along!
Details - Stamps: Bloom & Grow (Verve), Doodled Occasions (Verve); Paper: Sweet Tooth White, Chocolate chip; Ink: Clearsnap Mix'd Media Inx Chox Petals, Momento Rich Cocoa, Versamark; Accessories: Scor-Pal, Scor-Envi, Scor-Tape, paper snips, brayer, Clearsnap Mix'd Media Inx Honey embossing powder, clear embossing powder, heat tool, Clearsnap River Mossy Smooch Spritz, Clearsnap Gold Lame Smooch, Clearsnap Goldrush Smooch Glitz, Nestabilities, Floral Circles dies (Verve), May Arts mini cording, May Arts burlap string, glue dots, stampin' dimensionals, corner rounder.
20 comments:
Cool projects! Thanks for the inspiration.
Cool projects, thanks for the inspiration.
I love this idea! I've been thinking of making card sets for my friends - this would be a great way to present them
Great assortment of cards and cute box to hold them in!
What a great project. I love the grid pattern you made on the box bottom. What a clever idea!! TFS
Wonderful tutorial on making the lattice so easily. Love the different cards and card box. Great project.
Love the lattice work and colors. Thanks for the tutorial on creating that effect. The cards were so fun and the scor pal really made the different work stand out. Great job.
Nice card selection - neat little box . thank you for sharing and for the chance to win.
Nice selection of cards . neat little box. thank you for sharing and for the chance to win.
Oh this is lovely,I'm thinking it'd be a lovely Christmas pressie for several friends:-)
AnnB
Fabulous set! Thanks for the inspiration!
Fantastic cards and great tutorial. Thanks so much. I am going to try this.
Wow! Love this box! You make it look so easy... I guess I desperately need a score pal!
I love the idea for the card box! It and the cards are just lovely!
Like the tic tac toe card. Thank you!
What a beautiful set of cards. I love how you made your box for them.
This is fabulous! I love all the different techniques you used.
Love the different ways you used embossed score lines on these.
Lovely cards and boxes, thanks for the tutorial, I think boxes of cards are great to make for friends!
Very pretty card
box holder. Would
make a great gift.
Carla from Utah
Post a Comment