Monday, December 16, 2013

Facebook Fan Page Giveaway!

Are you a fan of Scor-Pal on Facebook? If you are, or even not, then you will want to go over to THE PAGE to see our great news!

Hint, here are the details!


Katie

Saturday, December 14, 2013

Quick and Easy Holiday Cards with Toni Storie

Hello Crafty Friends!  We are in December and it's time to whip up some quick holiday cards.  There's nothing like your Scor-Pal to get the job done with some pizazz.  Today, I am featuring a Z Fold card.  This card has a different fold than your regular card to make it that much more memorable!
For this card, you will need:
  • 4 1/4" x 11" piece of card stock
  • 2 5/8" x 4 1/8" piece of designer paper
  • 4 1/8" x 5 3/8" piece of designer paper. 
  • Matching card stock scraps for die cutting
  • Stamps
  • Ink
  • Assorted dies (snowflakes, rounded scallop frame and rounded rectangle)
  • Embellishments
Place the 4 1/4" by 11" piece of card stock into your Scor-Pal with the 11" side against the top fence.  Score at 5 1/2". 
Flip your card stock over and with the 11" side still against the top fence of the Scor-Pal, score at 2 3/4".
Crease all of your folds to create the "Z" shaped card base.
At this step, you could go crazy with embellishments or you can keep it simple.  I die cut and sponged five small snowflakes.  Then I die cut a rounded scallop frame and two rounded rectangles.  I quickly stamped the two rounded rectangles with a snowflake background and sentiments.  I adhered the patterned paper to my card base with some Scor-Tape.  Next, I matted the rounded rectangle on the rounded scallop frame and adhered only the left side of the rectangle to the top of my "Z".  Then, I added rhinestones to each snowflake and popped them up with some dimensional adhesive.  Finally, I adhered the second rounded rectangle to the bottom of my "Z" so that it hides neatly behind the top rounded scallop frame.
This completes my quick and easy holiday card for today!  Here's one more photo of it closed and in my flower frog. 
Here's to a wonderfully creative day.  Thank you for stopping by!

Details - Stamps: Warm Winter Wishes (Flourishes), Occasional Quotes (Stampin' Up!); Paper: Riding Hood Red, Neenah Solar Crest White, SEI Wintersong dp; Ink: Bordering Blue, Basic Gray; Accessories: Scor-Pal, Scor-Tape, Spellbinders Create a Flake 2, Rounded Scallop Frame die (Verve), Rounded Rectangle die (Verve), Recollection rhinestones, sponge dauber, stampin' dimensionals. 

Thursday, December 12, 2013

Quick and Easy Holiday Cards with Lisa Andrews

Today we have a Quick and Easy card from Lisa.


Christmas is just around the corner and making a quick and easy card could never be easier!
Here is how I made my gatefold card.


First I started with a piece of card stock 4" x 8", a piece of designer paper 3 3/4" x 3 3/4", a memory box die cut from a sparkly glitter paper and a piece of designer cut with Spellbinders Nestibilities Label 16 Die, my Scor-Pal, Scor-Tape and a sparkly gem from Stampin Up!


Score the card stock at 4" and 6" to create your gatefold. 


Next, cut the piece of designer paper in half so you have two pieces that are 1 7/8" x 3 3/4".  Attach them to the front of the card with Scor-Tape.  Add the Label, sentiment, Snowflake die and gem and you have a nice and easy Christmas card ready for the giving!


Thanks for stopping by and I hope you have a wonderful Holiday Season!!

Lisa


Tuesday, December 10, 2013

Quick and Easy Holiday Cards with Katie Tate

Today it is my turn, Katie from Both Sides of The Paper to share a Quick and Easy Holiday card project with you.
Hopefully if you are in a jam and need to make a few quick extra cards this could help you.
I used not only the fabulous Scor-Pal and Scor-Tape but also a few dies from the wonderful selection that Diana carries in her Magnolia-Licious Store
This card can be made in minutes, mails in a regular invitation sized envelope and can easily be adapted to die styles you have on hand.


Card Recipe:
Scoring Tool - Scor-Pal
Adhesive - Scor-Tape
Sentiment - Clearly Sentimental About Christmas by My Favorite Things
Border Die - Carnivale by Cheery Lynn Designs
Christmas Tree Die Cut - Elyse Christmas Tree by Memorybox
Circle Die - Jubliee Circle by Memorybox


The card base is simply an 8 1/2" by 11" sheet of Kraft cardstock cut in half to make it 8 1/2" by 5 1/2" (so you can get 2 cards from one sheet of cardstock)
Score at the 4 1/4" mark on the long side and burnish the fold.

Create a border by scoring on the front panel at 1/4" and 1/2" on all 4 sides (the photo shows where I scored at 1/2", I added the additional score line after thinking it needed a little more)
TIP : Score from the INSIDE of the front panel to create a raised edge or the OUTSIDE to create a debossed frame.

Now it is simply a case of decorating. I used a piece of patterned paper measuring 3" by 4 1/4" that fits in the scored frame.

I attached it Scor-Tape and the 1/4" size works great for the edge of the border die.

The dies cut easily through glittered paper, saving a step as the sparkle is already on the card!


Finally I added a sentiment.

I hope you can see the scored lines on the card, I took a close up to show it as well as I could.


This was a super easy card, great to make "production line style" and cheap to mail too.
I hope you have been enjoying these projects and be on the lookout for more to come.

Sunday, December 8, 2013

Quick and Easy Holiday Cards with Steph Ackerman

Hey everyone, Steph here today.  Did you know you can use your Scor-Pal or Scor-Buddy to create quick and easy cards in no time at all.


This Z fold card was created by cutting a sheet of 8 1/2" x 11" Kraft cardstock in half lengthwise creating two panels, each 4 1/4" x 11". With the long edge against the top of your Scor-pal, score at 2 3/4" and 5 1/2". 


Accordian fold creating a Z shaped card.


Now, decorate as desired.


I cut a panel of red sparkly cardstock for the bottom of the card - cutting it 5 1/4" x 4 1/8". Then I stamped a sentiment on white cardstock with black ink.


For the top panel, I cut white and silver cardstock rectangles, adhering the left half to the Z fold, being certain that the sentiment did not show. On top of this I added a Sizzix die cut Christmas Tree which was decorated with Stickles. To finish the card, a ribbon was tied to the left side. 

These are definitely quick cards to make. If you need a large number of cards, consider creating an assembly line format and your cards will be done in no time at all.


Friday, December 6, 2013

Quick and Easy Holiday Cards with Diane Zechman

Today we have the second of our Quick and Easy segments, this time with the wonderful Diane Zechman!

Are you working on your Christmas cards? Need some simple ideas that come together in a snap? Well, this week the Scor-Pal team is sharing ideas for Quick & Easy Holiday Cards! Today I have a scored and framed background on my card. It really is quick and simple with a few diecuts and scoring with the Scor-Pal!
Here's my card.


Directions:

1. Start with a 4 1/4 x 8 1/2 piece of white cardstock, scored and folded in half to make a 4 1/4" square base.


2. Add a layer of 4" x 4" patterned paper.

3. Diecut a decorative circle from white cardstock.

4. Align a 3" circle die inside the decorative circle diecut and cut it again, creating a frame. Set it aside.

5. Diecut a 3 1/4" circle from white cardstock.

6. Score lines every 1/2" on the 3 1/4" circle. Turn it 90 degrees and repeat.


7. Adhere the pieces to the cardfront, with the scored circle layered behind the frame.

8. Stamp and diecut the tree and the sentiment flag. Pop them up with foam tape.

You're done! Once I designed my card, I assembled a few rather quickly.


stamps- SU! Scentsational Season and Petite Pairs; paper- white, MME Colorful Christmas; ink- SU! Gumball Green and Soft Suede; accessories- Scor-Pal, Spellbinders Picot Edge Circles and Circle Nestabilities, SU! Holiday Collection Framelits and Bitty Banners, foam tape.

Wednesday, December 4, 2013

Quick and Easy Holiday Cards with New Design Team Member Janice Whiting!

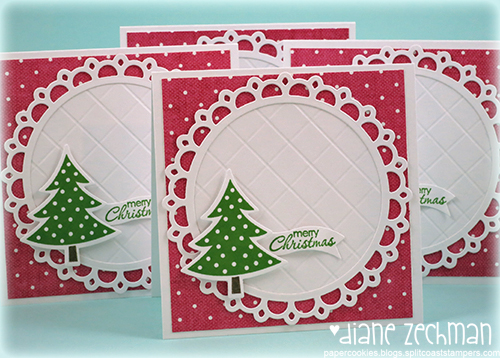
Today we are starting a series of Holiday cards that you can complete in just minutes and are perfect for those last minute makes.
We start with more great news, the super talented Janice has become a full time member of our team!
She is sharing a gorgeous card, really can this be quick and easy? it sure can!

Hi, everyone!  Today I'm joining the Scor-Pal girls in making quick and easy holiday cards!  The card I created might look like it took a long time to create but really, it was super easy--promise!  ;)

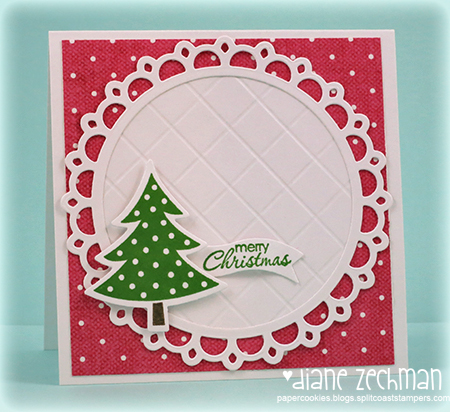
Here is what I came up with.

Looks complicated, right? Well, I think that beautiful Spellbinder's Gold Majesty Circles die cut is going to have to take the credit for that with all its amazing detail!  Luckily for us, all we have to do is run it through our die cut machine and the die does all the work!  :)

Let me show you how I created the entire card.
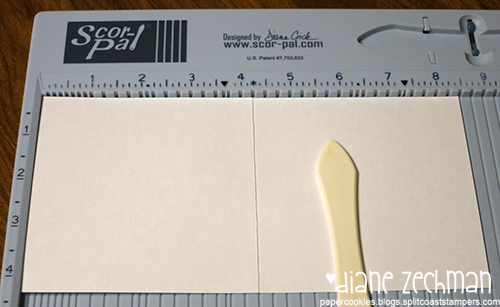
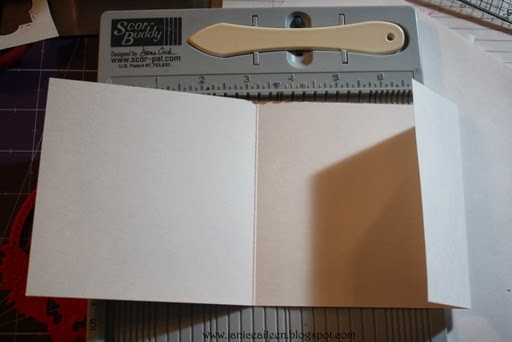
First, using my Scor-Buddy, I scored a 4 1/4" by 11" piece of cardstock at 4 1/2".

I turned it to its other end and scored it at the 2" mark.  This will create a pocket for things like gift cards, money or any things else you might want to give to the recipient.  :)


Place a strip of Scor-Tape on both ends of the 2" section, fold down and adhere to card to create pocket.

And, voila, here is the pocket created!

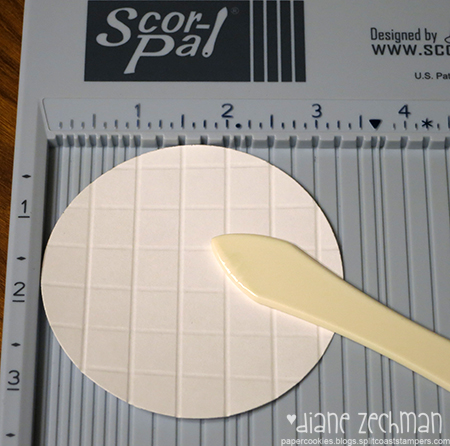
For added detail, I scored the card base in 1/4" sections but that is also be quick and easy!  I added a bow to "tie" it all together and there you have it, a quick and easy card that you can make in ten minutes flat (but looks like you slaved over the details!)!  

Stamped sentiment: The Craft's Meow 

I hope you've enjoyed this post, thanks so much for stopping by!  

Blessings to you,
Janice


Friday, October 25, 2013

Scor-Pal and Graphic 45 week with Katie Tate

Today marks Katie's project in the very special week of projects featuring the fabulous Scor-Pal products and the gorgeous papers of Graphic 45!

There have been projects at Scor-Pal and at the Graphic 45 blog


For your extra entries into the draw today comment on this post, follow our blog and like our Facebook page. If you have been following all week you should be all set!
Be sure to check our Facebook Fan Page as there will be another way to win there too!


I decided to use both The Secret Garden and A Place in Time papers to create a cute exploding box with a surprise inside!


Project Recipe:
Scoring Tool - Scor-Pal
Adhesive - Scor-Tape
Papers - The Secret Garden and Place in Time both by Graphic 45
Border Punch - Martha Stewart Garden Lattice
Flower Die - My Favorite Things
Flower - Recollections
Lace - Hobby Lobby
Ribbon - Really Reasonable Ribbon

Start with a 12" square of cardstock, score at 4" and 8" and rotate and repeat.
Cut away the corners as in the photo.


For the lid use a piece of patterned paper 7 1/8" square, score at 1 1/2" on all sides. Snip as in the photo to form the flaps for the corners and add Scor-Tape to adhere.


Use your score-tool on the inside edges to make crisp corners on the lid.


Decorate as desired. I use cotton lace and ribbon on the edge and a flower centerpiece on the top of the lid.


I used accents from the paper pad on the inside.


From the Place in Time pad I used the calendar sheet to create a mini calendar as a surprise.


I hope I have inspired you to get creating with Scor-Pal and Graphic 45 and I hope you have enjoyed this week of projects.

Katie