Monday, October 29, 2012

A Batty Card by Scor-pal Guest Designer Penny Ward


boo
Hello my scrappy friends Penny here again today as a guest designer. Can you believe the holidays are right around the corner?!? Since my children are grown I don’t usually bother with Halloween, but I saw these adorable bats and I just had to do something with them.

So gather up your Scor-Pal, card stock &…….

Let’s Make a Card…..

boo 3


Start with a Black card base measuring 5 1/2 x 4 1/4. Die cut a small oval (no, don’t throw this piece away, set it aside to use on another project). Cut a piece of yellow card stock just a bit smaller than the base card. Score this piece every 1/4 inch, then turn the card and score again every 1/4 inch.

You should end up with a grid pattern. Ink this section as desired. Die cut with a bit larger oval die directly over the same spot where you die cut the black card base.
boo 1


Take a scrap of white card stock and lightly ink with Gray Flannel, attach to back of black base card opening. With foam adhesive, attach the yellow card stock to the black card base.
boo 4


Die cut flourish from black card stock, paint with Glossy Accents. Let dry. Attach to yellow card section as shown, add “tickets” and flowers.
Color and fussy cut two bats, attach to oval opening with foam adhesive. 
boo 5


Add black “candi” dots to upper left side of card.
boo 2


Love & Liquid Pearls, Penny


Saturday, October 27, 2012

Scor-pal & Die Cuts with a View Week - Day 6


Today we continue a week long feature with our friends at Die Cuts with a View , also known as DCWV. Our designers have out done themselves once again to bring you some fun and exciting projects using not only Scor-pal products, but also, a mix of fun products from DCWV. Of course, that's not all. The DCWV team is playing with Scor-pal products this week on the DCWV Blog too! 

As always, there a prizes to be won!! 
Be sure to visit both the Scor-pal blog and DCWV blog each day this week to see more project ideas and to enter for chances to win some great prizes. To be entered into the random drawing for a Scor-buddy prize simply leave a comment here on the Scor-pal blog each day for a chance to win. 


There will be other ways to earn extra chances to win as well, so be watching for those announcements each day.

Today's bonus entry comes by telling us something you have learned this week. Just leave a second comment on this post for the bonus entry,

Deadline for entering is 8am Central, Monday, October 29.


First up, on our final day, is Scor-pal Designer Lisa Andrews.


 I am so happy that Scor-Pal and Die Cuts With a View has teamed up to bring you a fabulous Blog Hop! Their new line, Autumn Splendor is just gorgeous!  I am so happy that fall is finally here. We have had both beautiful fall days and crisp fall days here in Colorado. That means that snow is not far away!

OK, onto my project. Believe it or not, this project only takes about 30 minutes to complete! Yup, you read right, 30 minutes! I am going on a scrapbooking/crafting retreat in a few weeks and decided to make these little note cards and holders for the girls.


Supplies:
2 pieces of card stock to match designer paper(Autumn Spendor cardstock) DCWV
1 piece of cream card stock
1 piece of designer paper from Autumn Splendor, DCWV
punch
monogram stamp to emboss
Ribbon to match
Lacy ribbon
Scor-Pal
paper trimmer
Scor-Tape


First we are going to cut out our note cards, one sheet of card stock will make 8 note cards. Since I was making a number of note card holders, I used 4 note cards for each holder. (1) Score an 12" x 12" piece of card stock at 3" and 9", (2) next cut the card stock in half, 6". (3) Then stack each side on top of each other and cut 3" cards, as shown below


(1)

(2)


(3)


From the cream card stock, cut 5 - 2"x 2" squares, from coordinating piece of card stock cut 5 - 1 3/4" x 1 3/4" squares, now cut 4 - 2 7/8" x 2 7/8" squares from your designer paper. Fold cards in half and layer with all of the squares. My monogram stamp was 1 1/2" x 1 1/2". I stamped the monogram, then embossed with gold embossing powder. Viola! Note cards done!


Now for the basket. Cut a piece of designer paper, 3" x 11" and punch on the top edge. (1) Next, using a piece of matching card stock, cut a piece for the bottom, 3" x 4" and score each side at an 1/2". (2) Construct a small box out of the card stock and wrap it on the outside with 1/4" Scor-Tape. (3) Wrap the designer paper around bottom piece. Tip: I pinched the corners when I came to them. Attach a piece of Scor-Tape to the edge and close basket.

(1)

(2)

(3)


(4)

Next, wrap a piece of 1/4" Scor-Tape around the top and attach lace. Add two pieces of 1/4" Scor-Tape to the front and back. This will attach the ribbon handles, ribbon is about 8" long, you will need 2 pieces.


And your done!

For our final project of the week we have Scor-pal designer Toni Storie.

Hello!  I hope you enjoyed the Scor-Pal and DCWV week long feature! 
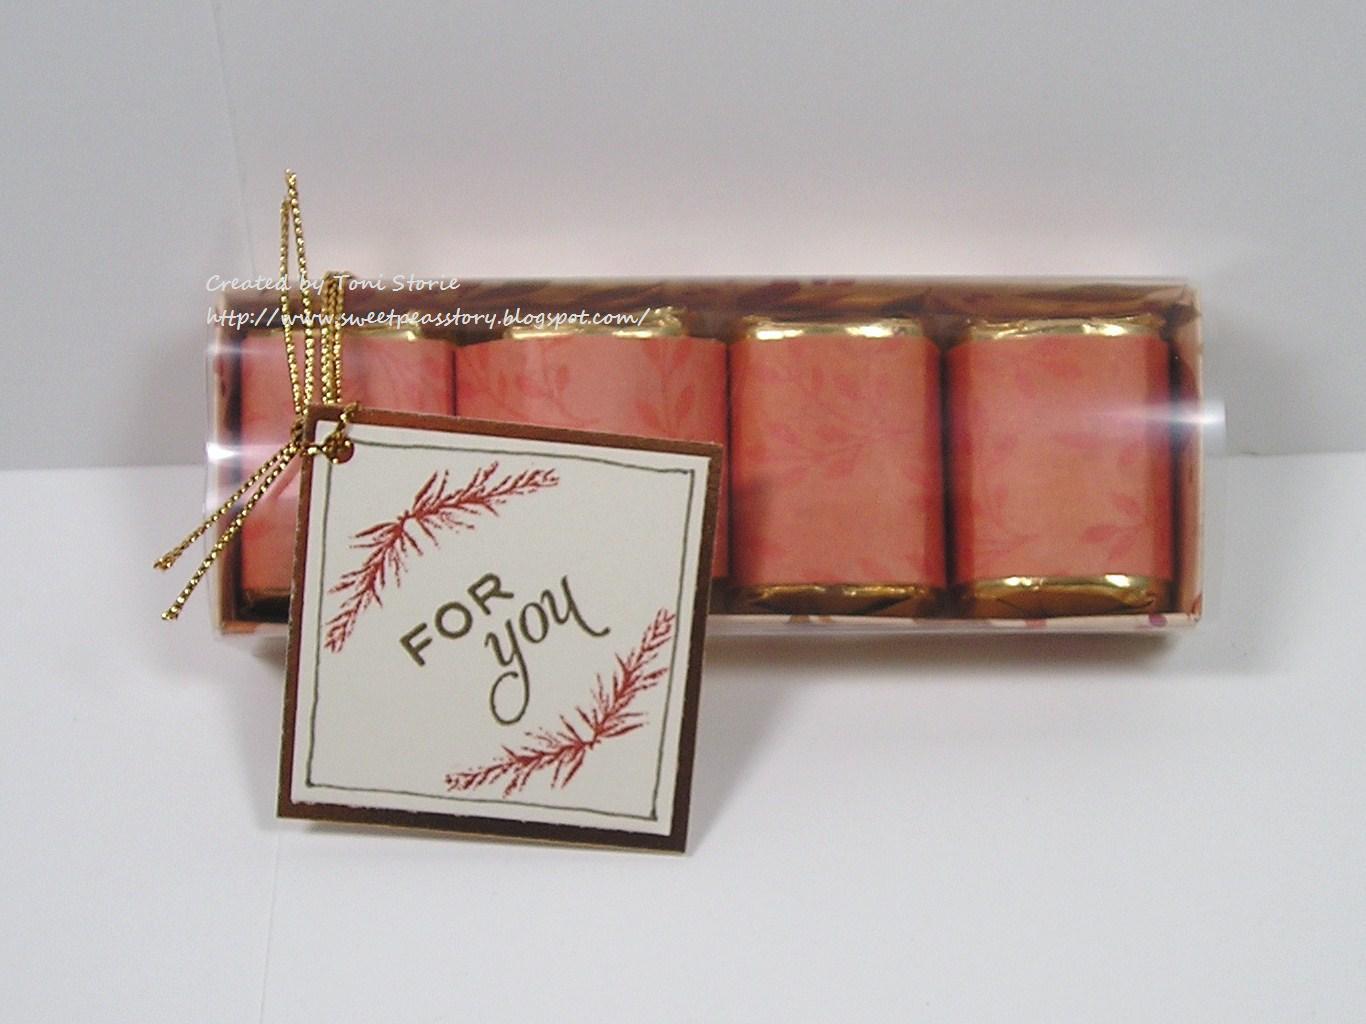
I offer you a sweet little treat in the form of a nugget box.

Details - Stamps: Taglines (Flourishes), Fine Herbs (Flourishes); Paper: DCWV Autumn Melody Stack, DCWV Autumn Melody Cardstock Stack, Very Vanilla, clear report cover; Ink: Soft Suede, Cajun Craze; Accessories: Scor-Buddy, Scor-Tape, 1/8" circle punch, gold cording. glue dot.
You will want to start with a piece of patterned paper or card stock that is 3 5/8" wide by 6 1/4" long.  Score on the right hand side of your paper at 5 1/8" and 5 3/4".  Turn your paper 180 degrees and score again at 5 1/8" and 5 3/4".  (See Diana's video for an easy way to achieve those eighths)

.
Turn you paper 90 degrees and score on the right hand side of you paper at 2 1/2" and 3 1/8".  Turn your paper 180 degrees and score again at 2 1/2" and 3 1/8".


Trim out the corner pieces shown below.


Create some tabs by trimming as indicated above on the red lines. 


 Ah, now we see some of the fabulous DCWV Autumn Melody patterned paper.  In this step, you want to crease all of your score lines you have made. 


Place some Scor-Tape on the panels adjacent to each side of the bottom of the box. 


Peel the backing of your Scor-Tape on the shorter sides first and adhere it down. 


Peel the backing of your Scor-tape on longer sides and adhere the tabs from the shorter sides.


Adhere the longer sides to the inside, finishing the bottom of you box. 


Start on the cover of your box now with a piece of acetate ( I used a piece of plastic report cover) measuring 4 5/8" by 4/16".


Score at 3/8", 1 7/8", 2 1/2" and 4". 


Crease each score line and apply Scor-Tape to the 3/8" section. 


 Peel the backing of your Scor-Tape and adhere the cover together.  Slide it over your box. 


 Now  for our wrapped nuggets, you will need some Hershey nuggets and a 1" by 2 3/4" piece of patterned paper.  Again, we have some luscious DCWV patterned paper covering these nuggets.


Place some Scor-Tape on the back of the nugget and some Scor-Tape on one end of the patterned paper. 


Peel the backing off your Scor-Tape and wrap up your nugget.  The nugget box I made today fits 4 nuggets, so you will want to repeat these steps three more times. 


Finally, slide back your cover and place the wrapped nuggets in your box.  Decorate as desired.

Thanks for hanging with me through the tutorial!  I hope you enjoyed it!  You can find the original directions on Splitcoaststampers and the modifications for a long box here

Friday, October 26, 2012

Scor-pal & Die Cuts with a View Week - Day 5


Today we continue a week long feature with our friends at Die Cuts with a View , also known as DCWV. Our designers have out done themselves once again to bring you some fun and exciting projects using not only Scor-pal products, but also, a mix of fun products from DCWV. Of course, that's not all. The DCWV team is playing with Scor-pal products this week on the DCWV Blog too! 

As always, there a prizes to be won!! 
Be sure to visit both the Scor-pal blog and DCWV blog each day this week to see more project ideas and to enter for chances to win some great prizes. To be entered into the random drawing for a Scor-buddy prize simply leave a comment here on the Scor-pal blog each day for a chance to win. 


There will be other ways to earn extra chances to win as well, so be watching for those announcements each day.

Today's bonus entry comes by sharing with us how you first heard about Scor-pal. Simply leave a comment here on this post telling us for an extra chance at this week's prize.

Deadline for entering is 8am Central, Monday, October 29.

Our first designer for Day 5 is Scor-pal Designer Tya Smith


Hello everyone! I am so excited to share with you today my Easel Table Favor box. This would make a great addition to your holiday table. Plus, they are super easy. Even the kiddos can help out with these! I really loved the DCWV Autumn Melody Pattern Paper and Card stock Stacks that we were able to use. They were the perfect canvas for my project - it even matched my candy corn! 


Supplies:
4x4 square cardstock for drawer 
7 ½ x 3 cardstock for drawer cover
5 x2 ¾ cardstock for easel box top
Scallop frame cut with Silhouette Machine
Name journaling spot cut with Silhouette Machine
Copper Brad
Burlap, button and twine for embellishments
Leaf shapes cut with Silhouette Machine

Step 1 – Score 4x4 cardstock ½ inch on each side.

Step 2- Snip corners as shown.


 Step 3 –Glue corners in to create box.
                             

 Step 4 – Score 7 ½ x 3 inch cardstock at 3,3 ½,6 ½, and 7 inches.


Step 5 – Fold box and glue edges together. Slide the cover over the drawer bottom. (It will be a little bit snug)


Step 6 – Take brown cardstock easel box top and score at 1 ½ and 3 inches.


Step 7- Glue oatmeal card stock to the box top and add adhesive to the underside as shown. Glue that section down.


 Glue name journaling spot to the scallop frame. Score leaf shapes down the middle and ink the edges. Add burlap strip, button and twine to top of box. Add Copper brad to front of box. Fill with your favorite treat and enjoy!


Next up, for Day 5, Scor-pal Designer Abby Henderson

When I first saw the Autumn Splendor stack I knew right away what I wanted to make, some Gratitude boxes for my family. I made a box for each of us, starting from the left is Steve's, mine, Kaley's and Tre's. Starting the first of November, my family and I will write down one thing we are grateful for each day and put our slip of paper in our boxes. At the end of the month we will all share what we wrote. 


Supplies:
Scor-Pal
Scor-Tape-all widths
DCWV Autumn Splendor Stack and coordinating CS Stack
Tim Holtz Distress Ink-Walnut Stain
Tim Holtz Sizzix Alterations Tattered Leaves Die
Mon Ami Gabby-Green trim
3 Girl Jam-Burlap
Twine & other trims-scrappy stash
May Arts-wide Gold Ribbon

First I chose which papers I wanted to use from the Autumn Splendor Stack and Card stock stack. For the base of the boxes, I cut the paper 11" square, then I scored each sheet at 4" on all sides.


Once I made all of my score marks, I cut the score lines on the opposing sides up to the first vertical score line.


Here you can see where I made the cuts. The next step is to measure 1" tabs on two sides.


It's not necessary to cut angles for your tabs but it does make a nicer fold on the inside when you're putting your box together. I've done it both ways and having the angles is easier, I think.


Once I made all of my cuts I used some 1/4" Scor-Tape on my edges. I do want to note that I inked all of my edges before putting my boxes together. I didn't want the white core of the CS to show once the boxes were assembled.


Here you can see the difference the inking makes, on the left the white core is really noticeable and I didn't want that for this project.


I used my Scor-Tool from my Scor-Pal to burnish the Scor-Tape to the CS...this is especially important on the CS that has texture & raised glittered images as the one in the picture above. 


For my box lids, I cut some coordinating CS 5" square and then scored it at 7/8" on all sides.


Instead of cutting angled tabs..this time I just made cuts up to the first score mark.


I again inked the edges of my lids before putting the box together. Scor-Tape can be used for more than just construction purposes. Here you'll see that I used it for my embellishing of the boxes as well.


I used the 1/8" tape to secure my twine to the base of the lid for Steve's box. I also used Scor-Tape for adhering all of my other ribbons, embellishments and sentiments. No need to use anything else...Scor-Tape is the best : )

Here are some close up photos of the boxes....


I fussy cut some of the images from the Autumn Splendor Stack to decorate the boxes. 


Making these boxes was super easy when you have a Scor-Pal to use along with some FAB paper like the Autumn Splendor stack from DCWV and of course Scor-Tape to put it all together. 

I have "Be Grateful Everyday" written on the family calendar that's posted on our fridge as I think it is really important to be grateful for what we all have in our lives & what a great way to not only encourage my teenagers to write something down each day but it's also a fun way to decorate for the Fall season. 

I hope you enjoyed my project and that I've inspired you to create your own Fall themed decorations for your home using the Scor-Pal & DCWV products.