
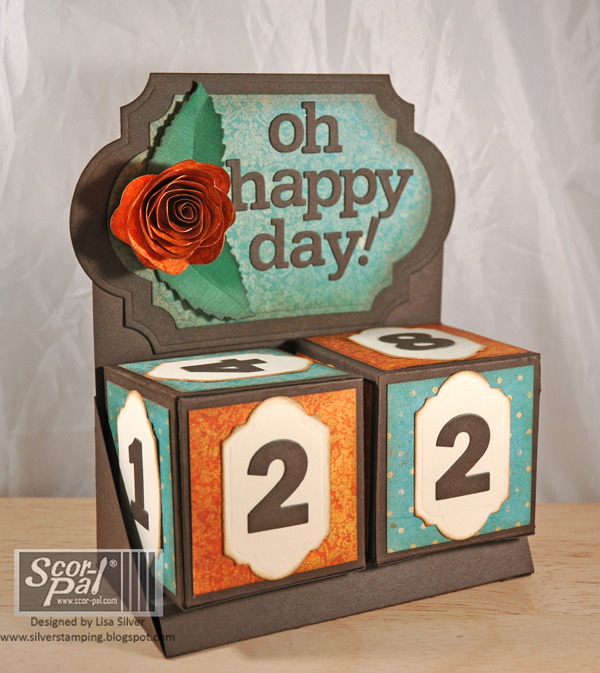
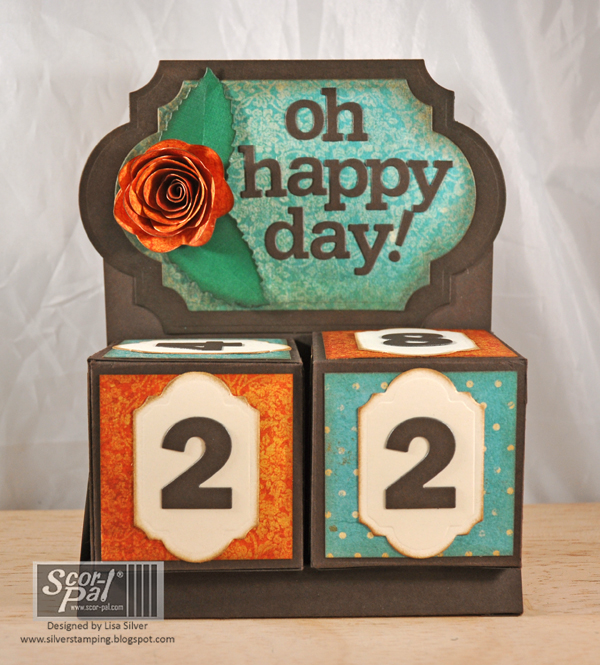
Hello! It's Lisa Silver here today with details on how to create your own Perpetual Calendar with paper.
I was inspired by so many projects available on the web. I've created altered wooden perpetual calendars in the past myself, but was intrigued with the idea of doing one entirely from paper. I was inspired by two spectacular projects and designer's work. Jamie Lane created a wonderful Advent Calendar with room to showcase a darling holiday image. Cindy Lawrence designed an elegant countdown calendar. Thank you ladies for your inspiration.
Oh Happy Day!
Supplies:
Ink: Brushed Corduroy Distress ink by Ranger
Paper: BoBunny Vintage Dot double sided papers (Burnt Orange and Ocean) 80# cardstock, Whipped Cream Pop-Tone Cardstock 100# and Hot Fudge Pop-Tone Cardstock 100# from DiscountCardstock.com
Other: hot glue gun, liquid glue, precision scissors, sponge, Spiral flower and Labels 28 dies by Spellbinder, number dies by My Favorite Things, Leaf die by Cheery Lynn Designs, letter dies by Papertrey Ink, corner rounder by Zutter
So, let's get started!
Step 1: Let's create two cubes for our numbers.
Follow the template below to create your cubes. Begin with a full sheet of cardstock and score with your Scor-Pal scoring board and Scor-tool as outlined below. Carefully trim with a precision scissors all the shaded areas.

Here's my cube base, with the added Scor-tape on all the small flaps.
TIP: Round the corners of all the flaps to make it easier to assemble the cube.

Fold your base to create your cube.

With your cubes complete, it's time to add your design flair! The completed cubes measure 2.5". Trim patterned paper to fit each side. Adhere numbers to each side.

To make it easy for your project, this is how you'll need to number the sides in order to make it function for a month of days.
Block 1 numbers: 0, 1, 2, 3, 4, 5
Block 2 numbers: 0, 1, 2, 7, 8 and 9 (which will also function as your number 6)
Step 2: Now, let's create your calendar base.
Cut and score a piece of cardstock using the template below.

Add Scor-Tape to the 1/2" bottom flap and adhere at the 5-7/8" score mark. This will create a triangulated base, which I find helps to keep your cubes on the base.

Cut and score the side panels as outlined in the template below. Cut with your trimmer the shaded areas. This piece will help add stability to your base as well as sides to hold the cubes in place.

Snip along the bottom to create flaps that can be adhered to the bottom of the base.

Add a bit of Scor-Tape to back of the base to adhere it to the side wrap panel.

Step 3: It's time to decorate your project! Go wild!
I opted to create a project that can function as both a perpetual calendar, but also as a countdown calendar for special days like birthdays and anniversaries (or the last day of school).
But, the skies are the limit. You could easily make a center section to your project that is magnetic with changeable panels for each holiday or month!

Thanks for stopping by and joining me today!
Lisa
18 comments:
This is such a fabulous project!
thanks for sharing the tutorial-i'll put it onto my to do list :0) have a nice week! dagmar
thanks for sharing the tutorial-i'll put it onto my to do list :0) have a nice week! dagmar
thanks for sharing the tutorial-i'll put it onto my to do list :0) have a nice week! dagmar
thanks for sharing the tutorial-i'll put it onto my to do list :0) have a nice week! dagmar
thanks for sharing the tutorial-i'll put it onto my to do list :0) have a nice week! dagmar
Love this project - so useful!
always loved these - thanks for sharing - love your paper choices!
Sandra ltb
Nice color choice!
This is so cute and clever. Thanks for the tutorial.
Rae Ann O.
i love the style of this but it is confusing could you make a video of how it goes together i am having a proble with the base
Great little boxes and holder. I could find many uses for these!
I love this project! I'll have to try this. TFS
Lisa, this is really darling! I love it and I can't wait to try it!
Such a great present for hubby's desk! Love the idea.
Love these calendars! Great job!
Fab project! TFS
Great idea.
Post a Comment