
Hi, everyone! Here in Texas, cooler weather is finally hitting us and it has inspired me to update the traditional paper pumpkin. :)
Here is what I came up with:
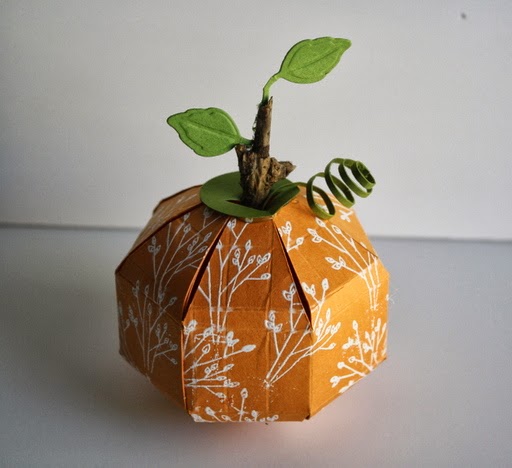
Isn't is cute? ;) I love the idea of making a few of these in different colors and sizes and displaying either as a center piece or through the house for some fall decor. :)
The How-to
I started out with a 4 1/4" by 11" piece of orange card stock that I heat embossed a pattern onto (Gina K Designs stamp set, Whimsical Autumn).
First, using your Scor-Pal, score along every 1/2" mark along the length of the card stock.

Then, turn it width-wise and score at these marks: 1/2", 1 1/4", 1 1/2", 2 3/4", 3", and 3 3/4".

On the surface of your Scor-Mat, cut off triangular sections from both ends of your scored card stock using a craft knife and ruler as shown below. Start at first corner and cut diagonally stopping at third scored line down (the line scored at 1 1/2"). From there, position your ruler and cut to the top of the next 1/2" line continuing that cutting pattern all the way across.

Do the same technique to both the top and bottom of the scored card stock.

Turn the piece over and using a bent tool, press and create a rounded shape on each section of the piece by pressing firmly over a foam pad in vertical stokes.

Turn the piece vertically and create a round shape using the same technique as above.

Place stripes of Scor-Tape on the inside edge of each section.

Take the paper backing off and gently adhere the flaps together as show below.

Cut a 1" circle and glue to cuter opening. This will be the bottom of your pumpkin.

Cut a 1" circle and using a craft knife and your Scor-Pal mat, cut some cross-hairs about 3/4" long. This will be adhered to the top of the pumpkin and allow for a stem to fit inside.

Adhere the green circle to the top of the pumpkin using hot glue. For my pumpkin, I added a branch from my back yard to be the stem, hot glued a couple of Spellbinder's Foliage leaves, and added a fun curly vine for extra flair.

I hope you've enjoyed this little tutorial! Comment below with pics or links of your cute paper pumpkin decor--I'd love to see what you come up with!
Have a wonderful day!
Janice :)
14 comments:
What a fun project. Thanks for the tutorial.
Very cute projet! TFS.
Love the pumpkin!
Love the pumpkin.
Goergeous! Thanks for sharing
adorable will give it a try later today thanks
Que bello tutorial!!! Gracias por compartirlo!
Lovely. Great pumpkin.
This is very cute!
Adorable pumpkin!
janice you are very talented and creative, well done showcasing the power of the scor-pal
LOVE the pumpkin! What a great blog. Watching your Pinterest board too.
Mary
I have seen different pumpkins made, but they were just strips, like this one better. Thanks for sharing.
Oh my goodness!! This is so adorable!!!
Post a Comment