Thursday, February 28, 2013

Flip Flop Album by Katie Tate

My remake project was inspired by this Flip Flop by Eleonor McGarry
I decided to not only update it with newer paper lines but I also changed up the size a little.

Project recipe:
Papers - Sn@p Life by Simple Stories
Card Stock - Core-dinations
Scoring Tool - Scor-Pal
Adhesive - Scor-Tape

This the album finished


Start with 2 pieces of card stock measuring 6" by 12" scored at 4" and 8" along the 12" side. You also need 2 6" squares of card stock for the covers and 1 piece 2" by 6" scored at 1" on the 2" side.


Use the 2" by 6" piece to attach the 2 6" by 12" pieces together to form an accordion as in the photo.


Decorate the front and back covers as desired.


Decorate the back panels with coordinating papers.


Decorate the inner panels too.


Create the flaps for the album from pieces of card stock measuring 5 1/2" by 3 3/4" scored at 1/2" on the 5 1/2" side. Use Scor-Tape to attach the flaps inside the album.


Decorate the flaps and attach the the album.


The following are some views of the completed album.


Wednesday, February 27, 2013

Tiny Take Out Box by Tya Smith


Hello everyone! I was really excited about the assignment that we were given for this month to give our take on a project from the existing projects on Scor-Pal.com. Before I was on the Design Team, I was constantly trying out all of these projects on my own and loved all the many talented designers that added their talents to the website.

I decided to do my project based on the Tiny Take Out box designed by the incredibly talented Beate Johns. Here is a link to the original post : Tiny Take Out Box.

I added a little St. Patrick's Day twist to my box since that fun holiday is just around the corner. (Plus any excuse to add some chocolate to ANY project is a plus in my book!) :) Here is a peek at the project:


 Supplies used:
8x8 black cardstock
Border Punch
 (2) 2  1/2 inch Scallop Cirlces (Used Echo Park Kiwi Tiny Dot)
(1) 2 inch circle
(2) 1 x 2 inch banners ( used Echo Park Kiwi Small Dot on the Stripe Side)
12 inchs gold tuelle
Pop Dots
Glitter Shamrock Button
28 gauge gold wire
Wood Skewer
Candy

Here are the Steps to make your own:

Step 1- take 8x8 Black Cardstock and score at 1, 3, 5, and 7 inches


Step 2:
Turn paper and score again at 1,3,5, and 7 inches in the other direction.


Step 3:
Cut off outer panels of the box as shown. Make sure to leave the center section intact. These will be the sections we fold over.


Step 4:
Turn the box on the diagonal and line up with the 6 inch mark. Scor each of these sections on all 4 corners of the box up to the intersecting score line as shown. 


Step 5:
Using a border punch - punch out the border on all of the taller sections of the box.


Step 6:
Trim off the sections that you scored on the 6 inch line as shown. These are the sections that fold into the inside of the box.


Step 7:
Fold all of the score lines so you have nice, crisp lines to work with. Add adhesive to the inside sections of the box as shown:


Step 8:
Add adhesive on ONE side of the inner flaps as shown inside the box, and glue these down. Take the wooden skewer and place it into one of the chocolate candies. Glue this candy to the bottom of the box with Scor-Tape.


Step 9:
Add Dimensional Adhesive to the outside flaps of the box on all 4 sides as shown.


Step 10:
Add gold tulle ribbon and tie around the box with the bow in front.Add the rest of the chocolate candies.


Step 11-
Add the (2) 2 1/2 inch  Scallop circles to the front and back of the skewer. Add the 2 inch white circle to the front of one of the scallop circles. Type a fun, festive sentiment ( I used fonts Expo and Amelie for my example.) Add green glitter shamrock button and thin gold wire to the sentiment.) Add the (2) 1x2 inch banners to the bottom of the scallop circles.


 Happy Scoring!
Tya

Tuesday, February 26, 2013

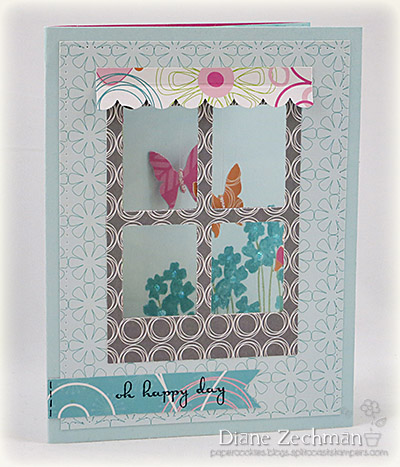
Flying Butterfly Pop Up Card by Diane Zechman


Diane, here. Today I chose to make the Flying Butterfly Pop Up card. I changed it up a bit, so I also took a few pics along the way. Here's my card from the front. You can see the punched butterflies peeking through the window...


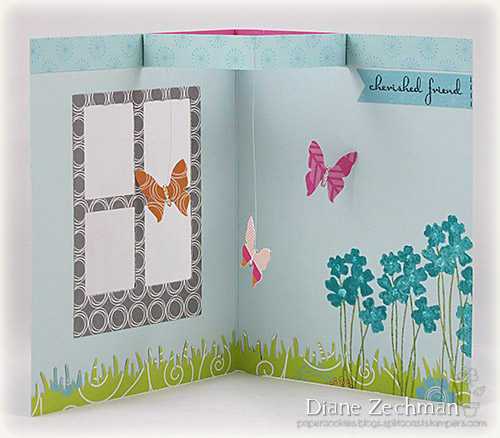
When you open the card, the butterflies are "flying"...  


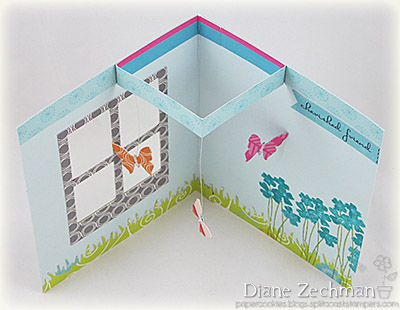
 And here's a view from the top so you can see how the butterflies are hung. Instead of using ribbon as in the tutorial, I attached them with a light fishing line.  


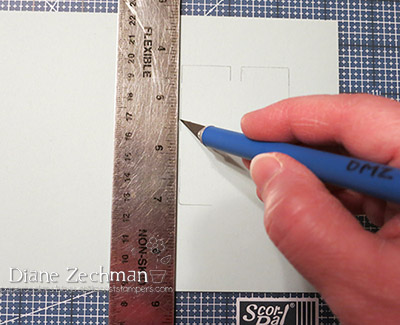
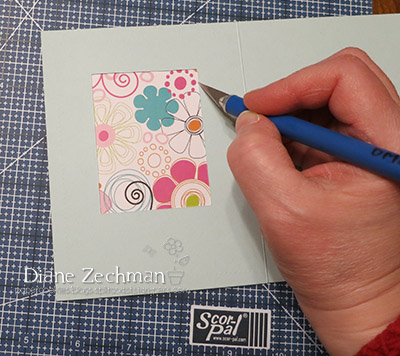
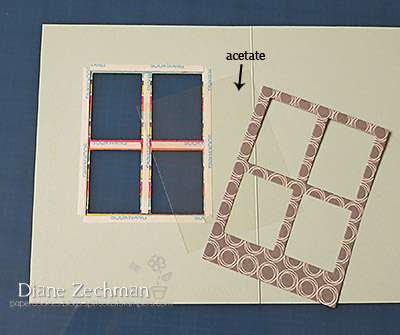
 I used some Momenta papers from the Kaleidoscope collection and an SU! Soft Sky cardstock base. I thought it would be fun to have an actual window in the front of the card. First I diecut 2 windows with a QuicKutz die (one for the card front and another for the inside). Then lay one window diecut onto your card front and trace the opening or window panes. These will be your guidelines for cutting an opening. Using a metal ruler, Scor-Mat, and craft knife, cut slightly outside of the traced lines.


 Next attach your patterned paper layer (if you have one) to the front of the card and turn it over. From the inside, cut away the middle of the layer using your previous cut as a guide.  


 Attach the 2 window diecuts to the front & inside with 1/8" Scor-Tape, sandwiching a piece of acetate between them.


 For the inside, I used a 3/4" x 8 1/2" strip of paper and punched one edge for the grass. Then I cut two 1/2" x 8 1/2" pieces for the top and scored/taped as directed. I used 2 punch-outs for each butterfly, attaching the fishing line between them with Scor-Tape. Finish as desired. I added a valance to the window and stamped sentiments & flowers. To finish it off, I used a tracing wheel and Stickles. Here's the inside again...
 

Monday, February 25, 2013

Half Window card by Gini Cagle


Good Morning!
Gini, here.
There are so many great tutorials on the Scor-Pal website, but we thought it would be fun to revisit and update some oldies but goodies.

I chose to make a Half Window Card, as was originally designed by Vicki Hook. The original version relied on the old Coluzzle cutting system, and now that there are so many wonderful dies available on the market, it opens up so many more design possibilities.


Supplies:
Cheery Lynn Designs Dies: 
Ankara Lace Doily with Angel Wing DL232
Lace Corner Deco I B174
Small Leave One D133
Daisy Strip B259
Mesh Border B254
Thank B230
You B235


Cut a piece of cardstock 6" x 12". Score at 3" and 6".  Fold as shown.


Cut patterned paper to add to the card base.
 (2)  2 7/8" x 5 3/4"
(2) 5 3/4" x 5 3/4" : Set one of these to the side. 
Ink the edges of the paper. Use Scor-tape to adhere the panels to the base, but on the first panel, do not put the tape along the edge that will have the cut.


 Take the angel wing die (this is an outline die, that matches a fancy doily die, but has one edge that is not a cutting edge).  Tape the angel wing along the scored/folded line. **If I want to hold something temporarily in place with tape, onto pretty patterned paper, I stick the tape to my skin a couple of times, before adhering to the paper, to make it less sticky and to decrease the chance of messing up my patterned paper.


This is what your card will look like after you run it through your die cutting machine.


When I added my doily on top of this, I wanted to have a consistent cream background underneath, so I cut a full circle with the angel wing (make the first cut, line the up so that it completes the circle, tape in place and cut).  Then I matched this up with the half circle, glued in place, then added the doily on top. This will be the inside portion of the card.


Take the second piece of designer paper  5 3/4" x 5 3/4" and lay it on top of the front, to see where the doily fits.  Tape your angel wing to the patterned paper, and using the two step method, cut a full circle from this piece of paper.  Then line it up on the front and attach.


Add your second doily to the front. Embellish as you please.


I love how this card looks like it's flipping around when you open it and hope that you will give it a try.  

Sunday, February 24, 2013

Baby Shower Favor Boxes With Guest Designer Melissa Craig

Hello everyone,  Melissa Craig here.  I am sharing my MONUMENTAL project with you today.  And let me tell you, I was thrilled that I had my Scor-Pal - it really did come to my rescue.

My friend at work is due to have a sweet baby girl in about 4 weeks so, my friend Evelyn and I set out to make the favors for her shower, which was yesterday.  Well, I ended up making all 40 of them by myself, Evelyn got really sick.  I found this great SVG box from a sweet little shop that I can't find at the moment.  I'm pathetic, I know.  Anyway, once I got it sized down to what I wanted, I was thrilled to discover that it fit on my Scor-Pal with only 1 adjustment needed.  Wow!  What a time saver.


So here is the front of the favor box.  I added an umbrella which was cut from Die-Namics Umbrella die.  The just dressed up the handle with a bit of ribbon.  I used glue to stick on the umbrella, but I did use Scor-Tape to adhere the box.


This is what it looks like on the side.  Cute right?  You have no idea how relieved I was to see this box fit into my Scor-Pal.  I was able finish 40 favors within the time it took to watch Phantom of the Opera and Memoirs of Geisha.  Mommy-to-be and friends LOVED them!

Have a wonderful Sunday!
Hugs & Blessings,
Melissa

Saturday, February 23, 2013

Picnic Caddy by Toni Storie

It's time for another fun Scor-Pal project. This time I will be making a Picnic Caddy.  This has so many potential uses that I am quite excited about it.  I can see this caddy personalized for parties, dolled up for Easter or filled with school supplies for a teacher or student heading back to school.  The possibilities are really endless.

 
Details -  Paper: Whisper White, Black Licorice, Crush Curry, Fancy Pants Designs Hopscotch dp; Accessories: Scor-Pal, Scor-Tape, paper snips, corner rounder, Nestabilities. 


For this project, you will need: 
one 12" x 12" piece of card stock
four 4 3/4" x 3 1/4" pieces of card stock
four 4 5/8" x 3 1/8" pieces of card stock
four 4 1/2" x 3" pieces of patterned paper
two 8 1/2" x 5" pieces of card stock
two 7 1/2" x 3 7/16" pieces of card stock
two 2 1/2" x 1/2" pieces of patterned paper
paper snips
corner rounder
Oval shaped die or punch
To begin, place your 12"x 12' piece of card stock in your Scor-Pal and score 3 1/2" and 8 1/2". 


Rotate your card stock 90 degrees and score again at 3 1/2" and 8 1/2".


Cut on the score lines from the outer edge in to the first score line, as shown below.


Crease all of your folds and place Scor-Tape on all four corner tabs of the what will become our picnic caddy base. 


Remove adhesive backing and assemble picnic caddy base.


Mat each of the four 4 1/2" x 3" patterned paper pieces on the 4 5/8" x 3 1/8" card stock pieces (yellow).  Mat again on top of the 4 3/4" x 3 1/4" card stock pieces (black).  Adhere each of these double matted patterned paper pieces to the sides of the picnic caddy base.  My patterned paper comes from the Fancy Pants Designs Hopscotch Collection and this particular piece is called Charming. 


Now place one 8 1/2" x 5" piece of card stock in your Scor-Pal with your 8 1/2" side along the top fence.  Score at 2 1/2".  Repeat with a second piece of  8 1/2" x 5" card stock.


Round the top corners (those furthest away from your score line) of both pieces of the 8 1/2" x 5" card stock.  Die cut or punch an oval shape under the rounded corners.  To get my ovals in the exact same spot, I used removable adhesive to keep my card stock pieces aligned perfectly and then ran them through my die cutting machine with an oval die.  


Crease the score lines of these two pieces and use Scor-Tape to adhere the two pieces together above the score line.  Line the bottom of the two flaps with Scor-Tape.


Remove Scor-Tape backing and carefully adhere this piece inside your picnic caddy base.  You have now created your handle for your caddy.


Place the 3 7/16" side of a  7 1/2" x 3 7/16" piece of card stock against the top fence of your Scor-Pal and score at 1/2".  Turn you paper 180 degrees and score at 1/2" again.  Repeat this on the next 7 1/2" x 3 7/16" piece of card stock.


With the 7 1/2" side up against the top fence, score at 1/2", 3 1/2", 4" and 7".  Repeat this on the next 7 1/2" x 3 7/16" piece of card stock.


Trim out each 1/2" square as shown.  Repeat this on the next 7 1/2" x 3 7/16" piece of card stock.


Crease all of your score lines and apply Scor-Tape to tabs as shown.  Repeat this on the next 7 1/2" x 3 7/16" piece of card stock.


Remove backing on the Scor-Tape and assemble small box to be used as an insert in the picnic caddy.  Repeat this on the next 7 1/2" x 3 7/16" piece of card stock.


Adhere 2 1/2" x 1/2" pieces of patterned paper to the top of each insert. 


Apply Scor-Tape around the remaining three sides of the inserts. 


Remove backing from the Scor-Tape and carefully adhere inserts into the picnic caddy base, creating four separate compartments.


Fill your picnic caddy as desired.


I loaded my caddy with paper napkins and plastic cutlery.  To test out my caddy, I stuffed it full (not shown here) and the caddy turns out to be quite strong!

Thanks for reading along through today's tutorial.  Have a wonderful day!