

Today we are continuing our week long feature with our friends at Pink Paislee. Our designers have out done themselves once again to bring you some fun and exciting projects using not only Scor-pal products, but also, a mix of papers and embellishments from Pink Paislee. Of course, that's not all. The Pink Paislee team is playing with Scor-pal products this week on the Pink Paislee blog.
As always, there a prizes to be won!!
Be sure to visit both the Scor-pal blog and Pink Paislee blog each day this week to see more project ideas and to enter for chances to win some great prizes. To be entered into the random drawing for a Scor-buddy prize simply leave a comment here on the Scor-pal blog each day for a chance to win.
There will be other ways to earn extra chances to win as well, so be watching for those announcements each day.
Today's bonus entry is for those readers who use Pinterest! Earn an extra entry by becoming a follower of the Scor-pal project board on Pinterest where you will find all sorts of great projects. (and a few contests to be announced as well!) Simply follow the board and come back here and let us know you did.
Deadline for entering is 8am Central, Monday, December 3, 2012.
First up: Scor-pal Designer Abby Henderson:
Hey everyone..I have a great project/tutorial to share with all of you today using the beautiful Portfolio Collection from Pink Paislee along with some of their embellishments and of course Scor-Tape and my ever handy Scor-Pal!
I was inspired to create this project as soon as I opened my goodie box that was full of the Pink Paislee goodies...I couldn't wait to get started. I started with the basic steps from the Mini Accordian File Folder by Maria Bell but added my own twist and take on this project by coming up with my own closures for the minis & I made the pockets instead of using an pre-existing envelope but more about that in a bit. First let me show you my project...

Products used:
Scor-Tape
Scor-Pal
Pink Paislee Porfolio Collection, Artisan Chipboard Arrows, Corners, Zig Zag Ribbons, Portfolio Alphabet Stickers, Words-Travel
Tim Holtz Distress Inks-please see my blog for full list
Colorbox Cat Eye chalks-Yellow Citrus, Yellow Cadmium
Tim Holtz Idea-ology knobs
Grunge Paper
3 Girl Jam Crinkle Ribbon
Want 2 Scrap bling
Various punches & dies-please see my blog for full list
Trims, ribbons, lace
I created the covers for both accordian minis from two pieces of 12x12 chipboard. I cut the chipboard to 4 1/4 x 5 1/2 pieces, in this example I cut 4 covers since I was making two minis.

Next, after selecting the papers I wanted for my covers, I cut the card stock to 5 x 6 1/4. I then covered the edges of the chipbard pieces with Scor-tape and covered them with the card stock. The next step was to add more Scor-Tape to the edges of the exposed card stock. Make sure you use your Scor-Tool to burnish your Scor-Tape before you remove the backing : )

I did this step for all 4 pieces-note that I tabbed the corners..this makes it easier to fold over edges over the chipboard & gives it more of a completed book feel. Here's a photo of the completed outside covers...

Next I cut 4 pieces of the card stock, these will be used to cover the exposed chipboard on the inside of your mini.


To make the accordion fold, cut a piece of card stock to 4 14 x 8.


Once you have your score marks, use your Scor-Tool to fold along the score lines, the indented score lines are your mountain. Add some Scor-Tape to both ends of your accordion fold card stock. This is needed to adhere it to your covers.

You will attach one end of each accordion strip to the bottom inside edge of your front and back covers. This is how it will look when you're done with that step...

Please note that I did ink the edges of my card stock before I assembled the accordion folds. This isn't a required step of course..I just like the look the distressing ink gives to my projects : )
Instead of making the standard handle for the Accordion File Folder, I decided to make straps, much like a purse or satchel. I used grunge paper for this so it was flexible. The Scor-Tape works perfectly with the Grunge Paper....

I inked one side of the Grunge Paper and added a strip of card stock for the outside. I punched a hole for the knob..I didn't really measure for this, I just laid it on the front of the album and chose the area. You will want to keep in mind how you will be embellishing the front cover as you'll need to make sure you leave enough room for the strap to fit in around your embellishments.
Since I wanted to use as much of the Pink Paislee papers in my projects, I chose to make my own pockets for the inside of the minis. After selecting the papers I wanted to use I cut them to 9 x 6. I hand cut the basic shape of the envelope and used my Scor-Pal to define the fold lines. I then added some Scor-Tape to each pocket I created.

I then added more Scor-Tape to the back side of each pocket so I could adhere them to the accordion folds in each mini.


For the rest of the project, it was nothing but creative play : ) I used more of the Portfolio collection, chipboard arrows, corners, zig zag ribbons, glitter alpha stickers and dimensional foam words from Pink Paislee...along with a few other scrappy items from my stash. The next series of photos shows the completed tags (both sides) for the pockets as well as the covers and inside of the mini albums. Please be sure to check out my blog after this week is over for photos of each tag as I'll just be sharing a few here in this post : )


Think of all the fun projects you can create with the accordion fold mini album using your Scor-Pal, Scor-Tape and of course the FAB paper collections from Pink Paislee.
Thanks for checking out my projects..now break out your Scor-Pal and get creative!!
Next up, Scor-pal Designer Virginia Nebel
I adore Pink Paislee's Portfolio collection. The journal cards in this collection are wonderful prompts to recording our everyday life stories.
If you are doing Project Life or December Daily this would be a fun inter-active project to record your story. It is hard to tell by the photos , it really is a little mesmerizing as you 'flip and flop' through your memories and journalling. The template I used to make this project is the never-ending card.


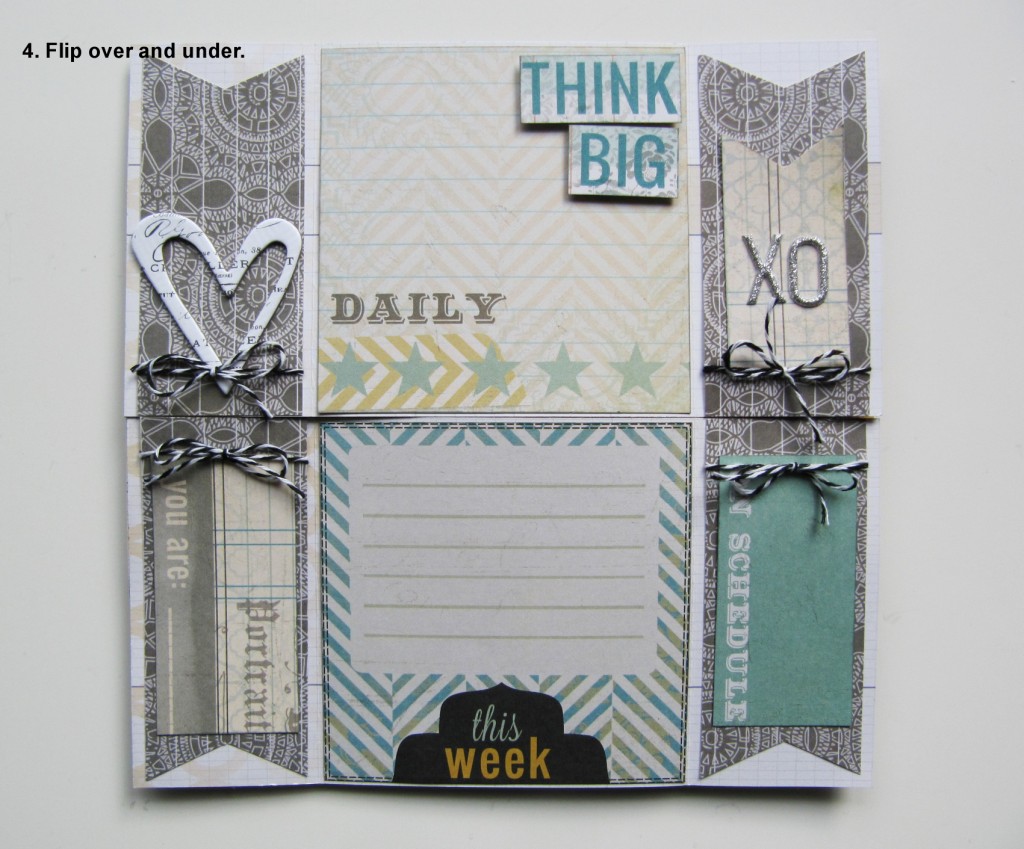

Supplies: Pink Paislee Portfolio pattern papers; Artisan words, Artisan wings, Artisan chipboard; Glitter alphabets. Queen&Co. twine, Memory box diecut
Here's how to make the never ending card.
1) Take 4 pieces of 8 x 4 inch pattern paper and score each at 2 and 6 inches.
Take 2 of the scored pieces and line them up so that the scored lines run vertical (shown in black lines in the image below)
Place score tape at the just the corners making sure the adhesive it outside of the score line and within 2 inches from the outside corner edges.
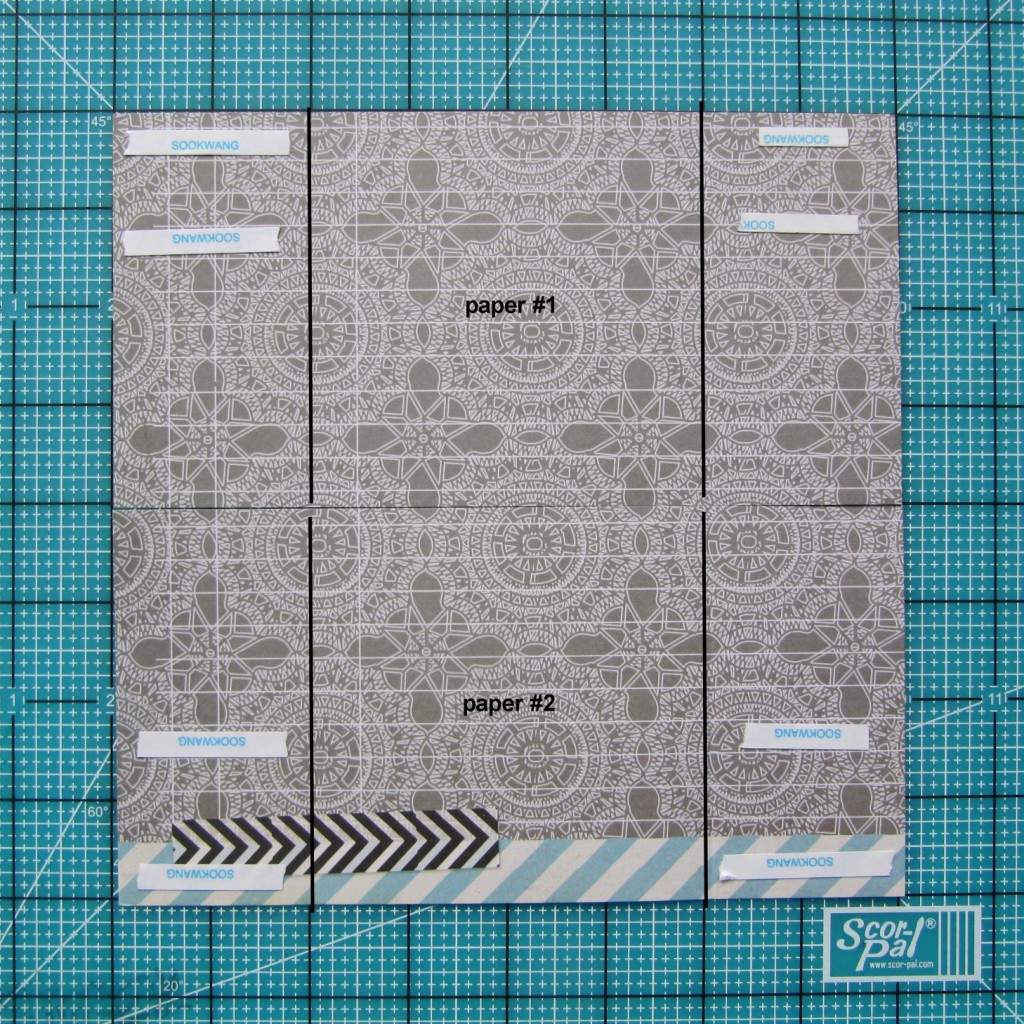
2) Peel off liner from adhesive strips, place the other two 8 x 4 inch papers directly over the top of the first two making sure the score lines are perpendicular to the score lines underneath. The papers are now secured at the corners.

3) You have just finished the base of your never ending card! Now you have to 'train' your card along the folds. First flip the pages open left and right and crease where the paper want to fold.

4) Now flip the top over and bottom under.

5) Now flip the pages over to the left and right.

6) This is the last rotation in the sequence, flip the top over and bottom under.

7) Now you are back to the beginning of the card. Have fun decorating!

Hope you give this easy project a try, I think you will like it!
Have a wonderful day!
36 comments:
So cool love it! Love all the detaisl and that you shared all the directions!
This is awesome. Love the details.
what a fabulous mini album and the papers are so beautiful!
the mini - it's gorgeous!
Wow so much detail in these great projects... love the never ending card.
Great projects! Thanks for sharing them! Can't wait to see what tomorrow will bring!
I love this and thank you so much for the tut on this I'd love to try to make one :)
those papers are fantastic love the colours
Great projects..Definitely want to try making that never ending card..thanks for the tutorial.
I love seeing all of the projects step by step!
Coll projects, love the paper. :)
this is great! TFS :)
What a great mini album! I really love how that turned out, great details and interactive elements!
I'm already a follower on Pinterest
Great projects, and the papers are awesome.
I'm already a follower on Pinterest.
Just popped over to become a follower on pinterest - how wonderful to have all the projects so readily available.
Great projects today too
Beautiful projects x
Awesome projects today--great use of scoring.
Great scoring projects! So many ideas from everyone.
Carla from Utah
Abby and Virginia, you rock. Loved your projects and I kept staring at them, just stunning.
I follow you on Pinterest bealawson!
Oh my, these are fabulous and I love the tutorials given with each project.
The mini albums is so sweet.. Love the yellow and great whites.. and the never ending card I never have seen.. great idea.
Bonus: I have already been a follower on pinterest. I'm addicted.
Super fun project idea!
Carol B
ciaoitalia2007(at)gmail(dot)com
I follow you on Pinterest!
Carol B
ciaoitalia2007(at)gmail(dot)com
The endless card is so much fun, I think my family believes this to be the neatest thing I have ever tried! Love the envelope album as well, I do like that every bit of it was made of PP papers. What a great way to do the front covers.
I do follow on Pinterest as well.
wonderful projects. the accordian is so cool, and the never ending card is such a surprise when you open it up. I love the picture tutorials today, so very helpful and well done.
I already follow pinterest.
PaperCraftingAddict Scrapper
What gorgeous papers! They all coordinate so well.
thanks for sharing creative inspiration, great work
ava g
Wow! Love all the details Abby! And Virginia's never ending card totally rocks!
You gals are sure showing us some amazing things here. Thanks!
I love the never-ending card idea
I'm a follower of the Scor-pal project board on Pinterest
Post a Comment