

Today we are thrilled to be kicking off a week long feature with our friends at Pink Paislee.
Our designers have out done themselves once again to bring you some fun and exciting projects using not only Scor-pal products, but also, a mix of papers and embellishments from Pink Paislee. Of course, that's not all. The Pink Paislee team is playing with Scor-pal products this week on the Pink Paislee blog.
As always, there a prizes to be won!!
Be sure to visit both the Scor-pal blog and Pink Paislee blog each day this week to see more project ideas and to enter for chances to win some great prizes. To be entered into the random drawing for a Scor-buddy prize simply leave a comment here on the Scor-pal blog each day for a chance to win.
There will be other ways to earn extra chances to win as well, so be watching for those announcements each day.
Today's, bonus entry comes by becoming a blog follower using the Google connect feature in the sidebar. Simply follow the Scor-pal blog and leave a comment here on this post telling us you have done so.
Deadline for entering is 8am Central, Monday, December 3, 2012.
Our first project this week comes from Scor-pal Designer Gini Cagle.
It's always fun to try different fancy folds on cards and the trendy papers from Pink Paislee's Portfolio Collection seemed perfect for this angular folded card.

WorldWin Cardstock
Clearsnap Smooch Spritz
Clearsnap Color Box Wild Hare Pigment Ink
Spellbinders Labels Twenty-One
Cut card stock base 6" x 12". With the long side against the upper fence, score at 3", and 9". Turn a quarter turn and score at 2". Cut as shown below.

Score from the upper inside corner, to the lower outside corner on both sides.

Fold in, towards the center.

Fold the lower edge, back up towards the folded edge, so they line up , and fold using your Scor-pal tool.

Your card frame is now ready to embellish.

Ink all edges using grey ink. Cover all panels on the card base with coordinating patterned papers that are cut 1/4" smaller than the card base. For the center section of the card, cut a 6" x 6" piece of cardstock. Trace the shape of the Spellbinders label around the top, and handcut, just the top edge. Cut the patterned paper with the same die. and layer it onto the base. Layer other paperson the card as shown and decorate with the Pink Paislee embellishments.
When the card is folded and ready for the envelope, this is how it will look.
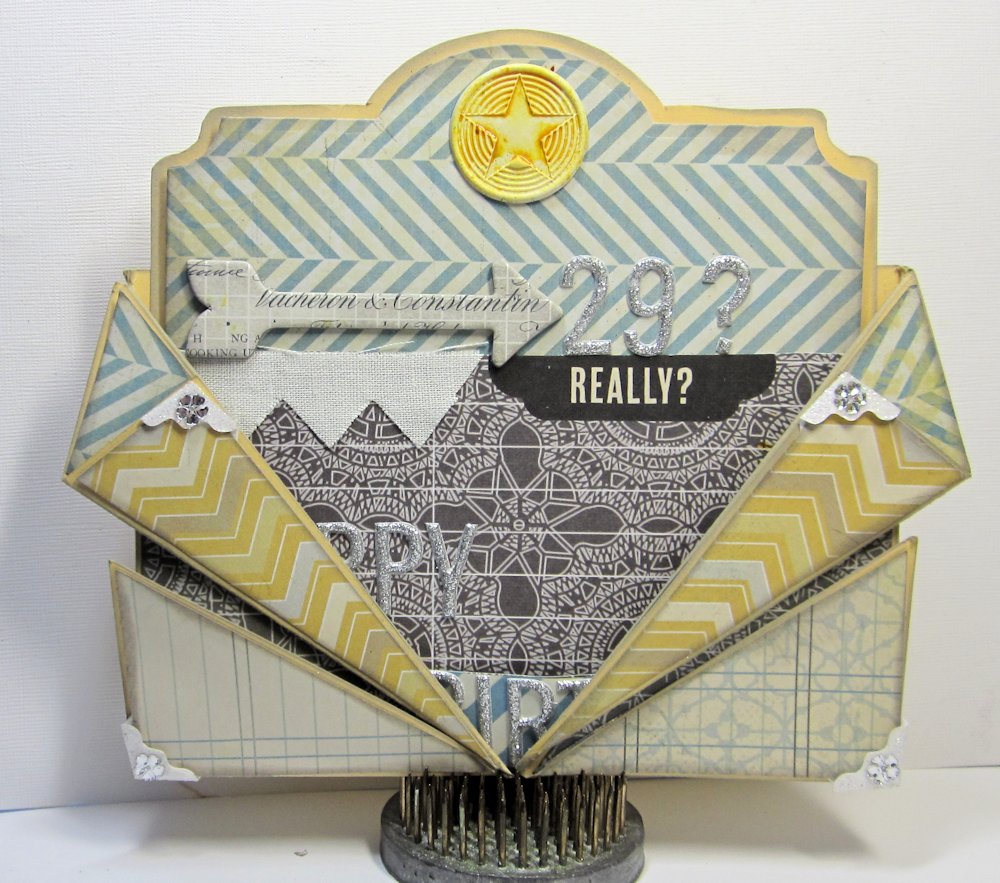
When the card is opened to display, the fancy folds will serve as a stand, to hold it up.


Hi Everyone, it's Lori here , I'm so tickled to be able to share this adorable picnic basket I made using Pink Paislee products and of course my Scor-Pal. It's a perfect place to tuck a homemade goodie gift for that someone special. I will say Pink Paislee's paper is such a heavy weight you can make this basket with just their paper, no cardstock needed. Let's jump right into the tutorial so you'll know how to make your own.
Supplies: Pink Paislee Designer Paper Portfolio, Pink Paislee Alphabet Sticker Portfolio,, Pink Paislee Artisan Chipboard/ Hearts, Pink Paislee Artisan Wings , Scor-Pal, Scor-Pal Tape
Other Products Used: Distress Ink, Liquid Pearls, Distress Markers, Velcro Fasteners
Step One: Cut designer cardstock 7" x 8 3/4 " and score on all four sides at 1 1/4"

Step Two: On all corners score from the intersected line of the first score to the corner and fold mountain up as the shown picture. Once you have it scored you'll want to be sure you crease your corner line well with your Scor-tool for a crisp edge.

Step Three: Apply your super strong Scor-Pal Tape to the inside of the mountain folds and also along one side and glue the mountain together and then to the interior of the box.

Step Four: Cut strip of designer paper to 1 " x 7 " and score at 1 1/2 " x 5 1/2" and fold.

Step Five: Using your Scor-Tape adhere to the middle of your basket. This is going to add strength but will also give a base for you top.

Step Six: Cut your designer paper 7 1/2" x 4 1/8" and score at 3/4" , 3 1/4", 4 1/4" and 6 3/4". Fold your end scores up and your middle the opposite. Apply tape down the middle of the top and adhere to the middle bar/base of your basket.

Step Seven: Cut a strip 2 " x 10 1/2" and score at 1/2' and 1 1/2" and fold inward and glue together. Apply handle to the outside of your basket and decorate as desired.

Here a close up of the finished basket

and here's the finished basket in full again
41 comments:
love this angular folded card...first time seeing this multi-fold technique!
Totally love the picnic basket! Great card too - thanks for the inspiration :)
fabulous projects! and they look so easy to make with a scorepal. thanks for the chance at winning one...would definitely be a dream come true for christmas :)
hugs, divinity
Great projects! That card is so neat, I've never seen that fold before, and the picnic basket is adorable - perfect for gift giving!
I follow your blog via RSS feed
Thanks forthe chance to win.
I'm a follower
Great inspiration - thanks - I have been a follower for some time
What great projects! Both are so different and beautiful! TFS!
adding that picnic basket to my bucket list.....
ava g
following as usual with my note book so that i can try out some of these great projects from the DT.
ava g
Fabulous fold on the card and cute idea to make a picnic basket.
I follow with GFC as Sue D
Awesome projects!! would so love to own a score-pal..thanks for being so generous
wow love these projects, the angular card is so unique. and the basket would be great for holiday cookie giveaways. thank you for the inspirations.
Im already a blog follower. thank you!
Great projects. Love the multi-fold card. The basket is too cute.
I'm a follower.
Wow these are awesome. I love how the card stands up with those folds and what a cute basket.
I followed both of you on my reader but now I am official.
Awesome card and the basket is too cute! Great projects!
I am a follower on Google connect!
Gini and Lori's projects are such a perfectly matched set, it's hard to believe they weren't made by the same person! I especially like the art deco feel of the card, really unique folds.
I absolutely subscribe to your blog and also like you on FB.
Lovely work ladies! Fun fancy fold and super cute picnic basket!!
Wow what wonderful projects!
Wonderful projects and such interesting scores! Thanks for
sharing.
Carla from Utah
oh wow! this is waaaaaaaay over my comfort level, but the result is absolutely gorgeous! maybe i'll do it one day)
Wow such amazing projects... thanks for the detailed pictures.
I am already a follower.
Wonderful projects! Love the funny folding of the card! Great idea!
Awesome projects! Love the detailed tutorial
These are absolutely stunning.
What a unique card... Never seen this fold before! And loved the beautiful basket, too cute!
Blog follower and huge fan:-)
Love the unique fold in the card and the tutorial was fabulous. Can't wait to try it and the basket is so cute. AReally appreciate all the great tutorials that you have,
Love these! Thanks for the project ideas!
Carol B
ciaoitalia2007(at)gmail(dot)com
I am a blog follower!
Carol B
ciaoitalia2007(at)gmail(dot)com
I am definitely going to try my hand at both of these tomorrow. Me and my PAL, Scor Pal that is! Thanks so much for the tutorials.
Great projects!
I already follow you on Google Connect
Post a Comment