Wednesday, May 29, 2013

Scor-Pal and Paper Smooches Week with Abby Henderson

Hi everyone, This week the designers from Scor-pal and  Paper Smooches  have an awesome blog hop for you.  Be sure to stop by everyone's blog to see what they've been up to.  Scor-Pal will be giving away 3 prizes packages - each one includes a Paper Smooches stamp that we've shown this week as well as Scor-tape. Leave comments on our posts this week for your chance to win!

Hi Friends! This is Abby with ScrappinAbby and I have some really cute, quick & fun tags to share with you using my Scor-pal and some of the lovely stamps from Paper Smooches. The DT with Scor-pal is partnering up with Paper Smooches this week and I was really excited when I saw the stamp set I received. I knew right away what I wanted to create with mine and couldn't wait to play : )
I made some quick & easy gift bag tags doing some simple embossing using my Scor-pal & using the Retail Therapy stamp set from Paper Smooches...

I used my Scor-pal to create different embossed backgrounds on each of the 4 pieces of vellum I chose to use on these tags.  Tag 1...I cut a piece of vellum and laid it on my Scor-pal on the diagonal. I then made a score mark every 1/2". I then rotated it and repeated the 1/2" score mark pattern. This creates a diamond embossed design. 
Tag 2...I did a simple line score to create a pin-stripe type embossed look. After placing my vellum on the Scor-pal I made a score mark at every 1/4". 
Tag 3...I wanted to create a simple grid pattern. I again placed my vellum on the Scor-pal..made a score mark at every 1/4"...rotated my vellum and made score marks again at the 1/4" mark. This creates a really cool grid look...
Tag 4...I just wanted to create a simple line pattern so all I did was lay my vellum on the Scor-pal and simply make a score mark at each line on the board until I reached the end of my vellum. This creates a really cool graduated line effect...
I used Scor-tape to adhere each of the vellum pieces to my tag card stock. I love using this tape as it is transparent and you can't see it through the vellum.  I used a variety of the Paper Smooches Retail Therapy stamps on my tags along with some flowers, bling, trims and laces to give each tag it's own unique look.
The Paper Smooches stamps work so well with the vellum and stamped so crisp and clean on the embossed lines.  Thanks for stopping by the Scor-pal blog today and for checking out another ScrappinAbby project. I hope I inspired you to create some really quick and easy tags using your Scor-pal to create some really cool and simple textures/backgrounds for your projects.  I will have a short video on my YouTube Channel so be sure to check it out.  Happy Craftin!!  

Scor-Pal and Paper Smooches Week with Toni Storie

Hi everyone, This week the designers from Scor-pal and  Paper Smooches  have an awesome blog hop for you.  Be sure to stop by everyone's blog to see what they've been up to.  Scor-Pal will be giving away 3 prizes packages - each one includes a Paper Smooches stamp that we've shown this week as well as Scor-tape. Leave comments on our posts this week for your chance to win!

Hi!  It's Toni here with another fun Scor-Pal project.  This week the Scor-Pal team is hopping with the design team from Paper Smooches!!! Oh man, this is going to be fun and you will not want to miss one single photo!  Make sure you visit the Paper Smooches blog, as well as the Scor-Pal blog.  My project for this hop is an origami gift box.
For this project, you will need:
With the 8 3/4" side of the card stock against the top fence of your Scor-Pal, move the left hand edge of the card stock to the 1/8" groove.  Score your card stock at 3" and 6".
Rotate the card so that the 11 7/8" side of the card stock is up against the top fence of your Scor-Pal.  Score at 1 1/2" and 4 1/2".  Then score at 2 1/2" from the top of your Scor-Pal to the first horizontal score line.  Score again at 2 1/2" from the second horizontal score line to the bottom of the card stock.
Rotate the card stock 180 degrees and repeat previous step.
Insert your Scor-Mat into your 
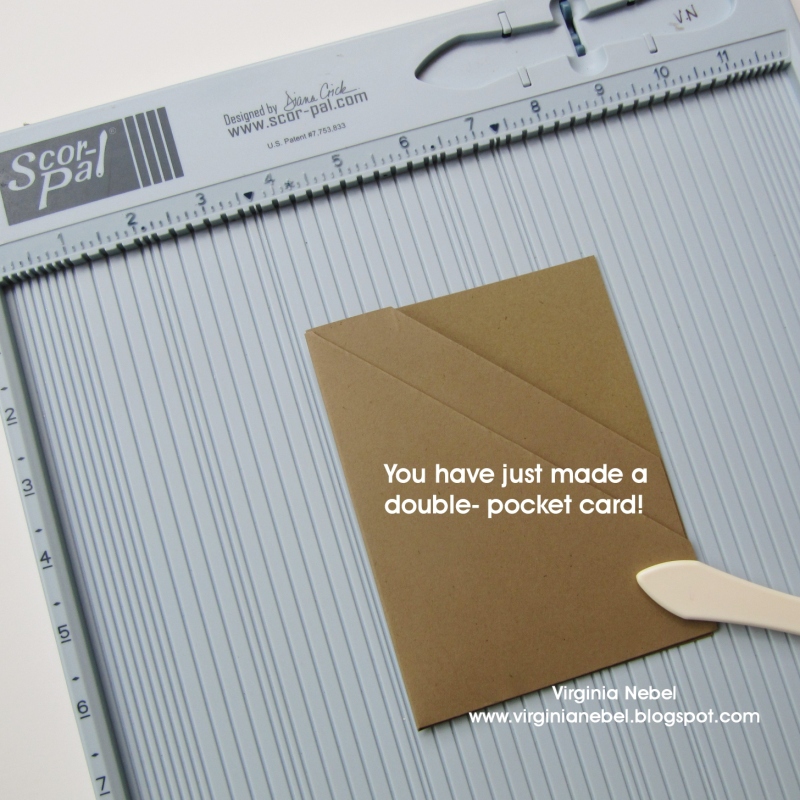
Scor-Pal and place your card stock with the 11 7/8" side up.  On the 2 1/2" score line, cut down to the first horizontal score line.  Repeat in the next three corners.
Rotate your card stock so that the 8 3/4" side of the paper is aligned with the top fence.  On the first vertical score line, cut from 1 1/2" to 4 1/2".  Repeat for the next three cuts as shown by red lines in the photo.
Turn the card stock over and crease all of the score lines. 
Flip the card stock over and adhere Scor-Tape as shown. 
Remove backing on the Scor-Tape and adhere sides together, forming the base of the box.
Trim 1" tabs as shown below.
Flip base of box over and line trimmed 1" tabs with Scor-Tape as shown. 
Remove adhesive backing and adhere to the adjacent square panel, creating side closures.
Here is a view of the origami box with the side closures folded up.  Now your box is ready for embellishment. 
Take a peek at these fabulous Paper Smooches images from the new set called Retail Therapy that I used to embellish my origami box.  Paper Smooches has the most fun fonts and I couldn't resist this one.  I stamped my sentiment and then punched it out with a small circle punch.  I backed the sentiment with another larger circle and a rosette.  It needed just  a bit more, so I inked up the bow.  I stamped, colored and trimmed it out.  Finally, I placed a rhinestone in the center and hung it off my sentiment. 
Doesn't this just make you smile?  Here is one more photo to show you how the finished box looks as you open it up to reveal a little gift.  I'll be placing some stick on earrings in her for my daughter who just turned seven!
Thanks for coming by!  Don't forget to head on back to the Scor-Pal blog so you don't miss a thing!

Details - Stamps: Retail Therapy (Paper Smooches); Paper: Whisper White, Melon Mambo, GKD White, wrapping paper; Ink: Melon Mambo, Tuxedo Black; Accessories: Scor-Pal, Scor-Mat, Scor-Tape, hot glue gun, circle punches, stampin' dimensionals, paper snips, Copic & Touch Twin Markers, rhinestones.

Tuesday, May 28, 2013

Scor-Pal and Paper Smooches with Gini Williams Cagle

Hi everyone, This week the designers from Scor-pal and  Paper Smooches  have an awesome blog hop for you.  Be sure to stop by everyone's blog to see what they've been up to.  Scor-Pal will be giving away 3 prizes packages - each one includes a Paper Smooches stamp that we've shown this week as well as Scor-tape. Leave comments on the Scor-Pal blog this week for your chance to win!

  I received the Think Fast stamp set from Paper Smooches, and knew that it would be fun to make a french-fry box.

I used a template for the box, and although I didn't have to do any measuring/scoring, I still think it is so much easier to use my Scor-Pal to score the marked lines.

I also used my Scor-Pal to make my dimensional banner.  I cut a strip of paper 3/4" wide, stamped my sentiment, and scored 2 marks to the left and 2 marks to the right (each separated by 1/2").

Supplies
SEI Patterned Paper
Clearsnap Ink
Copic Markers

Scor-pal and Paper Smooches Week with Virginia Nebel

 Hi everyone, This week the designers from Scor-pal and  Paper Smooches  have an awesome blog hop for you.  Be sure to stop by everyone's blog to see what they've been up to.  Scor-Pal will be giving away 3 prizes packages - each one includes a Paper Smooches stamp that we've shown this week as well as Scor-tape. Leave comments on our posts this week for your chance to win!

Hi, it's Virginia here and excited to share with you a cute little gift card holder I made using Paper Smooches Retail Therapy stamp set and the Scor-pal tool.


The construction of this circle card uses the popular double-pocket card style.  Below I've included the steps on how to create the double-pocket and I've added the circle twist at the end.

First, start with an 8.5 x 11 piece of paper and score into equal quandrants at 4.25 inches vertically and5.5 inches horizaontally.


Then follow the folding steps below:


To keep the circle card together, use thin Scor-tape along the bottom half of each panel to secure the pocket together.  This double pocket card would also be a fun addition to your scrapbook pages to hold journaling tags too!