Tuesday, June 11, 2013

May Arts and Scor-Pal with Lisa Silver

Hello!  It's Lisa with a tutorial for a unique gift box.  With Mother's Day in mind, I created a mini Hat Box that will make a lovely way deliver a special present this year.

Supplies:
Tools: Scor-Pal scoring board in inches, Scor-Tool, Scor-Envi, Scor-tape
Ribbons / Trim: pink cord, crocheted lace and pink ribbon by May Arts
Ink: ColorBox Party Pink and Spearmint dye inks by Clearsnap
Paper: Pop-Tone Razzleberry 100#, Pop-Tone Pink Lemonade 100#, Pop-Tone Gumdrop Green 100# by DiscountCardstock.com
Other: mini rose and leaves dies by My Favorite Things, waterbrush by Niji, buttons by Papertrey Ink, compass, pencil, ruler, hole punch

Mini Hat Box

So, let's begin!


The first step is to start with two equal hexagons of cardstock.  You can opt to use dies or create your own using a compass and ruler.

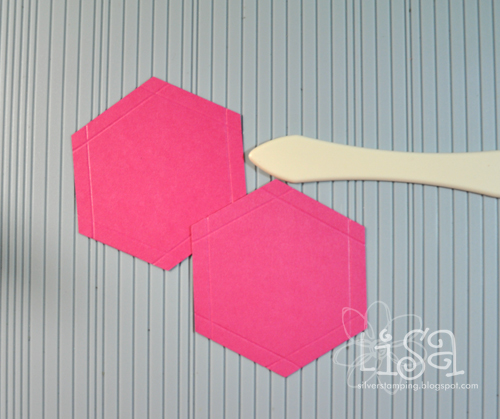
To create your own with a compass, as I have done, please refer to this LINK for a demonstration.  It's easy and you can customize the size of your final box.  Create two -OR- make one, cut and trace for the second hexagon.


Score your hexagons using your Scor-Pal scoring board and Scor-Tool.  The first should be scored 0.25" from each edge and the other 0.38" from the edge.


Fold along all the score lines and snip to remove the corners.  Add Scor-tape alone the edges.


Cut a hole in the center of each of the hexagons.


Trim cardstock to the length required for your Hexagons.  The dimensions are as follows:

TOP:
          Width = 2.5"
          Length = (the length of one side of the hexagon x 6) + 0.25"

BOTTOM:
          Width = 2.25"
          Length = (the length of one side of the hexagon x 6) + 0.25"

Take into consideration the "loss" at each score.  You may want to trim a longer piece of cardstock that is needed and score each of the box sides, one at a time.  Make a mark or number the first 2 sides so you can match your custom scores.

The added 0.25" will be used to close the side of the box and will have Scor-tape alone the edge.

Score the cardstock for the box sides using your Scor-Pal scoring board and Scor-Tool.


Remove the Scor-tape liner and adhere the box sides, one edge at a time until complete.


Now it is time to create a unique closure that will pull this project together.

Thread a button with May Arts cord and pull the cord ends through the bottom of the box - through the hole we punched earlier.


Thread the cord through the top of the box and out of the hole on top.  Add a button.  Tie off the cord, leaving about 2.5 - 3" of excess so you can open the box.  Test the length before securing a knot.

REMEMBER: The top button must move freely in order for the box to open.


Complete your project with paper roses, ribbon and lace.


Thanks for visiting,
Lisa

Monday, June 10, 2013

May Arts and Scor-Pal with Abby Henderson

Hi Friends! Abby here with ScrappinAbby .Wow am I excited for today's post. We the DT at Scor-pal have teamed up with May Arts and their amazing DT for a super fun two day blog hop!! You should have just come from Jen's blog...if not click on her name so you can start from the beginning : ) For my tutorial I made some Chic Grunge paper cones....
 To create these Chic Grunge paper cones I used: Scor-pal Scor-tape May Arts Ribbons-Trims & Laces
To create the paper cones, I cut the card stock I wanted to use for each cone into 8 1/2 x 8 1/2 pieces...
I used some sprays & mists on my card stock which is why it's curled up a bit. 
Next I placed the card stock on my Scor-pal on the diagonal and made a score mark down the center....
Then I measured 4" on each side of that score mark and drew a line using a pencil. This step creates the "flap" for your pocket front. 
Place the card stock back on your Scor-pal and score on your pencil-marked line.
Now it's time to create the score marks for the sides of the paper cone. Placing your card stock on your Scor-pal, you're going to score from the top right edge of your flap to the bottom point of your paper. You'll do this on each side of your initial score line. 
Fold along your score lines once you're done...
I wanted to cover the white flap so I adhered some Scor-tape to the flap and put a piece of the card stock I trimmed off earlier over the top and use my craft knife to cut away the excess.
I used more Scor-tape to close the flaps to create the paper cone...
The next few photos show you how I used the Scor-tape to embelish the paper cones using the May Arts ribbons & trims...
And now some photos of the completed Chic Grunge paper cones...
I hope I've been able to show you some fun & new ways to use your Scor-pal for projects using the yummy ribbons & trims from May Arts. 
Now here's the lineup for the rest of the hop just in case you get lost along the way...your next stop is going to be with Jenifer
Jen Shears
Abby Henderson - http://scrappin-abby.blogspot.com/
Jenifer Cowles
Diane Zechman - http://papercookies.blogs.splitcoaststampers.com/
Karen Baker
Jennie Harper - http://www.stampawaytheday.blogspot.com/
Lalo IK
Katie Tate - http://bothsidesofthepaper.blogspot.com/
Sandy Allnock
Lisa Silver - http://silverstamping.blogspot.com/
Virginia Fynes
Enjoy the rest of hop and be sure to check back for Day Two of the Scor-pal & May Arts Blog Hop...be sure to start at the Scor-pal blog so you can see the lineup for this day.  Happy Craftin : )

Thursday, June 6, 2013

May Arts Ribbon and Scor-pal with Virginia Nebel

Today I'd like to share how to use Scor-tape and beautiful May Arts ribbons to make a pretty flower rosette.

Supplies: May Arts eyelet lace, sheer ribbon, ribbon cord, Scor-pal tool, Scor-tape, SEI paper

Take a sheet of Scor-tape and apply to a piece of cardstock.  Cut (using a circle diecut or scissors) out a 1.75 inch circle.  The circle does not have to be perfect as the ribbon will be covering it.


Peel away the tape backing to expose the sticky tape. Take some pretty May Arts eyelet lace and pleat in a circular pattern onto the tape and trim off the excess when you have completed the circle.


Repeat for a 2nd flower.  Time time the circle tape backing is about 1 inch in diameter and I used the delicate blue sheer ribbon to create the rosette.  This will be nested on top of the larger white lace rosette.

Thin line Scor-tape is wonderful to adhere ribbon to your projects, just unroll and place where needed and your ribbon is securely fastened to your card.


Have fun making your pretty own floral accents!


Wednesday, June 5, 2013

May Arts and Scor-Pal with Jennie Harper

Hi Scor-Pal fans!  It's Jennie and I wanted to share a project I created for our May Arts ~ Scor-Pal Blog Week. Using a Scor-Pal, I created a Tea Bag Holder (using Beate Johns tutorial from Splitcoaststampers).
Supplies:
 Patterned Paper: SEI
Stickers: SRM Stickers
Ribbon: May Arts
Adhesive: Scor-Tape
Scissors

Take a 3 1/2" x 7 3/4" piece of cardstock and score at 3 1/2" and 4 1/4".
 Fold on score lines.
 Take a 6 1/2 x 7 piece of patterned paper (lining up the 6 1/2" side  up to the top of the Scor-Pal) and score at 1/2" and 3 1/2". Prefold on the score lines.
 Apply Scor-Tape to 1/2" section of the paper.
 Remove tape lines, fold paper over, and rub to set adhesive.
Align paper sleeve up on Scor-Pal and score at 3 5/8" (the upside down triangle). Turn 180˙ and score again.
 Prefold on score lines. Cut a half circle off each end using a circle punch.
Using Scor-Tape, adhere the center of sleeve to inside of pre-scored cardstock panel.
Decorate as desired using May Arts ribbon to close.
 Hope you will try making one of these yourself!!  If you do be sure to leave me a comment as I would love to check it out!! 

Monday, June 3, 2013

We Have Some Winners!


Thanks for joining us for the May Arts Blog Hop and the Paper Smooches Week! We had so much fun and hope you did too.  Now, I'm sure this is what you have been waiting for - some winners!!!

First up, the winner from the Scor-Pal and May Arts Hop is Denise Bryant. Congratulations!

For our Paper Smooches and Scor-Pal Week, we have three winners! Please congratulate these ladies:
1. Loly Borda-Towery
2.  auntiejenni
3.  Miriam Prantner

Congratulations to everyone!  Our next big event will be the week of June 24th, when we will be creating with Heartfelt Creations!