Tuesday, September 24, 2013

Keep Calm with Guest Designer Janice

Hi, everyone!  Janice here with a fun "on trend" card to show you.  :)  Bright neon colors mixed with the still very popular chevron stripe, makes for one super fun card! 

Isn't that fun? :)

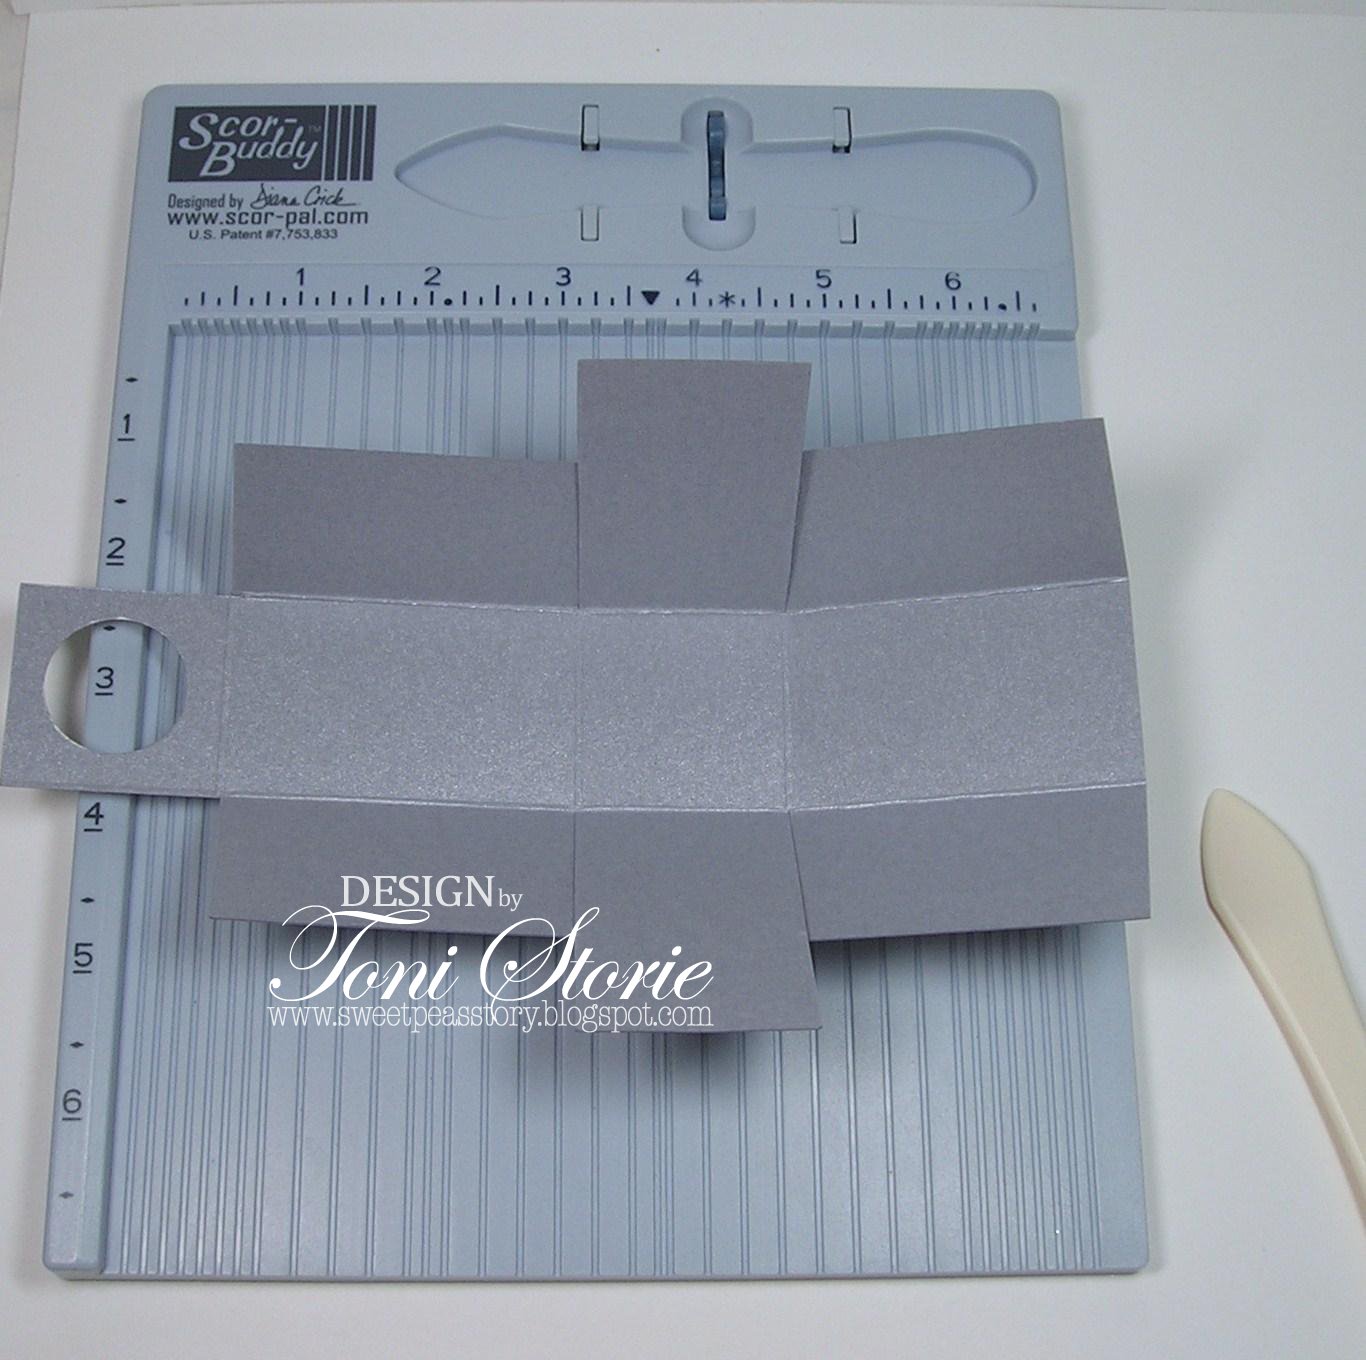
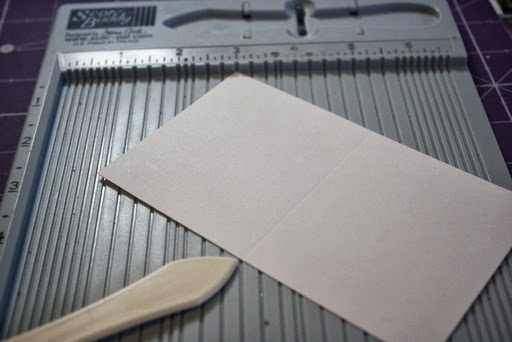
To make the chevron strip that I placed on my card, I used the Scor-Buddy to score a 1" x 5 1/2" piece of cardstock. 

 I went ahead and used a larger piece of cardstock to make it a bit easier to score but I only used the first 1" of the paper.  I scored at the 1/2" mark vertically at each 1/2" mark horizontally as shown in the pic below.

 I forgot to take a pic of how I drew the lines to create the chevron pattern (sorry!) but it was quite simple!  Take a ruler and draw a line from one corner of the squares created then up the other side to the corner of the square right next to it.  Do that for each set of side by side squares as shown in the picture above.  After I drew the pattern I colored it in and cut the excess cardstock off! Easy peasy!  ;) 


Next, I cut a 3 1/4" x 5 1/2" piece of white card stock and lightly scored it down the center at 2 3/4".
 

I then lined up the end of my lightly scored center line and one of the opposite corners of the piece and scored it.
 

Next, I scored at 1/2" intervals on both sides of the initial diagonal line as shown below.


Next, I turned the piece to the other corner and scored in the same way to that side.


The next step was to adhere my chevron strip and put my card together!


You can use this technique of making a scored grid to make bigger, wider chevron stripes for any project!  :)

My card uses a Hero Arts stamp for the greeting. I couldn't find the name of the set but on the package it says: Hero Arts CL650.


Thanks so much for stopping by!
Janice :)


Janice :)

Tuesday, September 17, 2013

Winners from the Authentique week!

I am so happy to announce that two lucky viewers who left comments on both our blog and the Authentique blog will be receiving A Scor-Buddy!!!

Our lucky winners are Aunt Dee and Mary Louh!!
If you would email me at katetate@tx.rr.com I can get your prizes on their way to you!
Thanks so much to all the people that commented last week, I saw lots of new faces and I hope you will stick around to see all the wonderful things we have in store for you here at Scor-Pal.

Katie

Friday, September 13, 2013

Scor-Pal and Authentique Week with Katie Tate

We have had a wonderful week of fabulous projects featuring our marvelous Scor-Pal Products and the super paper designs of Authentique!


I hope you have visited the Authentique blog for projects by their team too and have left comments as they have a prize pack on offer too!.
You can also catch them at their Instagram Page, like them on Facebook or follow them on Twitter!
Make sure you have seen every project this week as the team have made wonderful projects. A lucky person will win a Scor-Buddy, the perfect tool that every card maker needs in their arsenal!
To be in with a chance to win the prizes on either blog you must comment on both blogs, so the more you come the better the chance of you winning :)
For the final project we have Katie from Both Sides of The Paper

I decided to make a mini album with a storage basket using the gorgeous Naturals by Authentique
paper and accents line.


Project Recipe:
Papers and Accents - Naturals by Authentique
Scoring Tool - Scor-Pal
Adhesive - Scor-Tape
Ink - Distress Ink in Faded Jeans


Start with a piece of cardstock 12" by 9". Score at 3" and 9" on the 12" side and 3" and 6" on the 9" side.
Then on the 12" side score at 2" and 10" up to the first score line you come to (3" in length), turn a 1/2 turn so the other 12" side is on the top fence and score again at 2" and 10" up to the scored line. Burnish all scored lines but not the 1/2 scored lines.

Cut away the rectangle formed at the corner by the 1/2 score and then snip as in the photo to form a flap that will create the corner on the basket.

Repeat on all corners to leave what is left in the photo.

Turn over and add Scor-Tape to the flaps to make the corners.

Form the box and use your Scor-Tool on the inside to create crisp corners.

Decorate the box with the papers, I chose to add distress ink to the edges.

Create a handle from a piece of cardstock 12" by 1", I used a plain base added the pattern on top for strength. I inked it and added Scor-Tape to attach.

Attach the handle.

The mini album is created from 2 pieces of cardstock measuring 12" by 6" both scored at 4" and 8" along the 12" side. To attach the two pieces together create a flap from a piece of cardstock measuring 6" by 3" scored at 1 1/2" on the 3" side.

Add Scor-Tape as in the photo

Attach the two tri-folds together.

Now it is time to decorate.


The following photos show the decorated album.


I hope you have enjoyed this, be sure to leave a comment and then drop by the Authentique blog and do the same and you could be the winner of a great prize!

Thursday, September 12, 2013

Scor-Pal and Authentique Week with Steph Ackerman

Hey everyone, Steph here today.  The teams of  Scor-pal and  Authentique have teamed up to bring you some fun projects this week.  I used Authentique's  Seasons: Autumn  papers for my projects.  This is a beautiful assortment of papers, patterns and colors.

I decided  to create an easel card using these fun double sided papers. 

Cut Autumn 3 pattern paper 5 1/2" x 11".
Score at 2 3/4" and 5 1/2".
Fold to create the card, then fold again creating the easel.
Cut another piece of Autumn 3 paper 5 1/2" x 5 1/2" and adhere to create the card.


Cut a number of Enhancements to embellish the front of the card.
Add a 1" strip across the Enhancements.
Add a cardstock sticker element on top.
Cut a 5" square of Autumn 2 paper and adhere to the base.
 

Add a 1" strip  to the base of the card with foam adhesives to hold the card upright.


Next, I created a gift card holder.

Create a 5" x 6 1/2" card from brown cardstock.
Score 1/2" around the card.
Cut a panel of Autumn 1 paper to fit within the scored areas.
Add a tag and several matted stickers to finish the front.


Inside, cut Autumn 1 and Autumn 2 papers to fit.
On the left side, create a pocket page and insert a coupon.
On the right side, add Autumn 1 paper - it has plenty of room to write a note to the recipient.


Thanks for stopping by today.
 
Steph
 

Wednesday, September 11, 2013

Scor-Pal and Authentique Week with Toni Storie

Hi, it's Toni here! It's my turn to share a Scor-Pal and Authentique project. We will have a wonderful week crafty goodness by both the Scor-Pal design team and the Authentique design team. I received some really beautiful papers and created a Lotion/Nail File gift box*.
For this project, you will need:
  • One 6 1/2" by 8" piece of card stock
  • Four 1 3/8" by 2 3/8" pieces of designer paper
  • Four 1 1/4" by 2 1/4" pieces of designer paper
  • One 1/2" by 6 1/2" piece of designer paper
  • Circle punches
  • Scissors
  • Silver cording
  • Ink
  • Sponge Dauber
  • Silver Glitter
  • Lotion
  • Nail File
Place the 6 1/2" x8" piece of card stock in the Scor-Buddy with the 6 1/2" side against the top fence.  Score at 2 1/2" and 4".
Rotate the card stock 90 degrees, so that the 8" side of the card stock is now against the top fence.  Score at 2 1/2", 4" and 6 1/2".
Trim out the top and bottom sections on the far left.  Then cut the remaining tabs from top and bottom to the 2 1/2" score lines. 
 Measure 1" from the top and bottom of card stock of the first and third tabs that remain.  Trim off the 1" sections as shown below. 
Using a 1" circle punch, create a hole in the 1 1/2" by 1 1/2" tab on the far left. 
Crease the remaining score lines.
Apply Scor-Tape as shown below.  Place Scor-Tape horizontally on the first set of top and bottom tabs.  Place Scor-Tape vertically on the second set of top and bottom tabs.
Assemble the gift box.  Remove adhesive backing from the second set of tabs first and fold in the back of the box.  Then remove adhesive backing from the tabs just folded in and adhere the front of the box.  The Lotion/Nail File gift box is now complete and reading for embellishment. 
 Sponge the edges of the  1/14/" by 2 1/4" designer paper with coordinating ink.  Then layer the 1 1/4" by 2 1/4" designer paper on top of the 1 3/8" by 2 3/8" patterned paper.  For this project, Authentique Natural Enhancements designer paper was used.  A strip measuring 1/2" by 6 1/2" was scored at every 1/4"  and then fan folded.  The two ends of the strip were adhered together and the center of the center was pressed down to create a rosette.  The sparkling center circle was created by first placing Scor-Tape on some card stock.  Use a circle punch to create a small circle.  Remove the backing and cover the Scor-Tape circle with silver glitter.  Adhere glitter circle to center of rosette.  The tag attached to the top of the box is a card stock sticker from the Authentique Natural Elements sheet.  Silver cording attaches the tag and is tied around the box beneath the rosette.
Finally, fill the embellished box with the hand lotion and nail file gift.  Some additional silver cording was tied around the hand lotion to tie it into the packaging a bit more. 
Thanks for following along!

*Tutorial found on Splitcoaststampers.

Details - Paper: Authentique Natural designer paper, Authentique Natural Elements; Ink: Elegant Eggplant; Accessories: Scor-Buddy, Scor-Tape, paper snips, silver glitter, silver cording, circle punches, Crystal Effects, sponge dauber.

Tuesday, September 10, 2013

Scor-Pal and Authentique Week with Diane Zechman

This week the Scor-Pal team is hopping with Authentique. With the first day of Autumn just around the corner, I turned to some apple themed papers to create my card.

I created a tri-fold by starting with a 5 1/2 x 12 piece of double-sided patterned paper and scored it at 4 and 8 1/4.

There was no stamping involved here...all of the elements, tag, and images were cut from the Authentique line called Seasons Autumn. Here is the front of the card. An apple image was hand cut and popped on dimensionals.

The card as the front is opened...

And the full inside as you open the right fold...

My in-laws have a small orchard and always give us a few apples, some peaches, etc. This would make a perfect thank-you card...there's plenty of room on the inside to list what you are thankful for!

Be sure to check out all the projects on the Scor-Pal and Authentique blogs.

paper- Authentique- Seasons Autumn, brown; accessories- Scor-Pal, twine, tracing wheel, dimensionals.