Today we are continuing a week long feature with our friends at Core'dinations.
Our designers will be bringing you some fun and exciting projects using not only Scor-pal products, but also, a mix of papers from Core'dinations. Of course, that's not all. The Core'dinations team is playing with Scor-pal products this week on the Core'dinations blog.
As always, there a prizes to be won!!
Be sure to visit both the Scor-pal blog and Core'dinations blog each day this week to see more project ideas and to enter for chances to win some great prizes. To be entered into the random drawing for a Scor-buddy prize simply leave a comment here on the Scor-pal blog each day for a chance to win.
There will be other ways to earn extra chances to win as well, so be watching for those announcements each day.
Today's bonus entry comes by sharing
with us how you first heard about Scor-pal. Simply leave a comment here on this
post telling us for an extra chance at this week's prize.
Deadline for entering is 8am Central, Monday, December 17, 2012.
First up, Scor-pal Designer Toni Storie.
Today, I have prepared for you a Flat Backed Treat Box*. You can fit a variety of small treats inside this little box.
Details - Stamps: Winter Tree (Verve), Ornamental Christmas (Verve); Paper: Core'dinations Core Impression Pink Paislee Modern Prints, Core'dinations Core Essentials Card Stock Neutrals, White card stock; Ink: Tuxedo Black; Accessories: Scor-Pal, Scor-Tape, Sand It Gadget, scissors, corner chomper, Copic markers, Diamond Stickles, rhinestones, silver cording.
Supplies:
One 7" x 9" piece of card stock
Scissors
Corner Rounder
Additional card stock for stamped images
Stamps
Ink
Embellishments
Instructions
To begin, place your card stock with the 9" side of the paper against the top fence of your Scor-Pal with your embossed pattern face down. I used some Core'dinations Core Impression Modern Prints. Specifically, I used the Leapfrog Chevron pattern. Score at 1", 2", 3", 4" and 5".
Turn your card stock 90 degrees and align your 7" side with the top fence. Score at 1/2", 3/4", 1 1/2", 5 1/2", 6 1/4" and 6 1/2".
Trim off the corner pieces as shown in the picture below.
Trim the tabs on 3" and 4" score lines up to the 1 1/2" score on either side. These cuts are highlighted in red for you.
Trim the edges of each tab at an angle to ensure a good fit.
Take your Sand It Gadget and sand over the embossed pattern on the top 4" by 4" section which will be the "flat back" on your box. Sanding will reveal the cool ColorCore of this fabulous line!
Turn you box over and adhere your Scor-Tape between the 1" and 2" score lines.
Next, you will burnish all the folds on your box.
Finally, remove the backing on your adhesive and assemble your box. Fold each section in toward the flat back until you make the rectangular box at the base. Fold in each of the short tabs. Then fold in the longest tab to close off each end.
Embellish your treat box as desired. Don't forget to fill it with fun little goodies. This year, mine will hold holiday chap stick for my girlfriends
I hope your enjoyed today's tutorial, as much as I enjoyed creating it for you!
Next, Scor-pal Designer Katie Tate
There are other tutorials around but I decided to go from scratch and see how it turned out :)
Project Recipe:
Core'dinations Card Stock - Core Amour Sable and Onyx and Signature Series (matches Graphic 45)
Tools - Scor-Pal and Scor-Mat
Adhesive - Scor-Tape
Ribbon - Really Reasonable Ribbon
Brad - Heidi Grace
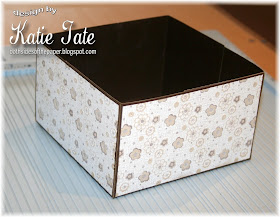
For the base of the box I started with an 11" square of card stock. Scored at 3", made a 1/4 turn, scored again at 3" and repeated until all 4 sides were scored.
I burnished all scored lines and then, as shown in the photo, I cut up one scored line to the intersection on all four sides to make the flaps that become the corners on the box.
I then turned the base over and added Scor-Tape to all 4 flaps.
To create the base part of the cupcake to top the box you need to make rosettes of different sizes. All are scored at 1/4" along the long side and all strips are 12" long. The widths of each strip are 3/4", 1", 1 1/4" and 1 1/2"
To create the top part of the cupcake make more rosettes, this time with strip widths of 1 1/4", 1", 3/4" and 1/2". Top the smallest one with a decorative brad/embellishment.
Decorate the box further if you wish, I simply added a pleated sheer ribbon to the sides of the lid. I finished the set with a simple gate fold card in coordinating papers.
And finally a few choice cupcakes makes for the perfect gift.


What cute boxes. Really love the cupcake
ReplyDeleteFirst heard about you from Core'dinations
ReplyDeleteLove those rosettes!
ReplyDeleteFirst heard about you on www.stamptv.com!!
ReplyDeleteI saw your collaboration with core'dinations and checked you out.
ReplyDeleteLove the cupcake. Just saw a Christmas tree made with a tool from Scor-pal that makes bumps. Going to have to check that out. It was really cute.
ReplyDeleteLOVE all your projects!!
ReplyDeleteWow...Beautiful Projects today...As always. Thank you for the tutorials. I am always inspired.
ReplyDeleteI first heard about Scorpal by browsing around the blogs looking for inspiration. And thru my clicks I found you. Then I decided to stay around and keep getting that wonderful inspiration over and over. Thanks so much for all of the inspiration you have given me the last year. HUGS
ReplyDeleteOh WOW!! awesome Projects!!TFS
ReplyDeleteMore great projects today! I really love the cupcake container!
ReplyDeleteI first heard about Scorpal from a hop/blog swap similar to this one.
ReplyDeleteGreat project. the rosette cupcake is too cute.
ReplyDeleteI first heard about Scor-Pal from Stamptv in one of the video tutorials.
ReplyDeleteWow!! these are both wonderful projects
ReplyDeleteI found this site while blog-hopping and decided to follow as it is so helpful
ReplyDeletelove the first little box. i've tried a variation of it -- so fun! :) thanks for sharing. :)
ReplyDeleteBeautiful boxes! I've been loving all the inspiration this week!
ReplyDeleteheard about scorepal from an online crafty friend who had one. i was wondering how she added her creative lines to her cards and projects...and i'd never seen cuttlebug,etc. folders with those lines. that kinda got me hooked on the whole scorepal idea :)
ReplyDeleteI found scor pal via coredinations, but I love your product, it's so very versatile!
ReplyDeleteLove the treat box!
ReplyDeleteI first heard about you from an online crafty friend who loves your products!
Wow, these are both terrific creations. Thanks for the tutorials.
ReplyDeleteThese boxes are terrific! Thanks for the step by step
ReplyDeleteI found out about Scor -pal probably from blog land.
ReplyDeleteLove the fan-folded cupcakes! I probably heard about Scor-Pal on QVC when they have craft days.
ReplyDeleteFabulous projects today. Loved the cupcakes. My LSS introduced you to me.
ReplyDeleteGreat projects! Love the combo this week with Core'dinations and Scor Pal!
ReplyDeleteI first heard about Scor Pal a local stamp store!
DeniseB
Such yummy boxes, and cupcakes:)
ReplyDeletecathyplus5.blogspot.com
I found you some time ago while blog hopping.
ReplyDeletecathyplus5.blogspot.com
I think that I heard about you on a blog...
ReplyDeleteI love to learn about the amazing things I can do with your ScorPal
ReplyDeleteSo many amazing ideas.
ReplyDeleteI heard about Scor-Pal on a scrapbooking blog.
ReplyDeleteLove the box. Great tutorial.
ReplyDeleteI first heard of Scor-Pal reading blogs. Obsessed with Scrapbooking, I think.
ReplyDeleteAmazing projects!!
ReplyDeletei don't remember when or where i first heard of scor-pal, i do know that I am here to stay and i believe that scrapbooking is where is may have all started.
ReplyDeleteava g
WOW - fabulous projects!!!
ReplyDeleteToo hard to pick a favourite, but as a rosette addict, I know I will be making some cute cupcakes :)
Thank you for sharing your work and tutorials, I really appreciate having the step-by-step details.
THANK YOU for a great hop!!!
ReplyDeleteI have so many projects that I want to try making.
I have learnt that Scor-Pal opens up an entire new world of papercrafting, adding texture and dimension to cards & layouts AND allows you to make the most amazing gift boxes :)
Both treat boxes are fabulous!
ReplyDeleteI first learned of Scor-pal on Splitcoast Stampers.
ReplyDeleteLovely! The rosette cupcake is amazing!!! TFS!
ReplyDeleteI don't remember when I first heard about Scor-Pal. It just seems like it's something I've known about and had on my wish list for a while...
ReplyDeleteBeautiful projects!! The first time I knew about Scor-Pal I was watching a you tube video of someone doing some minialbums and when the lady needed to score the cardstock, she just brought out her Score-Pal. I had to stop the video to try to find out which brand she was using, after that I just google you!! =).
ReplyDeleteI love the rosettes cupcake, too cute. and loce the gift box, wonderful tutorials. thanks for sharing.
ReplyDeleteI first heard about it on a crop, someone was making Christmas cards. thought it was a really neat tool.
ReplyDeleteI think I learned about Scor-Pal on one of the card-making blogs I follow.
ReplyDeleteWOW!! AWESOME projects and tutorials!! THANKS SO MUCH for sharing and for the chance to win!! Have a FABULOUS WEEK!! =)
ReplyDeleteI first heard about you on the Core`dinations blog!! I'm a NEW FOLLOWER on all things Scor-Pal!! THANKS for sharing and have a FABULOUS WEEK!! =)
ReplyDeleteGreat great boxes! So many possibilities. And the cupcake is so cute!
ReplyDeleteI've learned about scor-pal through Splitcoasters website
ReplyDeleteHow cute! I love the rosette cupcake topping your box!
ReplyDelete