We are winding down the SEI and Scor-Pal cross-promotion week. We hope you have enjoyed the week as much as we have. Don't forget,to check out SEI blog for more great projects and prizes as well. Leave comments on our
blog, and Facebook page for entries to win the great prizes below.
So, speaking of prizes, here they are:
1. A full-sized Scor-Pal!
We will also add a couple of rolls of Scor-tape!
2. SEI May papercrafting kit
3. SEI May card kit.
So you have three chances to win! Be sure to tell your friends, because you won't want to miss out on this giveaway! Make sure all of your entries are in by Sunday, May 5th, 11:59 pm E.S.T.
2. SEI May papercrafting kit
3. SEI May card kit.
So you have three chances to win! Be sure to tell your friends, because you won't want to miss out on this giveaway! Make sure all of your entries are in by Sunday, May 5th, 11:59 pm E.S.T.
For this project, you will need:
- Craft Knife
- Ruler
- One 4" x 12" piece of designer paper
- One 4 1/4" x 4 1/4" piece of card stock
- One 1 7/8" x 3 7/8" piece of card stock
- One 1 3/4" x 3 3/4" piece of designer paper
- Additional card stock, rhinestones, dies and ribbon to embellish
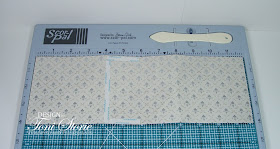
Place the 12" side of the 4" by 12" designer paper along the top fence of the Scor-Pal with the desired pattern face up. Score at 4" and 8". The designer paper featured here is SEI Mia Bella. This particular pattern with the silver foil accents shouted "wedding" to me.
Turn paper over and score at 6".Crease score lines creating mountain, valley and mountain folds from left to right.
Insert your Scor-Mat and place your patterned paper, desired pattern down with the 12" side along the top fence of the Scor-Pal. Align the ruler with the 6" score line and cut on that line from 3/4" to 3 1/4" (allowing enough room to insert your gift card).
With patterned paper desired side up, line with Scor-Tape as shown. The most important idea within this step is to avoid taping the cut side closed.
Remove backing from the Scor-Tape and adhere the two center sections together, forming the insert for the gift card.
Embellish as desired. This particular gift card holder is adhered to a 4 1/4" by 4 1/4" mat. The line art wedding cake was embossed in silver and die cut. Then it was matted on a larger silver card stock die cut. White taffeta ribbon was tied in a bow across the front of the card and rhinestone flourishes were applied to opposing corners. The focal image was then popped up on the card front.
The gift card insert was embellished with some more of the SEI Mia Bella designer paper matted with some silver card stock. The gift card then slides right into the slit created with the craft knife.
Don't forget to stop by the Scor-Pal blog to see what other lovely creations the design team has created.
Details - Stamps: Blissful Bride; Paper: SEI Mia Bella, Brushed Silver, Shimmery White; Ink: Versamark; Accessories: Scor-Pal, Scor-Tape, Scor-mat, Craft Knife, Ruler, Nestabilities, White Taffeta ribbon, Recollections Rhinestone Flourishes, stampin' dimensionals.


Lovely GC holder! TFS joy4umetoo at hotmail dot com
ReplyDeleteToni, this is so clever! Love it. I see all kinds of things to use this tutorial for. Thank you for sharing:)
ReplyDeleteBeautiful card. Inside and out. Wonderful details. I love it!!!
ReplyDeleteLove pop-up cards. This one is great for a wedding or shower. Thanks for sharing.
ReplyDeletewhat a B-E-A-U-T-iful card
ReplyDeleteMy favorite project was the tea cups. I'm going to try to make one this afternoon. Wish me luck.
ReplyDeleteBeautiful gift card holder! Love the fun paper and touch of silver! Great project!
ReplyDeleteGreat card!!
ReplyDeleteThis is perfect for a wedding gift card!
ReplyDeleteFabulous card.
ReplyDeleteAll around gorgeous! Love this collection, very elegant.
ReplyDeleteElegant gift card holder, I love it!
ReplyDeleteI love this card, so elegant! TFS
ReplyDeleteThis is such a lovely card. Cool how you designed it to hold a gift card. Very creative. (I also loved the bling. ) Thanks for the tutorial.
ReplyDelete
ReplyDeletewhat a very elegant idea for a wedding or shower gift - could be adapted to many other occasions. Thanks for sharing !
Wow, Love, Love, Love the Gift Card Holder. Beautiful details & elegance with the perfect touch of bling.
ReplyDeleteWhat a pretty, and tidy, way to include a gift card inside a card.
ReplyDeleteGORGEOUS!!!
ReplyDeleteLovely card.
ReplyDeleteMarilyn
wonderful card x
ReplyDeleteI've done a card like this before but it didn't hold the card well. I think I will have to follow this tutorial for my next one, seems like it would work better than my first attempt! I like the embellishment on the gift card too.
ReplyDeleteWhat a beautiful card! I love that this is a gift card holder as well as being beautiful! TFS.
ReplyDeleteBeautiful card, thanks for sharing it.
ReplyDeleteBeautiful card, thanks for sharing it.
ReplyDeleteSo cute! Thanks!
ReplyDeleteThis wedding gift card holder is gorgeous! bbiswabic@new.rr.com or www.sarahbiswabic.blogspot
ReplyDeleteI love learning about new and fun card folds! :)
ReplyDeletebbiswabic@new.rr.com or www.sarahbiswabic.blogspot.com
Stunning!
ReplyDeleteVery nice!
ReplyDelete