Welcome back for the 2nd post of day one with SEI and Scor-Pal cross-promotion week ! We have lots of fun in store for you, including wonderful projects and great prizes.
Every day, we will have 2-3 posts on our blog, and the SEI blog is
going to be sharing projects and prizes as well. Leave comments on our
blog, and Facebook page for entries to win. There may be extra ways to
earn entries hidden in the posts - so pay close attention for those
chances.
 A full-sized Scor-Pal!
We will also add a couple of rolls of Scor-tape! Be sure to tell your
friends, because you won't want to miss out on this giveaway! Make sure
all of your entries are in by Sunday, May 5th, 11:59 pm E.S.T.
A full-sized Scor-Pal!
We will also add a couple of rolls of Scor-tape! Be sure to tell your
friends, because you won't want to miss out on this giveaway! Make sure
all of your entries are in by Sunday, May 5th, 11:59 pm E.S.T.
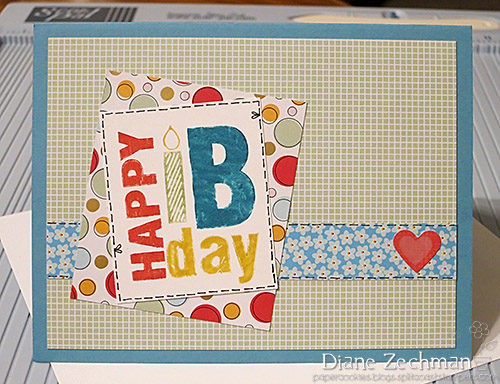
Hi…Diane here. This week the Scor-Pal team is hopping with SEI! Today I have a fun pop up tutorial for the inside of your card. I don't know where the idea originated but you can use lots of different images such as flowers, hearts, butterflies, etc. Today I am using balloons. The front of the card is a clean and simple layout.
So, speaking of prizes, here is what we are giving away:

Hi…Diane here. This week the Scor-Pal team is hopping with SEI! Today I have a fun pop up tutorial for the inside of your card. I don't know where the idea originated but you can use lots of different images such as flowers, hearts, butterflies, etc. Today I am using balloons. The front of the card is a clean and simple layout.
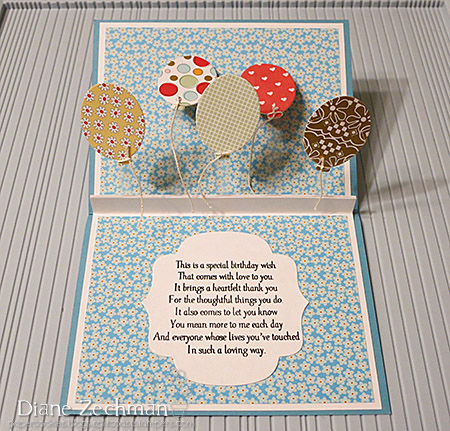
First, start with a 4 1/4 x 5 1/2 card base. Then cut a 5 1/4 x 10 1/4 piece for the inside layer. Using the Scor-Pal, align the inside layer at the 1/8" groove. Score the 10 1/4 side at 4 1/4, 4 3/4, 5 1/4,
5 3/4, and 6 1/4.
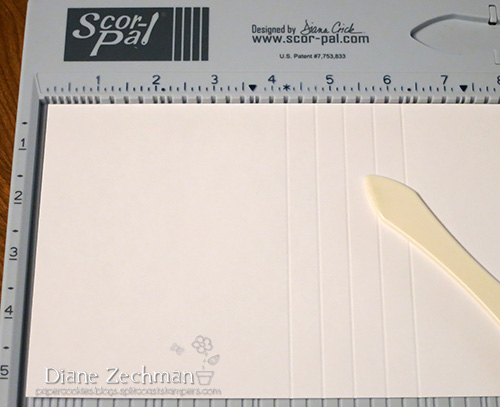
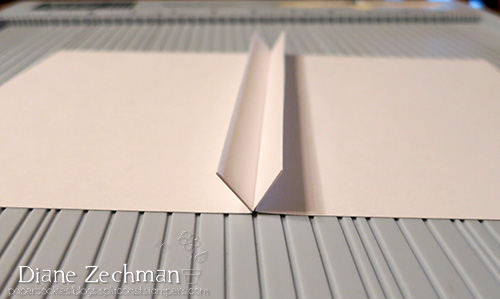
Turn the paper over to the back. Mountain and valley fold the scored lines, and add Scor-Tape as shown below.
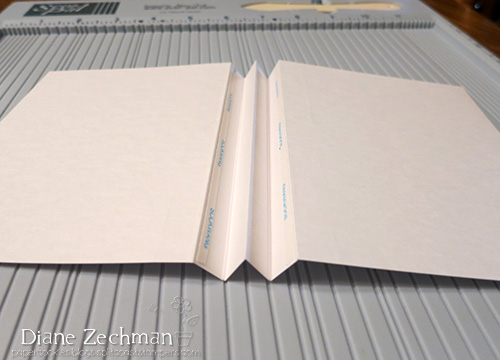
Remove the adhesive backing on the tape and adhere. Turn it over to the right side. It should now look like this.
Add additional Scor-Tape to the center of the folds and adhere strips of clear acetate in varying lengths.
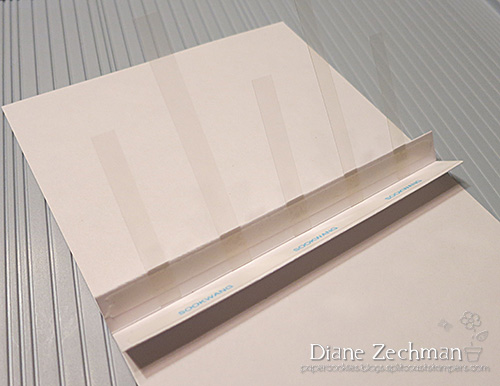
Adhere center folds to "sandwich" the acetate between them. Then glue the inside layer to the card base. Attach two die-cut balloons back to back to each acetate strip. Tie a bit of string to each, hanging freely. Add additional papers and finish
card as desired.
stamps- SNSS Birthday Bash and Birthday Innies; paper- SEI- think of me cardmaker paper pack, SU! Marina Mist, white; ink- Memento Tuxedo Black, SU! Pear Pizzazz, Crushed Curry, Island Indigo, Poppy Parade; accessories- Scor-Pal, Scor-Tape, acetate, SNSS Birthday Bash dies (balloons), crochet thread, Labels 9 Nestabilities.
This is such a cool project. I want to compliment you on your tutorials. They are always great and very informative.
ReplyDeleteLove this card! The balloons are so cute!
ReplyDeleteSo cute and festive with the balloons!
ReplyDeleteThis is a great idea. I can see a card with butterflies in my future.
ReplyDeleteRae Ann O.
Oh... I love it... Another way to do a pop up. YAY!!! I am going to have to try this right away. Thanks for the great Idea. HUGS.
ReplyDeleteBeautiful, love the balloons!
ReplyDeleteVery cool card. TFS
ReplyDeleteSuper cute!
ReplyDeleteCute and clever card
ReplyDeletedesign. Thanks for
sharing it.
Carla from Utah
Love it. Will give it a go. Thanks
ReplyDeleteLove This Card. I Was Thinking It Would Be Cute If It Had AnimalS In Place Of The Balloons Or Ghosts And Bats For halloween
ReplyDeleteWhat a fun card! Thinking of ways to adapt for Mother's Day!
ReplyDeleteSuper Cute card:)
ReplyDeleteFun card!
ReplyDeleteVery clever. I Love the way you did the ballons and it's so fun. The recipient will have so much when opening this card.
ReplyDeleteLove it love it love it!!
ReplyDeletecathyplus5.blogspot.com
I love this card. Thank you for the tutorial.
ReplyDeleteSo much fun! I just love those pop up balloons!
ReplyDeleteLove the free floating balloons & the beautiful card. Awesome that you included the in-depth tutorial, thank you.
ReplyDeleteLove the balloon card! Really hope I win the Scor-Pal so that I can make some of these wonderful cards!
ReplyDeleteI'm already dreaming of having the scor-pal on my desk and creating different projects using it. Scor-pal makes crafting much easier.
ReplyDeleteWhat a great idea. The inspiration here in incredible!!! I have found so many new creations that I must try if I am fortunate enough to win this!!!
ReplyDeleteGreat card, good tutorial. Thank you, and thank you as well for the chance to win the Scor-Pal.
ReplyDeleteCool idea, lovely card, TFS
ReplyDeleteLovely card and those popup balloons are great.
ReplyDeleteI love this design! What a great way to use acetate!
ReplyDeleteA card that looks so simple to make, but wow, the possibilities of a popup card! so great! tfs Tami
ReplyDeletelovely...
ReplyDeleteThis is so adorable. I love how simple it is to make, but so clever and professional looking. I immediately started thinking of other ways to decorate it--flowers, butterflies, and so on. Thanks for the inspiration.
ReplyDeleteSo cute! Love how the balloons float. :)
ReplyDeleteYou make it look so simple! Love it!
ReplyDeleteSuch a sweet card!
ReplyDeleteClever card. I like making cards that "do" something rather than the usual flat card.
ReplyDeleteI have always wondered how to make a pop-up card but was intimidated by how difficult I thought it would be! Thanks for helping me to understand how simple it is so I can finally make them myself!
ReplyDeletetotally cute project!!
ReplyDeleteVery cute idea - could be used in many ways - thanks for the inspiration !
ReplyDeleteReally clever! Love the use of the acetate strips to hold up the balloons.
ReplyDeleteLove pop-ups cards! Thanks for the amazing tutorial!
ReplyDeleteHow fun! I love the balloon pop-ups
ReplyDelete