Today we are continuing our week long feature with our friends at Pink Paislee.
Our designers have out done themselves once again to bring you some fun and exciting projects using not only Scor-pal products, but also, a mix of papers and embellishments from Pink Paislee. Of course, that's not all. The Pink Paislee team is playing with Scor-pal products this week on the Pink Paislee blog.
Our designers have out done themselves once again to bring you some fun and exciting projects using not only Scor-pal products, but also, a mix of papers and embellishments from Pink Paislee. Of course, that's not all. The Pink Paislee team is playing with Scor-pal products this week on the Pink Paislee blog.
As always, there a prizes to be won!!
Be sure to visit both the Scor-pal blog and Pink Paislee blog each day this week to see more project ideas and to enter for chances to win some great prizes. To be entered into the random drawing for a Scor-buddy prize simply leave a comment here on the Scor-pal blog each day for a chance to win.
There will be other ways to earn extra chances to win as well, so be watching for those announcements each day.
Today's, bonus entry comes by becoming a blog follower using the Google connect feature in the sidebar. Simply follow the Scor-pal blog and leave a comment here on this post telling us you have done so.
Deadline for entering is 8am Central, Monday, December 3, 2012.
First up, Scor-pal Designer Diane Zechman
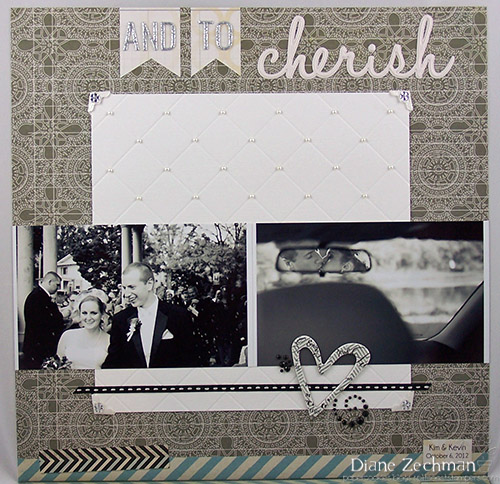
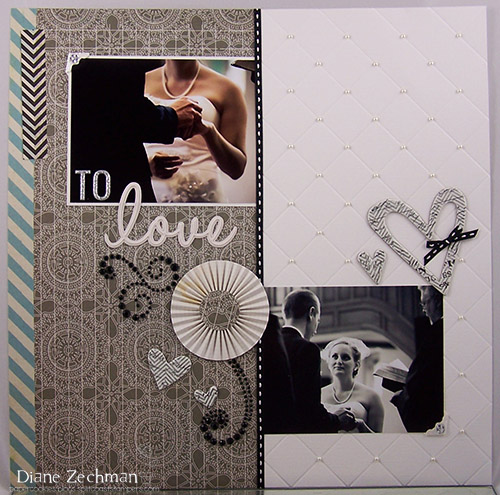
Today I will share my project using these fabulous products. I made a 12x12 2-page layout with pics from my daughter's recent wedding. I used the Scor-Pal, Scor-Envi, Scor-Tape, and the Pink Paislee Artisan and Portfolio collections.
I loved the black and white pattern on one of the papers called Amazing. It also has the blue diagonal stripe and black chevron "tape" to give you a great jump start on your layout.
paper- textured white cardstock, Pink Paislee Portfolio-Amazing; ink- SU! Going Grey; accessories- Scor-Pal, Scor-Envi, Scor-Tape, Pink Paislee Portfolio alpha stickers, Pink Paislee Artisan Words (Cherish), Chipboard Hearts, and Photo Corners, adhesive pearls and rhinestones, ribbon, circle punch.
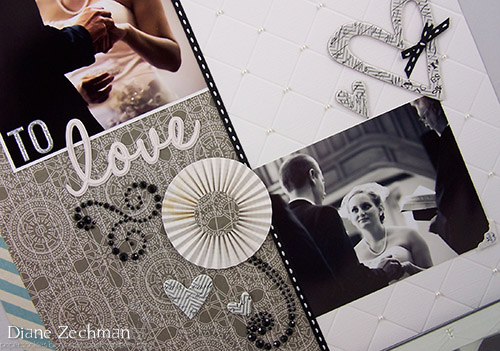
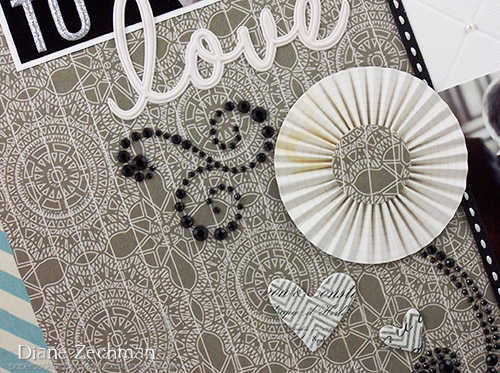
On the first page I used photos that were taken when they said their vows so it was only fitting to title the pages "To Love" and "To Cherish". The smaller letters are glittery alpha stickers and the words love and cherish are foam word stickers which can be customized with various coloring mediums. I chose to leave mine natural so they would remain elegant and contrast from the darker background.
On each page I used the Scor-Envi tool to create diagonally embossed lines on the white cardstock. Then I added small white adhesive pearls to each place the lines intersected. I don't think I will ever tire of this look...it's so pretty in person! The chipboard hearts have a resist pattern and vintage script on them. They come white and you add color to customize these as well. I added some gray dye-based ink with a Q-tip to reveal the chevron pattern...fun!
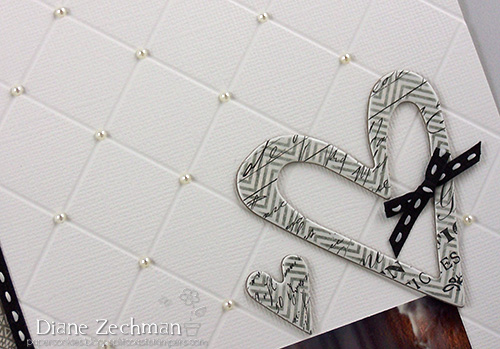

I wanted to add a rosette but I didn't want it to be very thick since the pages will be going into a scrapbook. This rosette was cut in a 1" wide strip and the length was scored every 1/8". Directions can be found in the Scor-Pal book.
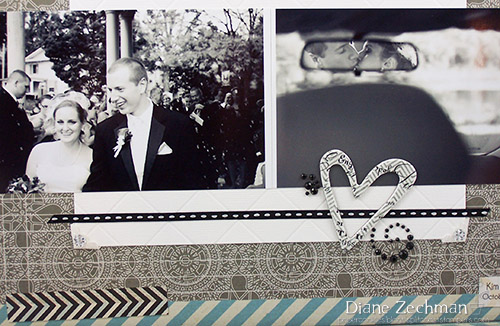
The second page has pictures of the bubbles after the ceremony and the rear-view mirror of the car they rode away in... moments to cherish.

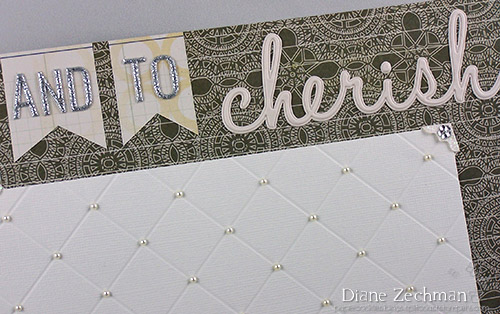
The glittery alpha stickers were placed onto flags that I cut from the design on the reverse side of the paper (also used for the rosette above). You can also see one of the beautiful photo corners I used here (plus more of the diagonally embossed pattern).

Next, Scor-pal Designer Jennie Harper
I am excited that Scor-Pal and Pink Paislee are teaming up to bring this fun Blog Hop Week! Today I wanted to share two quick and easy projects: a Treat Holder and an Easel Card.
Supplies:
Card Stock: Moonlit Fog and White (Gina K. Designs)
Patterned Paper: Pink Paislee Portfolio 12 x 12 Paper Pack, Portfolio Alphabet Stickers
Artisan Collection - Resistable Arrows, Artisan Collection - Words Cherish, Artisan Collection - Zig Zag ribbon and Artisan Collection - Wings
Bling: Want2Scrap
Die: Open Scallop Border (My Favorite Things)
Tool: Scor-Pal scoring board
Adhesive: Scor-Tape
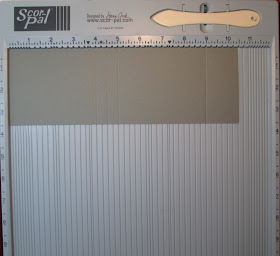
Place your 3 1/2" x 10 1/2" piece of card stock in the top right corner of Scor-Pal. Score at 4", 4 1/2", 5" and 9". Fold cards tock in half at the 4 1/2" score line. Then fold the 4" and 5" score lines in the opposite directions to create the bottom of the treat bag. Fold down the flap.
Then simply decorate as desired.
And here is the inside:
For the Easel Card I used THIS tutorial:
Here is a side view:
I am so glad you stopped by today and hope you will give one of these easy projects a try!!




love the treat holder idea...awesome!
ReplyDeletewow!!!!!!!! i LOVE the scoring you did on the scrapbook page!!!! another fabulous idea on how to use the scorepal...definitely on my christmas list! :)
ReplyDeletebtw, i'm a follower of the scorepal blog already :)
ReplyDeleteWow, these are both such wonderful projects!
ReplyDeleteWow, these are both such wonderful projects!
ReplyDeleteReally loving those layouts! The scoring adds such a subtle, elegant touch!
ReplyDeleteAlready a blog follower via Google RSS.
ReplyDeleteGreat projects today - thanks.
ReplyDeleteI have been a follower of your blog for some time
Both are really pretty! Love easel cards.
ReplyDeleteCarla from Utah
Such beautiful projects! Love me an easel card! And the quilted paper in the wedding album is especially appealing to me, one layer of my multicolored wedding cake was quilted and beaded just like this.
ReplyDeleteWhat a beautiful layout. Love the scoring and pearls. I still have not ever made a easel card. Just so intimidated by them. I know shame on me.
ReplyDeletebonus: I am already a follower.. Shame on them who are not.
ReplyDeleteLove the folding card - and the treats inside!
ReplyDeleteWOW!! love both ur project...Both are gorgeous!!
ReplyDeleteI already am a follower of ur blog..Thanks again
ReplyDeleteLove the pages Diane, you really captured the elegance of the day! Fabulous project Jennie, love how you used the trim on the treat holder!
ReplyDeleteGreat project. The scoring on the layout give the page and elegant look.
ReplyDeleteI'm a follower..
ReplyDeletePretty creations...really love how the layout had the scored diamond pattern.
ReplyDeleteI am already a follower.
ReplyDeleteWhat lovely projects! Very nicely done!
ReplyDeletegreaat scoring and love the pp on this layout. great design to the layout.
ReplyDeleteava g
Beautiful scoring on the wedding layout and sweet treat holder and card.
ReplyDeleteI follow with GFC as Sue D
ReplyDeleteI love how you made the quilted look with the scoring and the pearl details on the layouts, so beautiful. and the treat card is so sweet, very nice little treat to give to someone. thank you for sharing.
ReplyDeleteGreat projects! Love the wedding layout! It is very classy and inspiring!
ReplyDeleteOh wow... I love the quilted look with the tiny pearls... So elegant! Perfect wedding layout.
ReplyDeleteI subscribe to your blog.
ReplyDeleteLove the layout with the lattice work design and pearls. it's gorgeous.Realy makes the B&W phots stand out. Love it.. The card and gift box are also cute and both projects had fabulous tutorials.
ReplyDeleteSuch elegant projects, love them!
ReplyDeleteCarol B
ciaoitalia2007(at)gmail(dot)com
I am a blog follower!
ReplyDeleteCarol B
ciaoitalia2007(at)gmail(dot)com
Beautiful projects!
ReplyDeleteI'm a Google follower
ReplyDelete