Pages

Friday, June 29, 2012

Scorpal & Momenta Week Day 5 with Virginia Nebel & Tami Mayberry


Good morning Scor-pal friends! 

Today we are thrilled to be hosting a week long feature with our friends at Momenta. Our designers have out done themselves once again to bring you some fun and exciting projects using not only Scor-pal products, but also, Momenta products. Of course, that's not all. The Momenta team is playing with Scor-pal products this week on the Momenta blog too! 


As always, there a prizes to be won!! 

Be sure to visit both the Scor-pal blog and Momenta blog each day this week to see more project ideas and to enter for chances to win some great Scor-pal and Momenta products. To be entered into the random drawing for a Scor-buddy and Scor-tape prize pack simply leave a comment here on the Scor-pal blog each day for a chance to win. 


There will be other ways to earn extra chances to win as well, so be watching for those announcements each day.

Today's bonus entry comes by showing us one of your favorite Scor-pal projects. It can be something you've created and posted online, it can be a project from the Scor-pal Project Board on Pinterest, it can be from the Scor-pal Gallery at Splitcoast Stampers, a project from the project listing on Scor-pal website or anywhere else! Simply leave a comment with the link here on this post telling us what you can't wait to make.

Deadline for entering is 8am Central, Monday, July 2.

Now for today's first project brought to you by Scor-pal Designer Virginia Nebel

So happy to be playing along in the Momenta and Scor-pal blog hop. I chose Momenta's bright and cheerful Kailedoscope collection. I love all the summer florals in this collection and the pretty coordinating stickers, diecuts, and acetate 3D embellishments.

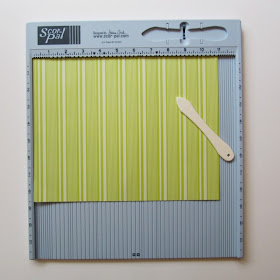
I made a couple of projects. The first is a tri-fold card using Scor-pal's convenient brochure score markings which are the inverted triangles along the ruler. Your starting paper size is an 11x 8 1/2 inch piece of paper, score on the two triangles and you end up with an perfect tri-fold card base giving you ample room to decorate and play up your card theme.


My next project was a total experiment!  I used the other Scor-pal reference markings along the top ruler and created a pocket fold card.  I like the pocket because it has a nice, crisp, clean fold, and is deep enough to securely hold a gift card.


Here are the instructions:

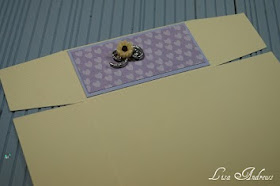
Start with an 11 1/2 X 5 1/2 inch piece of paper.  Place on the Scor-pal tool and score at the dot, star, and inverted triangle and fold as shown in the photo.


You have created a true pocket and all you need is to add a 1 inch border so that the front which you can tuck nicely under the flap and glue down a clean edge.  Add glue on the inside edges of the pocket to secure the sides together.


Embellish and add your gift card.
Thanks for stopping by, hope you have enjoy all the wonderful creative ideas from the Momenta and Scor-pal teams!

And the final project of the week by Scor-pal Designer Tami Mayberry.

Today I have an easy project to share that makes a fun and inexpensive gift for almost anyone--a triple easel desk display. Of course, while you're at it, I'm sure you'll want to make one for yourself! For this particular project I used my Scor-pal and a variety of products from Momenta's vacation line. I love the patterns in this line as they lend themselves well to non-vacation projects as well.


Supplies needed:
12x12 sheet of card stock for base
Scor-pal scoring board
Adhesive
decorative papers and embellishments of your choice

Step by step instructions
(followed by cutting and scoring diagram)

Begin with a 12"x12" piece of card stock. Trim it to 12" x 8". (Keep the remaining piece for use later in the project) 

With the 8" edge at the top of your scoring board score at  the 4" mark.

Rotate the paper 90 degrees and score at the 4" and 8" marks stopping at center score.

Create a diagonal score line on the two outer squares going from the top inner corner to the bottom outer corner on each end square. The is easily done by placing the corners at the 6" line. (marked at the bottom of the Scor-pal with 2 arrows)
Score the center block horizontally at the 2" mark.
Next cut the vertical lines that were made at the 4" and 8" marks and fold the panels in half inward.
Now simply cut the 12" x 4" piece into three 4" squares. Attached to base and decorate.
(Panels will be attached at bottom corners/edges)

Here is a quick recap of where the cut and score lines are located:
To finish the display place buttons or other 3D embellishments on the base to keep panels upright. and decorate.

Once decorated this project is the perfect size for post-it notes or used as a photo display. I chose to use it as a motivational post-it note holder by adding some quote stickers from the vellum sticker collections. I thought they went well with not only the typical form of travel but travel through life.

Here's a close up of those:


Thursday, June 28, 2012

Scor-pal & Momenta Week Day 4 with Lisa Andrews


Good morning Scor-pal friends! 

Today we are thrilled to be hosting a week long feature with our friends at Momenta. Our designers have out done themselves once again to bring you some fun and exciting projects using not only Scor-pal products, but also, Momenta products. Of course, that's not all. The Momenta team is playing with Scor-pal products this week on the Momenta blog too! 


As always, there a prizes to be won!! 


Be sure to visit both the Scor-pal blog and Momenta blog each day this week to see more project ideas and to enter for chances to win some great Scor-pal and Momenta products. To be entered into the random drawing for a Scor-buddy and Scor-tape prize pack simply leave a comment here on the Scor-pal blog each day for a chance to win. 


There will be other ways to earn extra chances to win as well, so be watching for those announcements each day.


 Today's bonus entry comes by simply telling us what you have learned this week. Simply leave a comment on this post telling us for an extra entry into the drawing. 

 Deadline for entering is 8am Central, Monday, July 2.

Now, for today's project from Scor-pal Designer Lisa Andrews.

First off I have a lovely treat basket.  
I used the Cuddle and Coo collection from Momenta.

Start with a 12x12 piece of cardstock and score at 4” and 8”, turn the paper 90 degrees and score again at 4” and 8”.  Fold all scored lines.  Score and fold each corner diagonally and bring them up to the middle.  Decorate each square with 3 ¾” squares and attach a ribbon (or as I did, beads) to the middle and presto!  A cute treat basket!  I made the flowers with a Stampin Up! punch,  I layered several layers and attached them together with a brad.


Next is my Trinket Chest.  I used Magnolia Stamps, colored with Distress Inks  to decorate the top.  Here are the instructions:


The drawer are 3”x3”.  Start with a piece of paper 6”x6” and score each side at 1 ½”.  Attach a drawer liner, 2 ¾” x 2 ¾”  in the middle.


.

To create the drawer pulls, I start with a brad, eyelet and flower decoration.  Attached flower to brad with hot glue, then thread the eyelet through the post of the brad, as shown.  Punch a hole through the drawer front and attach brad, the eyelet will provide just enough space to lift it off of the paper. 


Repeat to create 8 drawers.


Next wrap a 3” x 10” piece of cardstock around the drawer, there will be overlap, this is where you will attach the slip cover together with Scor-Tape.


Cut a 3” x 3” of chipboard and attach to the top of one of the drawers, this will stabilize everything really good.  Stack another drawer on top. 


Adhere all of the drawer sets together to create your chest.  Attach covered 3”x 3”, chipboard to the sides.  The top and bottom are covered 7”x7” pieces of chipboard.

Here is close up of the images


Images used:  Tilda as Butterfly and Stone Pathway


Images used: Bee Tilda, Ladybug, Summer Background, Dock and Mushrooms.

Decorate as you please.

Thanks for stopping by!
Lisa

Wednesday, June 27, 2012

Scor-pal & Momenta Week - Day 3 with Steph Ackerman


Good morning Scor-pal friends! 


Today we are thrilled to be hosting a week long feature with our friends at Momenta. Our designers have out done themselves once again to bring you some fun and exciting projects using not only Scor-pal products, but also, Momenta products. Of course, that's not all. The Momenta team is playing with Scor-pal products this week on the Momenta blog too! 


As always, there a prizes to be won!! 

Be sure to visit both the Scor-pal blog and Momenta blog each day this week to see more project ideas and to enter for chances to win some great Scor-pal and Momenta products. To be entered into the random drawing for a Scor-buddy and Scor-tape prize pack simply leave a comment here on the Scor-pal blog each day for a chance to win. 


There will be other ways to earn extra chances to win as well, so be watching for those announcements each day.

Today's bonus entry is for those readers who use Pinterest! Earn an extra entry by becoming a follower of the Scor-pal project board on Pinterest where you will find all sorts of great projects. (and a few contests to be announced as well!) Simply follow the board and come back here and let us know you did.


Deadline for entering is 8am Central, Monday, July 2.


Now for today's projects brought to you by Scor-pal Designer Steph Ackerman


With a fun collection of Momenta papers and stickers to work with, it is easy to make an assortment of cards with the help of your Scor-pal.

Adorable Card
Cut blue cardstock 4 ½” x 11”.
To create the top fold, use a Scor-pal and score at 5 ½”.
To create the score lines at the bottom of the card, score at 10”, 10 ¼” and 10 ½”.
Corner round all edges.
Since these Momenta stickers are pliable, I was able to gently curve the banner stickers so they fit across the top of my card.
I then added a Momenta sentiment slightly above the first score line.


Friends Card

Cut blue cardstock 4 ½” x 11”.
To create the top fold, use a Scor-pal and score at 5 ½”.
Corner round all edges.
Cut pattern paper 4” x 5”, corner round edges and adhere to the card.
Cut pattern paper 3” x 4”.
Score 1” on both long edges.
Adhere puffy sentiment and then adhere to the card.


Graduation Easel Card

Cut blue cardstock 5 ½” x 11”.
Placing the long side on the Score-pal, score at 5 ½” and 8 ¼”.


Fold on the 5 1/2" scored line to create the card, then fold on the 8 1/4" scored line to create the tent fold. 


Cut another piece of cardstock 5 1/2" x 5 1/2" and add to the tent to create the top layer the card.
Cut the striped paper 5 ¼” x 5 ¼” and adhere to the front of the card.


Cut the dotted paper 4 ½” x 4 ½”.
Score ½” around all four edges and add to card front.
Add a puffy sticker at the top scored line.
Stamp sentiment on blue cardstock in brown ink.

Ink the edges with brown ink and mat with brown cardstock.
Add to card front with foam adhesives for dimension.
Add GRAD stickers on the left side of the card.

Cut the blue print 5 ¼” x 5 ¼” and adhere to the card base.
Cut the dotted paper 2” x 5 ¼”.
Score ¼” on both long sides
Adhere to the card base.
Add a puffy sticker across the center which will be used to hold the easel upright.


Beautiful Card

Cut pink cardstock 4 ½” x 11”.
To create the top fold, use a Scor-pal and score at 5 ½”.
To create the score lines at the bottom of the card, score at 1/2", 3/4" and 1”.


Corner round all edges.
Turn card lengthwise and add the banner stickers
I then added a Momenta sentiment  along the first score line.


An embossed sticker was the perfect touch for the interior sentiment.


Supplies:
Scoring tool:  Scor-pal
Cardstock: Momenta Textured Cardstock
Pattern paper: Momenta Pyramid Pad
Stickers: Puffy Messages, Puffy Borders, Embossed Messages
Ink: Clearsnap