Pages

Thursday, January 31, 2013

Winter Treat Box with Wrap by Lisa Andrews


Welcome all!  Today I have a beautifully inspired winter wrap box to share with you that holds something to warm your insides.

Supplies:
Little Yellow Bicycle - Winterings
card stock
sliver glimmer paper
teresa collins Christmas cottage rhinestone medallion
Spellbinder pearl heart

Tools:
Scor-Pal
Scor-Tape
Martha Stewart punches
Memory Box snowflake die


To start, cut a piece of cardstock 5 1/2" x 5 1/2" and punch around the outside with a Martha Stewart border snowflake punch.  This is the dark blue base of the box


Create a box using a light blue piece of card stock measuring 8 1/2" x 8 1/2".  Score at 2" on all sides to create your box.  For the lid, cut a piece of light blue card stock 5 1/2" x 12".  With the long edge on the top fence, score at 4 1/2", 6 1/2" and 11".  Turn the paper so that the short edge is on the top fence and score at 1/2" and 5".  It should like the picture below.


Now cut as shown below:


Here is the lid and the base of the box:


Attach the lid to the box using Scor-Tape making sure that the bottom of the box is attached to the bottom of the lid piece on the outside.


Now we are going to create our "wrap" pieces.  Cut a piece of white card stock 3" x 12", punch both sides with a Martha Stewart snowflake border punch and a row of snowflakes using a Martha Stewart punch.  I used a contrasting piece of Little Yellow Bicycle Winterings paper behind the circle snowflakes. 

Attach one of the snowflake strips to the bottom, back and top of the box with Scor-Tape.


Attach the remaining snowflake strip to the bottom of the box with Scor-Tape, leaving the front edge and top free.  I hot glued the medallion to the top leaving the bottom half of the medallion free from hot glue.  This is where you tuck the other part of the "wrap" under.  Attach the box to the snowflake base we created in the first step.


Add a little something inside to warm you up on a cold winter's day!

I hope you have a wonderfully warm day!!
Wednesday, January 30, 2013

Scor-pal & Simple Stories Week Winer

Thanks to all who joined us last week for Scor-pal & Simple Stories week. If you missed any of last week's projects you'll want to be sure and go back and take a look. If you did join us and left comments or entered for the bonus entries this is the moment you have been waiting for, ;) The winner of the Scor-Tape/Simple Stories prize is....


Pamela, please send you mailing address to ScorpalMedia@gmail.com before Wednesday, February 6, 2013 and we will get that out to you.

Thanks to all who joined us. 
don't forget to subscribe to the Scor-pal blog (links in the sidebar) and also follow the Scor-pal Fan Page on Facebook and check out the Scor-pal Projects Board on Pinterest.

Happy Scoring!

Easel Calendar Display by Virginia Nebel

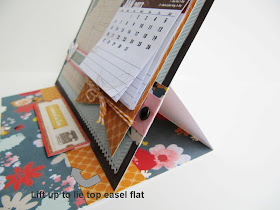
It's a New Year and I thought it would be fun to share a project that incorporates a mini calendar and room for seasonal photos.  This will look pretty on your desk and keep you organized at the same time!  The inspiration for this project is the easel card construction.  My easel card is sized A9 which measure 8.5 x 5.5 inches when the project is flat.  I chose this size so that it fits into a standard mailing  envelope should you decide to make some for friends and family.


Supplies: Pink Paislee and Crate pattern paper, Scor-tape, Twinery twine, Creative Impressions brads, Washi Downtown Tape, Calendars (saved from advertising mail)


Here's how to make the A9 sized Easel card:
1. Score 11 x 8.5 inch cardstock at 5.5 and 8.25 inches.


2. Valley fold on 5.5 inch score line and mountain fold on 8.25 inch score line.


3.  Apply Scor-tape on the top panel only.


4.  Adhere a separate 8.5 x 5.5 inch card stock piece, lining it up to the top edge of the folded panel and adhere together.  You have just finished your the easel card construction.


5. The easel part of the card only stays up when it is positioned behind a raised element (positioned about halfway) on the horizontal panel of the card. 


6. The calendar was a marketing mailout that I had saved, if you do not have a calendar you could download mini calendar templates off the internet or substitute a post-it pad instead.


7.  Making the project sized to A9 gives you plenty of room to include a favorite photograph.  Here I just used washi tape to tack down a photo that would slip under the belly band.


8.  The easel card easily lies flat so that you could place it into a mailing envelope.


Hope you enjoyed the project steps and that a making a calendar easel card in in your future!

Cheers, 

Tuesday, January 29, 2013

Wooden 3D Canvas by Abby Henderson


I have a really fun project to share with you all today that is just perfect for the new year & I love the name I came up with for this..."In 2013 The Sky Is The Limit". I used some gorgeous papers from Websters Pages along with some Scor-tape and my Scor-Pal of course : )

The Sky Is The Limit
Designer Abby Henderson

Supplies:
Scor-tape
Scor-Pal
Websters Pages Sunday Picnic & Everyday Poetry Collection
Tim Holtz Distress Ink
The Twinery
Prima
Mon Ami Gabby
Kaiser Craft
Pink Glass Glitter
Vellum

Instructions:
I started the project by using a blank wooden canvas from Kaiser Craft & I then decided which papers I wanted to use for the project.


I wanted to use my Scor-tape in a really unique way so I used it as my base for embossing. I put some of the Scor-tape on the pink portion of my rainbow...


I put a few crinkles in the tape so there would be some texture along with the embossing...


Next I peeled back the tape & sprinkled some pink embossing powder over the strip Scor-tape...


Here's a pic of the rainbow halfway embossed..I wanted to show you the difference...


I LOVE how this technique turned out...the Scor-tape in combination with the heat & embossing powder created this very shabby look which I love.


Nothing better than Scor-tape to adhere your papers to any of your projects...


Instead of adding an already made flower to the project, I decided to make my own..so I created a rosette using my Scor-pal. I cut a 1" strip of 12x12 card stock and made a score mark at every 1/4".


To create the rosette..simply do an accordion fold on your score lines..a back and forth motion and you'll have something like this...


Add some Scor-tape to one end (make sure you trim off one of the folds so you have a valley on one end and a mountain on the other..this is so you can overlap the ends and create the rosette). I added fabric flower I cut & topped off my rosette with some bling.


I wanted to create another visual & textured element so I cut used a 1" x6" strip of card stock and scored every 1/4" as I did for the rosette.


Instead of turning this into a rosette..I simply inked the edges and attached it to the top of my canvas.


I also used my Scor-pal to emboss some vellum that I cut into a kite.


Another creative way to use your Scor-tape is to put a strip of it on some card stock...sprinkle some pink glitter on it and voila you have a custom made embellishment.


Using more of the Scor-tape I added some strips of card stock around the edges of the canvas.


I love how this project turned out and I already have it displayed in my craft room. I hope I've inspired you to use your Scor-tape for other uses than just as adhesive...did I mention how much I love this stuff??

I have some personal crafty goals I've set for myself in the new year and I'm using this project as my visual aid to keep me on track for those goals. I hope that you too find that In 2013 The Sky Is The Limit!!

Happy Crafting : )

Monday, January 28, 2013

Perpetual Calendar by Lisa Silver


Hello!  It's Lisa Silver here today with details on how to create your own Perpetual Calendar with paper.

I was inspired by so many projects available on the web.  I've created altered wooden perpetual calendars in the past myself, but was intrigued with the idea of doing one entirely from paper.  I was inspired by two spectacular projects and designer's work.  Jamie Lane created a wonderful Advent Calendar with room to showcase a darling holiday image.  Cindy Lawrence designed an elegant countdown calendar.  Thank you ladies for your inspiration.

Oh Happy Day!

Supplies:
Ink: Brushed Corduroy Distress ink by Ranger
Paper: BoBunny Vintage Dot double sided papers (Burnt Orange and Ocean) 80# cardstock, Whipped Cream Pop-Tone Cardstock 100# and Hot Fudge Pop-Tone Cardstock 100# from DiscountCardstock.com
Other: hot glue gun, liquid glue, precision scissors, sponge, Spiral flower and Labels 28 dies by Spellbinder, number dies by My Favorite Things, Leaf die by Cheery Lynn Designs, letter dies by Papertrey Ink, corner rounder by Zutter

So, let's get started!


Step 1: Let's create two cubes for our numbers. 

Follow the template below to create your cubes.  Begin with a full sheet of cardstock and score with your Scor-Pal scoring board and Scor-tool as outlined below.  Carefully trim with a precision scissors all the shaded areas.


Here's my cube base, with the added Scor-tape on all the small flaps.
TIP: Round the corners of all the flaps to make it easier to assemble the cube. 


Fold your base to create your cube.


With your cubes complete, it's time to add your design flair!  The completed cubes measure 2.5".  Trim patterned paper to fit each side.  Adhere numbers to each side.

To make it easy for your project, this is how you'll need to number the sides in order to make it function for a month of days.

Block 1 numbers: 0, 1, 2, 3, 4, 5
Block 2 numbers: 0, 1, 2, 7, 8 and 9 (which will also function as your number 6)

Step 2: Now, let's create your calendar base.

Cut and score a piece of cardstock using the template below.


Add Scor-Tape to the 1/2" bottom flap and adhere at the  5-7/8" score mark.  This will create a triangulated base, which I find helps to keep your cubes on the base.


Cut and score the side panels as outlined in the template below.  Cut with your trimmer the shaded areas.  This piece will help add stability to your base as well as sides to hold the cubes in place.


Snip along the bottom to create flaps that can be adhered to the bottom of the base.


Add a bit of Scor-Tape to back of the base to adhere it to the side wrap panel.

Step 3: It's time to decorate your project!  Go wild!

I opted to create a project that can function as both a perpetual calendar, but also as a countdown calendar for special days like birthdays and anniversaries (or the last day of school).

But, the skies are the limit.  You could easily make a center section to your project that is magnetic with changeable panels for each holiday or month!


Thanks for stopping by and joining me today!
Lisa